UICollectionView 横向滑动停止的两种效果。
UICollectionView 横向停止的两种效果。
类似于 Airbnb 这款App的首页酒店效果,从最开始的减速停止效果,到现在的分页效果。
本文主要说一下Demo的关键类及代码的使用, 还有算法的大概思路。看下面~
使用方式
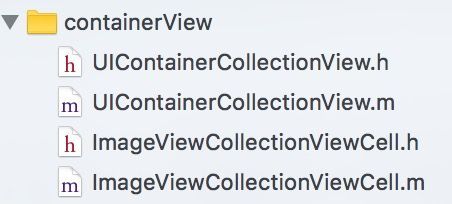
关键类:
注意: Demo类中使用的布局方式是第三方约束 Masonry ,请使用Pods自行导入到项目中。
部分代码说明:
#import

typedef NS_ENUM(NSUInteger, WBScrollType) {

    WBScrollTypeFree ,      //自由减速效果
    WBScrollTypePage        //分页的效果
};

@interface UIContainerCollectionView : UIView

- (void)setupWithDataSource:(NSArray *)dataSource pointValue:(NSValue *)pointValue;

@property (nonatomic, copy) void (^pointChangeBlock)(NSValue *pointValue);

@property (nonatomic, assign) WBScrollType scrollType;      //默认是分页的

@end
UIContainerCollectionView 是 UICollectionView 的容器类,直接在需要使用的地方创建 UIContainerCollectionView 即可。
- setupWithDataSource: pointValue ; //设置数据源 和 当前的滑动到的初始位置。 (pointValue 为了解决重用的问题)
void (^pointChangeBlock)(NSValue *pointValue);//每次滑动CollectionView, 都会把停止的位置回传出来,在VC记录,也是为了解决重用问题
scrollType //设置滑动停止类型。 默认是分页效果。 设置为WBScrollTypeFree 为减速效果。
下面的代码是创建在 UITableViewCell 里面的:
- (void)setupUI {

    WEAK_SELF();
    self.containerView = [UIContainerCollectionView new];
    //默认是 WBScrollTypePage 分页
    self.containerView.scrollType = WBScrollTypeFree;
    [self.containerView setPointChangeBlock:^(NSValue *pointValue) {
        weakSelf.pointChangeBlock(pointValue);
    }];

    [self.contentView addSubview:self.containerView];

    [self.containerView mas_makeConstraints:^(MASConstraintMaker *make) {
        make.top.leading.trailing.bottom.equalTo(@0);
    }];
}

- (void)setupWithDataSource:(NSArray *)dataSource pointValue:(NSValue *)pointValue {
    [self.containerView setupWithDataSource:dataSource pointValue:pointValue];
}
使用方式直接创建就行了,数据源再赋值一下就ok了~~
实现思路 :
首先都是要实现 UIScrollViewDelegate ,及下面这段代码 (UIScrollView 的减速Delegate)
- (void)scrollViewWillEndDragging:(UIScrollView *)scrollView withVelocity:(CGPoint)velocity targetContentOffset:(inout CGPoint *)targetContentOffset {

    CGPoint estimateContentOffset = CGPointMake(targetContentOffset -> x, targetContentOffset -> y);
    CGPoint currentPoint = [self itemCenterOffsetWithOriginalTargetContentOffset:estimateContentOffset];

    self.pointChangeBlock([NSValue valueWithCGPoint:currentPoint]);
    *targetContentOffset = currentPoint;
}
这个方法能在你拖动,甩动ScrollView ,手指离开时会调用此方法,这个会提前计算出ScrollView 最终大概会停止的位置 targetContentOffset 。
然后我们要根据这个位置,自己计算出 需要停止的合适的具体位置 ,再传给 targetContentOffset。
在初始化 UICollectionView 的时候, 就要设置好 滑动的减速速度 decelerationRate ,这个值等于 1.0f 的时候,速度最慢,就会是减速运动。 等于0.1f 的时候,就会是分页效果(分页效果这只是其中的一个条件,为0.1f)。
具体看Demo中的这个方法 :
- (CGPoint)itemCenterOffsetWithOriginalTargetContentOffset:(CGPoint)orifinalTargetContentOffset {

    if (self.scrollType == WBScrollTypeFree) {  //自由惯性的

        CGFloat pageWidth = self.contentSizeWidth / (CGFloat)self.imageNameds.count;
        NSUInteger cellWidth = (self.collectionView.width - CONTENTOFFSET_X * 2 - 10 ) / 2.0;
        NSInteger row = 0;
        CGPoint point ;

        if (orifinalTargetContentOffset.x <= pageWidth / 2.0) {
            row = 0;
            point = CGPointMake(0 - CONTENTOFFSET_X, 0);
            self.collectionView.contentInset = UIEdgeInsetsMake(0, CONTENTOFFSET_X, 0, 0);
            return point;
        }
        if (orifinalTargetContentOffset.x > self.contentSizeWidth - cellWidth * 2.5 + 20) {
            row = self.imageNameds.count - 2;
            point = CGPointMake(row * (cellWidth + CONTENTOFFSET_X / 2.0) - CONTENTOFFSET_X, 0);
            self.collectionView.contentInset = UIEdgeInsetsMake(0, 0, 0, CONTENTOFFSET_X);
            return point;
        }

        NSUInteger index = orifinalTargetContentOffset.x / pageWidth;
        row = index + (orifinalTargetContentOffset.x - pageWidth * index > pageWidth / 2.0 ? 1 : 0);

        point = CGPointMake(row * (cellWidth + CONTENTOFFSET_X / 2.0) - CONTENTOFFSET_X, 0);
        return point;

    } else {

        CGFloat pageWidth = self.contentSizeWidth / (CGFloat)self.imageNameds.count;
        NSUInteger cellWidth = (self.collectionView.width - CONTENTOFFSET_X * 2 - 10 ) / 2.0;
        NSInteger row = 0;
        CGPoint point ;

        CGFloat scrollBeforeContentOffsetX = self.row * ((cellWidth + CONTENTOFFSET_X / 2.0) - CONTENTOFFSET_X);    //滑动之前的 X 位置
        NSUInteger scrollDirection = orifinalTargetContentOffset.x - scrollBeforeContentOffsetX >= 0.0 ? 1 : 0;    //1向右, 0向左

        if (orifinalTargetContentOffset.x == -CONTENTOFFSET_X) {
            scrollDirection = 0;
        }

        if (fabs(orifinalTargetContentOffset.x - scrollBeforeContentOffsetX) > pageWidth * 1.5) {
            // + 2

            row = (scrollDirection == 0) ? (self.row - 2) : (self.row + 2);
        } else {
            // + 1

            row = scrollDirection == 0 ? (self.row - 1) : (self.row + 1);
        }

        row = row < 0 ? 0 : row;
        row = row > self.imageNameds.count - 2 ? (self.imageNameds.count - 2) : row;
        self.row = row;

        if (row == 0) {
            self.collectionView.contentInset = UIEdgeInsetsMake(0, CONTENTOFFSET_X, 0, 0);
        }

        if (row == self.imageNameds.count - 2) {
            self.collectionView.contentInset = UIEdgeInsetsMake(0, 0, 0, CONTENTOFFSET_X);
        }

        point = CGPointMake(row * (cellWidth + CONTENTOFFSET_X / 2.0) - CONTENTOFFSET_X, 0);
        return point;
    }

    return CGPointMake(0, 0);
}
这个方法首先分了两种情况,
这里只说下自由减速的思路,把系统告诉我们大概停下的位置,除以 pageWidth, 能获得一个至少要停止的整数值index (假设我们这边index == 5),那我们到底是停在 5 还是 6 呢? 这个还要取决于系统告诉我们的位置是否大于 5.5 (暂时这是比较合理的需求吧~当然你也可以是5.3 或者 5.8) , 所有就有下面的:
row = index + (orifinalTargetContentOffset.x - pageWidth * index > pageWidth / 2.0 ? 1 : 0);
最终再计算出point 返回给系统,就能停止到指定的位置了。
分页效果的思路:
和减速不同的是,我们要确定分页一次最多能滑动几页,这个Demo是一般滑动都是一页,如果最用力的滑,是两页。 所以计算范围 就不能像减速那样自由。
如果滑动停止的位置是在一页到两页的宽度之间,那么 row就在原来的基础上 +1 ,如果超过两页的距离, 就加 +2 。 并且这里还要记录下 滑动的方向,向左的话就 -1 或者 -2。 方向的判断,可以用 滑动之前的位置(a) 和 停止位置(b) 做比较, 如果 b - a > 0 说明向右滑动,反之向左。
最终返回合适的point 。
效果样式图
分页效果:
减速效果:
Demo下载地址:
http://download.csdn.net/detail/yutianlong9306/9583643
补充一个 Item的 UI 效果。
效果图:
说明:
这个Demo中,是实现了一个Item的计算方式,并且做了一些极端情况的优化,更友好的滚动交互。
Demo下载地址:
http://download.csdn.net/detail/yutianlong9306/9623331
