spice、qemu-kvm以及libvirt源码编译安装与使用(上)
本文将会介绍如何利用spice、qemu-kvm以及libvird源码编译并进行虚机的创建。相信大家平时搭建虚机用的可能比较多的是诸如使用VMware类的工具,这些工具也都基本能够满足我们的需求,但是要想从事虚拟化工作以及针对部分功能进行优化可能就无从下手了。那么今天就会带大家一起熟悉以下利用常见的qemu-kvm源码创建虚机的过程,源码的好处之一自然就是可以修改优化。下面进入正题。。。
环境准备
1、CentOS 7 64位 最小化安装
大家如果没有闲置的服务器可以使用,可以使用VMware Workstation 创建一台虚机,然后安装CentOS 操作系统,这里就不介绍具体系统安装过程了。我的环境就是通过VMware Workstation安装的,安装好如下:

2、配置yum源
大家机器如果可以上外网,这里就不用操作了,因为CentOS 系统安装好之后,这个一般都是已经配置好默认官网镜像源,但是如果你在公司且机器不能上外网,那就需要配置成本公司的镜像源或者本地源,因为后续编译源码的时候需要下载一些依赖包。 这步也不是本文重点,网上教程也很多,主要就是修改/etc/yum.repos.d目录下的一些文件。
3、安装基本工具
如gcc bzip2 执行命令:
yum install gcc gcc-c++ bzip2 -y
4、检查
我们最终的目的是想创建和管理qemu-kvm虚机,所以我们在编译之前需要做一些准备和检查工作:
首先: 检查一下我们的机器是否支持cpu虚拟化,执行命令:grep -E 'vmx|svm' /proc/cpuinfo
如果有输出表示,支持支持CPU虚拟化。如果没有输出,需要开启,开启方法如下:
-
如果你是像我一样使用VMware创建的虚机作为编译和安装机器,首先关闭虚机,打开虚机设置,选择处理器并勾选虚拟化引擎,如下图所示即可。

注:当前设置这个的前提是你的PC机BIOS设置已经开启了硬件虚拟化功能,如果没有,那就需要先进入PC的BIOS设置。 -
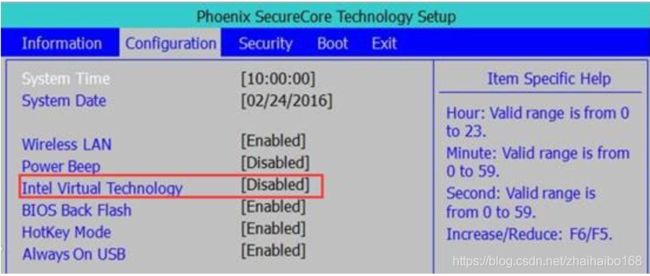
如果你是服务器那就需要进入BIOS进行设置,每个类型的服务器设置可能不大一样,具体请参考相关资料。例如联想笔记本:进入BIOS后,移动到第二列的configuration选项下,如下图

移动光标定位到Intel Virtual Technology,敲击回车,将Disabled设置为Enabled,然后按下fn+f10选择yes保存退出即可
其次: 加载是否已经加载KVM内核模块
执行命令:lsmod |grep kvm

这表明已经加载,如果没有加载则执行以下命令加载KVM
执行命令:modprobe kvm
好了,环境准备工作已经完成,接下来进入本文的重点工作:源码下载、编译和安装。
源码下载
这里给出本文使用的源码下载路径,一般都是最新版本的上一个版本。
spice-protocol:https://www.spice-space.org/download/releases/spice-protocol/spice-protocol-0.12.15.tar.bz2
spice server:https://www.spice-space.org/download/releases/spice-0.14.0.tar.bz2
qemu: https://download.qemu.org/qemu-3.1.0.tar.xz
libvirt: https://libvirt.org/sources/libvirt-5.2.0.tar.xz
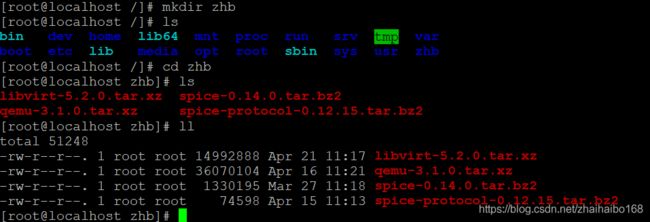
具体下载方式根据个人情况而定,可以在配置yum源后直接下载,也可以先下载到本地在上传到编译机器上。本人采用的第二种方式,代码目录结构如下:

源码下载完毕后,接下来将进入编译、安装环节啦~
源码编译
编译 spice-protocol
1、解压并进入目录
[root@localhost zhb]#
[root@localhost zhb]# tar -xf spice-protocol-0.12.15.tar.bz2
[root@localhost zhb]# ls
libvirt-5.2.0.tar.xz  qemu-3.1.0.tar.xz  spice-0.14.0.tar.bz2  spice-protocol-0.12.15  spice-protocol-0.12.15.tar.bz2
[root@localhost zhb]# cd spice-protocol-0.12.15
2、执行命令 ./configure

执行后,会生成Makefile文件。
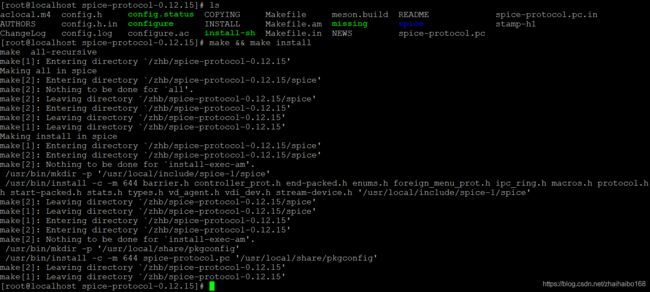
3、make && make install

如上表示已经编译安装完毕,安装spice-protocol,主要是因为后面介绍的spice-server 需要依赖它。
编译spice-server
1、解压并进入目录
[root@localhost zhb]#
[root@localhost zhb]# tar -xf spice-0.14.0.tar.bz2
[root@localhost zhb]# ls
libvirt-5.2.0.tar.xz  qemu-3.1.0.tar.xz  spice-0.14.0  spice-0.14.0.tar.bz2  spice-protocol-0.12.15  spice-protocol-0.12.15.tar.bz2
[root@localhost zhb]# cd spice-0.14.0
2、配置 PKG_CONFIG_PATH,使得能够找到spice-protocol的安装目录(当前你也可以在编译安装spice-protocol 执行./configure 时加上–prefix=/usr)
[root@localhost spice-0.14.0]# export PKG_CONFIG_PATH=/usr/local/share/pkgconfig3、执行命令 ./configure
[root@localhost spice-0.14.0]# ./configure这其中会发现缺少很多库文件,一一安装即可。我编译的机器是centos 7 64位 最小化安装的机器,所以会有很多需要安装。例如:

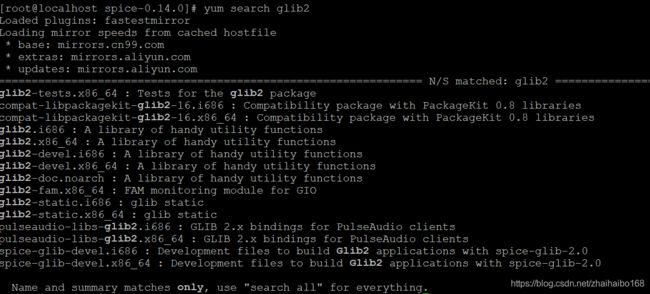
表示缺少glib2 相关库,这时如果你不知道安装什么软件包,可以先查看有哪些相关包可以安装,然后再根据需要安装即可,如下查询可以安装的包:
[root@localhost spice-0.14.0]# yum search glib2查询结果如下:

因为我的机器时64位机器,所以一般只需要安装***-devel.x86_64 即可,安装。
[root@localhost spice-0.14.0]# yum install glib2-devel.x86_64 -y4、再重复第三步,直到./configure 没有报错
下面给出我在编译过程种提示需要安装的包,你也可以先执行一遍下面的命令,肯定会减少很多报错或许一次性就通过了。
[root@localhost spice-0.14.0]# yum install pixman-devel.x86_64 celt051-devel.x86_64 openssl-devel.x86_64 libjpeg-turbo-devel.x86_64 -y当出现如下界面时,表示./configure 成功并生成Makefile文件。

4、make && make install
[root@localhost spice-0.14.0]# make && make install如果没有错误,编译、安装成功界面如下:

至此spice-server编译、安装以及完毕,安装spice-server 主要目的是我们希望后面介绍到的qemu能够支持spice 连接。好了,接下来我们就会进入qemu-kvm的编译环节啦~
编译qemu-kvm
1、解压并进入目录
[root@localhost zhb]# tar -xf qemu-3.1.0.tar.xz
[root@localhost zhb]# ls
libvirt-5.2.0.tar.xz  qemu-3.1.0  qemu-3.1.0.tar.xz  spice-0.14.0  spice-0.14.0.tar.bz2  spice-protocol-0.12.15  spice-protocol-0.12.15.tar.bz2
[root@localhost zhb]# cd qemu-3.1.0
[root@localhost qemu-3.1.0]#
2、配置变量PKG_CONFIG_PATH,使qemu可以找到spice和spice-protocol的安装目录
[root@localhost qemu-3.1.0]# export PKG_CONFIG_PATH=/usr/local/share/pkgconfig/:/usr/local/lib/pkgconfig/3、执行./configure 配置生成makefile文件
[root@localhost qemu-3.1.0]# ./configure --enable-spice --enable-kvm --enable-vnc t--arget-list=x86_64-softmmu --prefix=/usr这里注意以下几个参数:
--enable-spice 表示加载spice模块
--enable-kvm   编译KVM模块,使QEMU可以利用KVM来访问硬件提供的虚拟化服务。
--enable-vnc    表示支持vnc
--target-list=x86_64-softmmu   选择目标机器的架构。默认是将所有的架构都编译,但为了更快的完成编译,指定需要的架构即可
--prefix=/usr  安装到/usr目录下
如果第2步没有配置PKG_CONFIG_PATH,会报如下错误:

当然我安装的qemu是3.1.0,如果你安装不同版本报的错误可能不一样。
PS:这里如果还是报错,建议再重新安装一遍spice-protocol和spice,我有遇到过的。
如果出现下面的提示表示./configure 成功并生成Makefile文件。
[root@localhost qemu-3.1.0]# ./configure --enable-spice --enable-kvm  --enable-vnc --target-li        st=x86_64-softmmu --prefix=/usr
Install prefix    /usr
BIOS directory    /usr/share/qemu
firmware path     /usr/share/qemu-firmware
binary directory  /usr/bin
library directory /usr/lib
module directory  /usr/lib/qemu
libexec directory /usr/libexec
include directory /usr/include
config directory  /usr/etc
local state directory   /usr/var
Manual directory  /usr/share/man
ELF interp prefix /usr/gnemul/qemu-%M
Source path       /zhb/qemu-3.1.0
GIT binary        git
GIT submodules
C compiler        cc
Host C compiler   cc
C++ compiler      c++
Objective-C compiler cc
ARFLAGS           rv
CFLAGS            -O2 -U_FORTIFY_SOURCE -D_FORTIFY_SOURCE=2 -g
QEMU_CFLAGS       -I/usr/include/pixman-1   -I$(SRC_PATH)/dtc/libfdt   -pthread                                                                       -I/usr/include/glib-2.0 -I/usr/lib64/glib-2.0/include   -fPIE -DPIE -m64 -mcx16                                                                       -D_GNU_SOURCE -D_FILE_OFFSET_BITS=64 -D_LARGEFILE_SOURCE -Wstrict-prototypes -Wr                                                                      edundant-decls -Wall -Wundef -Wwrite-strings -Wmissing-prototypes -fno-strict-al                                                                      iasing -fno-common -fwrapv  -Wendif-labels -Wno-missing-include-dirs -Wempty-bod                                                                      y -Wnested-externs -Wformat-security -Wformat-y2k -Winit-self -Wignored-qualifie                                                                      rs -Wold-style-declaration -Wold-style-definition -Wtype-limits -fstack-protecto                                                                      r-strong -Wno-missing-braces  -pthread -I/usr/local/include/spice-1 -I/usr/local                                                                      /include/spice-server -I/usr/include/glib-2.0 -I/usr/lib64/glib-2.0/include -I/u                                                                      sr/include/pixman-1   -I$(SRC_PATH)/capstone/include
LDFLAGS           -Wl,--warn-common -Wl,-z,relro -Wl,-z,now -pie -m64 -g
QEMU_LDFLAGS      -L$(BUILD_DIR)/dtc/libfdt
make              make
install           install
python            python -B
smbd              /usr/sbin/smbd
module support    no
host CPU          x86_64
host big endian   no
target list       x86_64-softmmu
gprof enabled     no
sparse enabled    no
strip binaries    yes
profiler          no
static build      no
SDL support       no
GTK support       no
GTK GL support    no
VTE support       no
TLS priority      NORMAL
GNUTLS support    no
libgcrypt         no
nettle            no
libtasn1          no
curses support    no
virgl support     no
curl support      no
mingw32 support   no
Audio drivers     oss
Block whitelist (rw)
Block whitelist (ro)
VirtFS support    no
Multipath support no
VNC support       yes
VNC SASL support  no
VNC JPEG support  yes
VNC PNG support   no
xen support       no
brlapi support    no
bluez  support    no
Documentation     no
PIE               yes
vde support       no
netmap support    no
Linux AIO support no
ATTR/XATTR support yes
Install blobs     yes
KVM support       yes
HAX support       no
HVF support       no
WHPX support      no
TCG support       yes
TCG debug enabled no
TCG interpreter   no
malloc trim support yes
RDMA support      no
PVRDMA support    no
fdt support       git
membarrier        no
preadv support    yes
fdatasync         yes
madvise           yes
posix_madvise     yes
posix_memalign    yes
libcap-ng support no
vhost-net support yes
vhost-crypto support yes
vhost-scsi support yes
vhost-vsock support yes
vhost-user support yes
Trace backends    log
spice support     yes (0.12.15/0.14.0)
rbd support       no
xfsctl support    no
smartcard support no
libusb            no
usb net redir     no
OpenGL support    no
OpenGL dmabufs    no
libiscsi support  no
libnfs support    no
build guest agent yes
QGA VSS support   no
QGA w32 disk info no
QGA MSI support   no
seccomp support   no
coroutine backend ucontext
coroutine pool    yes
debug stack usage no
mutex debugging   no
crypto afalg      no
GlusterFS support no
gcov              gcov
gcov enabled      no
TPM support       yes
libssh2 support   no
TPM passthrough   yes
TPM emulator      yes
QOM debugging     yes
Live block migration yes
lzo support       no
snappy support    no
bzip2 support     no
NUMA host support no
libxml2           no
tcmalloc support  no
jemalloc support  no
avx2 optimization yes
replication support yes
VxHS block device no
bochs support     yes
cloop support     yes
dmg support       yes
qcow v1 support   yes
vdi support       yes
vvfat support     yes
qed support       yes
parallels support yes
sheepdog support  yes
capstone          internal
docker            no
libpmem support   no
libudev           no

NOTE: cross-compilers enabled:  'cc'
[root@localhost qemu-3.1.0]#
4、make && make install
[root@localhost qemu-3.1.0]# make && make install这个过程大约3~4分钟,没有出现错误的话,执行如下命令且提示正确表示编译、安装成功。
[root@localhost qemu-3.1.0]# which qemu-system-x86_64
/usr/bin/qemu-system-x86_64
[root@localhost qemu-3.1.0]# which qemu-img
/usr/bin/qemu-img
[root@localhost qemu-3.1.0]#
qemu-system-x86_64 是qemu 启动虚机的关键文件,每个虚机对应一个qemu-system-x86_64启动进程;
qemu-img是一个比较重要的工具,是QEMU的磁盘管理工具;
5、查看安装版本号
执行下面命令:
[root@localhost bin]# qemu-system-x86_64 --version
qemu-system-x86_64: error while loading shared libraries: libspice-server.so.1: cannot open shared object file: No such file or directory
我们发现提示找不到libspice-server.so.1 库文件,原因是默认情况下,编译器只会使用/lib和/usr/lib这两个目录下的库文件,通常通过源码包进行安装时,如果不指定–prefix,会将库安装在/usr/local/lib目录下;当运行程序需要链接动态库时,提示找不到相关的.so库,会报错。也就是说,/usr/local/lib目录不在系统默认的库搜索目录中,需要将目录加进去。
1、将/usr/local/lib 目录添加到/etc/ld.so.conf 文件中,如下:
[root@localhost ~]# echo /usr/local/lib >> /etc/ld.so.conf
2、将文件/etc/ld.so.conf列出的路径下的库文件缓存到/etc/ld.so.cache以供使用,如下:
[root@localhost ~]# ldconfig -v 如果看到如下界面,即看到/usr/local/lib 目录下的libspice-server.so.1,表示修改成功

再次查看版本号,如下表示成功:
[root@localhost ~]# qemu-system-x86_64 --version
QEMU emulator version 3.1.0
Copyright (c) 2003-2018 Fabrice Bellard and the QEMU Project developers
[root@localhost ~]#
好了,到这里我们的qemu 也算是安装完成了,当我们安装完qemu时,我们就可以通过命令来创建虚机并使用了,这将在下一篇《spice、qemu-kvm以及libvirt源码编译安装与使用(中)》介绍~