SpringCloud--向服务注册中心注册一个服务
xl_echo编辑整理,欢迎转载,转载请声明文章来源。更多IT编程案例、资料请联系QQ:1280023003 ,群:298140694
百战不败,依不自称常胜,百败不颓,依能奋力前行。——这才是真正的堪称强大!!
前言:
在注册服务之前你需要一个正常运行的服务注册中心,搭建参考:https://blog.csdn.net/xlecho/article/details/80614496
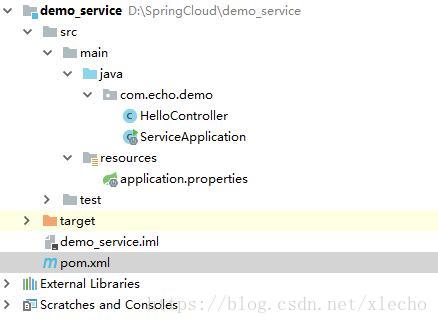
在springcloud中每一个服务都是一个springboot工程,所以我们的服务搭建也是从一个简单的springboot工程开始,添加基本的依赖之后,最为关键的就是怎么指向我们的服务注册中心。
pom依赖详情如下:
<project xmlns="http://maven.apache.org/POM/4.0.0"
         xmlns:xsi="http://www.w3.org/2001/XMLSchema-instance"
         xsi:schemaLocation="http://maven.apache.org/POM/4.0.0 http://maven.apache.org/xsd/maven-4.0.0.xsd">
    <modelVersion>4.0.0modelVersion>

    <groupId>com.echo.demogroupId>
    <artifactId>demo_serviceartifactId>
    <version>1.0-SNAPSHOTversion>

    <parent>
        <groupId>org.springframework.bootgroupId>
        <artifactId>spring-boot-starter-parentartifactId>
        <version>1.5.13.RELEASEversion>
        <relativePath/>
    parent>

    <properties>
        <project.build.sourceEncoding>UTF-8project.build.sourceEncoding>
        <project.reporting.outputEncoding>UTF-8project.reporting.outputEncoding>
        <java.version>1.8java.version>
    properties>

    <dependencies>
        <dependency>
            <groupId>org.springframework.bootgroupId>
            <artifactId>spring-boot-starter-webartifactId>
        dependency>

        <dependency>
            <groupId>org.springframework.bootgroupId>
            <artifactId>spring-boot-starter-testartifactId>
            <scope>testscope>
        dependency>

        <dependency>
            <groupId>org.springframework.cloudgroupId>
            <artifactId>spring-cloud-starter-eurekaartifactId>
        dependency>
    dependencies>

    <dependencyManagement>
        <dependencies>
            <dependency>
                <groupId>org.springframework.cloudgroupId>
                <artifactId>spring-cloud-dependenciesartifactId>
                <version>Brixton.SR5version>
                <type>pomtype>
                <scope>importscope>
            dependency>
        dependencies>
    dependencyManagement>

    <build>
        <plugins>
            <plugin>
                <groupId>org.springframework.bootgroupId>
                <artifactId>spring-boot-maven-pluginartifactId>
            plugin>
        plugins>
    build>

project>
pom文件和我们之前创建的springboot工程有不同的地方在于多添加了几个依赖
        org.springframework.boot
        spring-boot-starter-web


        org.springframework.boot
        spring-boot-starter-test
        test


        org.springframework.cloud
        spring-cloud-starter-eureka
主类:
package com.echo.demo;

import org.springframework.boot.SpringApplication;
import org.springframework.boot.autoconfigure.SpringBootApplication;
import org.springframework.cloud.client.discovery.EnableDiscoveryClient;

/**
 * Created by Xlecho on 2018/6/8/008
 */
@SpringBootApplication
//服务注册组件
@EnableDiscoveryClient
public class ServiceApplication {

  public static void main(String[] args){
    SpringApplication.run(ServiceApplication.class, args);
  }

}
基本的依赖添加好后,主类启用服务注册组件,那么我们就需要为工程指定注册的位置了,不然两个springboot工程不能自动匹配。配置文件就是我们的application.properties,详情如下
spring.application.name=demo_service

#注意一下地址是eureka的地址,不能随便写,不然无法发现注册中心
eureka.client.serviceUrl.defaultZone=http://localhost:10080/eureka/
补充:类一个
package com.echo.demo;

import org.slf4j.Logger;
import org.slf4j.LoggerFactory;
import org.springframework.beans.factory.annotation.Autowired;
import org.springframework.cloud.client.ServiceInstance;
import org.springframework.cloud.client.discovery.DiscoveryClient;
import org.springframework.web.bind.annotation.RequestMapping;
import org.springframework.web.bind.annotation.RequestMethod;
import org.springframework.web.bind.annotation.RestController;

/**
 * Created by Xlecho on 2018/6/8/008
 */
@RestController
public class HelloController {

  private static final Logger logger = LoggerFactory.getLogger(HelloController.class);

  @Autowired
  private DiscoveryClient client;

  @RequestMapping(value = "/hello", method = RequestMethod.GET)
  public String index(){
    ServiceInstance instance = client.getLocalServiceInstance();
    logger.info("/hello, host:" + instance.getHost() + ", service_id:" + instance.getServiceId());
    return "Hello World";
  }

}
配置完成之后,我们一次启动服务,先eureka,然后在启动需要注册的服务。之后访问http://localhost:10080,看到一下界面就证明你成功了,可以看到我们注册了一个服务。

请检查你的配置文件application.properties中的注册地址,报错就是因为注册地址是错误的。
采坑:当你自动生成项目配置完成启动之后,只要一小会项目就会断开。无法注册,启动也看起来不成功,但是没有明显的错误。
解决办法:在服务提供者的pom.xml文件中加入web依赖即可
以上为博主自己学习采坑实记,不喜勿喷,有不足的地方希望能够补充评论。

