Swagger2+nacos+gateway+Springcloud的简单配置
Swagger探索:Swagger2+nacos+gateway+Springcloud的配置+路由统一鉴权认证
-
- 前言:Springfox-swagger介绍
- 一:Srpingboot+swagger
-
- 0.项目结构一览
- 1.添加依赖
- 2.添加配置文件(application.yml)
- 3.创建swagger配置文件(configuration)
- 4.使用swagger注解
-
- 1.启动项
- 2.控制器 (以AreaController为例)
- 3. 实体类(以AreaEntity为例)
- 5.常见错误及解决方法
- 二:Srpingcloud+gateway+nacos+swagger
-
- 0.项目结构一览
- 1.导入依赖包
- 2.创建控制类MySwaggerResourceProvider
- 3.创建响应器:API接口识别文件SwaggerHandler
- 4.gateway中的swagger配置
- 三:统一鉴权管理
-
- 1. 需求概述
- 2.配置文件添加**白名单**
-
- 3.具体实现
- 四:效果展示
- 五:剩余问题
- 附录: 参考一览
这是我的第一篇博客,是初步探索swagger2UI的一个总结。文章中的错误和不准确的地方希望各位指正,先行谢过。
开始之前,(郑重感谢***@吉/@巫林老师***/后端三剑客@墨@来@宇/外援组合@吉@皓)
前言:Springfox-swagger介绍
感谢 @从此寂静无声的博客
这次项目主要运用Springfox-swagger。
Swagger是一系列用于Restful API开发的工具,在这次项目里是为了满足前后端分离的开发模式下开发人员内部测试的需求,故而使用Swagger UI做API文档展示。
Springfox是通过扫描代码提取代码中的信息,并以此生成API文档的工具。
Springfox-swagger也就是两家互相支持的模式。
这次项目内部除Swagger之外的所有配置都已经搭建完成,所以在此只写Swagger所属的配置内容的部分以及它带来的坑。
一:Srpingboot+swagger
第一部分先介绍只有单一模组的springboot项目和SwaggerUI界面的简单构建。
0.项目结构一览

服务模组是SwaggerUI真正构建的地方。即使是在多模组项目中,所有的Swagger配置也都是存在于服务侧,网关侧的配置只是为了通过正确的路径调用正确的接口(第二部分会详细说明)。
1.添加依赖
所有的springboot/springcloud功能的实现,第一步都是在pom.xml中依赖包的导入。
swagger UI界面主要有两个依赖包。建议两个依赖包都导入2.9.1及以上的版本。
 <!-- Swagger2 始 -->

		<!-- 获取和调用API文档+注解 -->
        <dependency>
            <groupId>io.springfox</groupId>
            <artifactId>springfox-swagger2</artifactId>
            <version>2.9.2</version>
        </dependency>

		<!-- 生成图形化界面 -->
        <dependency>
            <groupId>io.springfox</groupId>
            <artifactId>springfox-swagger-ui</artifactId>
            <version>2.9.2</version>
        </dependency>
        <!-- Swagger2 终 -->
(依赖包版本问题可以直接去maven官方仓库查看:maven repository)。
2.添加配置文件(application.yml)
#swagger 配置
swagger: '2.0'
info:
  title: 测试界面
  version: 1.0.0
  license: Apache 2.0
  basePackage: com.example.service
  contactName: jiadong.GUO
  lang: zh-cn
  enabled: true
这里需要注意的是把enabled设置成true来启用swagger注解
感谢@wendell_dev的简书
3.创建swagger配置文件(configuration)
import org.springframework.context.annotation.Bean;
import org.springframework.context.annotation.Configuration;
import springfox.documentation.builders.ApiInfoBuilder;
import springfox.documentation.builders.PathSelectors;
import springfox.documentation.builders.RequestHandlerSelectors;
import springfox.documentation.service.*;
import springfox.documentation.spi.DocumentationType;
import springfox.documentation.spi.service.contexts.SecurityContext;
import springfox.documentation.spring.web.plugins.Docket;
import springfox.documentation.swagger2.annotations.EnableSwagger2;

import java.util.ArrayList;
import java.util.List;


@EnableSwagger2
@Configuration
public class Swagger2Configuration {


    @Bean
    Docket createRestApi() {


        return new Docket(DocumentationType.SWAGGER_2)
                .apiInfo(apiInfo())
                .select()
                .apis(RequestHandlerSelectors.basePackage("com.guo.service.dataupload"))
                .paths(PathSelectors.any())
                .build()
                ;
    }

    private ApiInfo apiInfo() {

        return new ApiInfoBuilder()
                .title("DataUploadService API 文档")
                .description("公司数据上报系统前后端调试API界面")
                .termsOfServiceUrl("@Author 郭嘉栋/GUO jiadong")
                .version("1.0.0")
                .build();
    }

}
这里有两个点需要注意:
1.RequestHandlerSelectors.basePackage一定要按照项目的结构写清楚,才能引用到正确的api注释。
2.开头@ComponentScan里也要标注正确的文件
感谢@ITDragon龙的博客
4.使用swagger注解
感谢**@X_Xian_**CSDN
1.启动项
      ...
   @EnableSwagger2

   public class ServiceApplication {

          ...
      }
2.控制器 (以AreaController为例)
常用注解使用说明
-
@Api()用于类,表示表示这个类是swagger的资源
字段 说明 tags 说明 value 说明,可以用tags替代 代码片段:
... @Api(tags = "实验接口1号") ... public class AreaController implements AreaService { ... }-
@ApiOperation()用于方法,表示一个http请求的操作
字段 说明 tags 可以重新分组 value 方法描述 notes 提示内容
@ApiOperation(value = "查询父ID", tags = { "返回父ID信息"}, notes = "查询父ID不能为空") @Override public BaseResult<List<AreaVo>> queryAreaByParentId(String parentId) { if (StringUtils.isBlank(parentId)) { return BaseResult.err("查询父ID不能为空"); } return BaseResult.ok(areaService.queryAreaByParentId(parentId)); }-
@ApiParam()用于方法的参数的字段说明,是否必填等
字段 说明 name 参数名 value 参数说明 required 是否必填 @ApiParam(value = "根据地域开展服务") @Resource private AreaServiceImpl areaService;
完整代码如下:AreaController.java
... @Api(tags = "实验接口1号") ... public class AreaController implements AreaService { @ApiParam(value = "根据地域开展服务") @Resource private AreaServiceImpl areaService; @ApiOperation(value = "查询父ID", tags = { "返回父ID信息"}, notes = "查询父ID不能为空") @Override public BaseResult<List<AreaVo>> queryAreaByParentId(String parentId) { if (StringUtils.isBlank(parentId)) { return BaseResult.err("查询父ID不能为空"); } return BaseResult.ok(areaService.queryAreaByParentId(parentId)); } @Override public BaseResult<List<AreaVo>> queryAllArea() { return BaseResult.ok(areaService.queryAllArea()); } } -
3. 实体类(以AreaEntity为例)
-
@ApiModel()用于类,表示对类进行说明,用于参数用实体类接受
字段 说明 value 对象说明 description 描述 -
@ApiModelProperty()用于model的字段,表示对model属性的说明或者数据操作更改
字段 说明 value 字段说明 name 重写属性名字 datatype 参数重写属性类型 example 举例说明 required 是否必填 hidden 隐藏 完整代码如下:
import com.baomidou.mybatisplus.annotation.IdType;
import com.baomidou.mybatisplus.annotation.TableField;
import com.baomidou.mybatisplus.annotation.TableId;
import com.baomidou.mybatisplus.annotation.TableName;
import io.swagger.annotations.ApiModel;
import io.swagger.annotations.ApiModelProperty;
import lombok.Data;

import java.util.Date;

@ApiModel(value = "地域量", description = "涵盖所在地域信息")
@Data
@TableName(value = "t_sys_area")
public class AreaEntity {

    @ApiModelProperty(value = "用户ID", required = true)
    @TableId(type = IdType.ASSIGN_UUID)
    private String id;

    @ApiModelProperty(value = "地域名称", required = true)
    @TableField(value = "areaName")
    private String areaName;

    @ApiModelProperty(value = "区域代码", required = true)
    @TableField(value = "areaCode")
    private String areaCode;

    @ApiModelProperty(value = "父代码", required = true)
    @TableField(value = "parentCode")
    private String parentCode;

 @ApiModelProperty(value = "是否删除", required = true)
    @TableField(value = "isDel")
    private Integer isDel;

    @ApiModelProperty(value = "创建时间", required = true)
    @TableField(value = "createTime")
    private Date createTime;
}
5.常见错误及解决方法
1.错误描述:To display the conditions report re-run your application with ‘debug’ enabled.
原因:常见是因为不同依赖包结构下,同样的类名冲突。
解决办法:找到类名冲突的bean即可。
2.错误描述:Failed to start bean ‘documentationPluginsBootstrapper’
原因:使用swagger2出现这个异常,这个问题解决办法是因为swagger依赖google的guava。
解决办法:在pom.xml中添加或者升级guava依赖包即可。
3.错误描述:Failed to start bean ‘documentationPluginsBootstrapper’; nested exception is java.lang.NullPointerException
原因:swagger2配置文件中缺少了必要信息,例如没有写controller所在的包
解决办法:具体问题具体分析
4.错误描述:localhost:swagger-ui.html 拒绝了请求连接
原因:具体问题具体分析,不过我是因为swagger版本过低,所以一定要在引入依赖的时候引最新的包。
5.问题描述:Swagger的UI界面没有相关的api文档
原因:basePackage写错或者Swagger配置文件(SwaggerConfig)在项目中位置有问题
解决方法:保证basePackage扫描路径正确,且SwaggerCongif在控制器的
父级或者同级文件夹中
二:Srpingcloud+gateway+nacos+swagger
第二部分着重描述了在项目注册到Nacos注册中心后,如何通过在网关侧构建Swagger UI来达到对服务侧的访问。
需要注意的是gateway的启动类用不上swagger的注解,因为springcloud gateway是基于webflux开发的,而目前版本的swaager是不支持webflux的。
0.项目结构一览

1.导入依赖包
前言:
因为涉及到了gateway+nacos注册中心+swagger,所以项目是由多个子模块构成的。依赖包用了父子结构的方法,在这种情况下一定要谨慎的选取依赖包和依赖包的版本,避免造成大量的debug工作。
这一部分感谢**@逃往乌托邦 _**CSDN
我自己之后会做一篇springboot依赖构架的体会,希望各位大佬指正。
需要导入的包如下:
<!-- Swagger2 始 -->

		<!-- 获取和调用API文档+注解 -->
        <dependency>
            <groupId>io.springfox</groupId>
            <artifactId>springfox-swagger2</artifactId>
            <version>2.9.2</version>
        </dependency>

		<!-- 生成图形化界面 -->
        <dependency>
            <groupId>io.springfox</groupId>
            <artifactId>springfox-swagger-ui</artifactId>
            <version>2.9.2</version>
        </dependency>
        <!-- Swagger2 终 -->
2.创建控制类MySwaggerResourceProvider
因为Swagger暂不支持webflux,所以Gateway里不能配置SwaggerConfig,可以通过实现 SwaggerResourcesProvider方法获取各个服务的Api-doc文档(即SwaggerResources)
import org.springframework.cloud.gateway.config.GatewayProperties;
import org.springframework.cloud.gateway.route.RouteLocator;
import org.springframework.cloud.gateway.support.NameUtils;
import org.springframework.context.annotation.Primary;
import org.springframework.stereotype.Component;
import springfox.documentation.swagger.web.SwaggerResource;
import springfox.documentation.swagger.web.SwaggerResourcesProvider;

import java.util.ArrayList;
import java.util.List;

@Component
@Primary
@AllArgsConstructor
public class MySwaggerResourceProvider implements SwaggerResourcesProvider {

    public static final String API_URI = "/v2/api-docs";
    private RouteLocator routeLocator;
    private GatewayProperties gatewayProperties;

    @Override
    public List<SwaggerResource> get() {

        List<SwaggerResource> resources = new ArrayList<>();
        List<String> routes = new ArrayList<>();
        //取出gateway的route
        routeLocator.getRoutes().subscribe(route -> routes.add(route.getId()));
        //结合配置的route-路径(Path),和route过滤,只获取有效的route节点
        //读取各个服务上SwaggerInfo信息的方法
        gatewayProperties.getRoutes().stream().filter(routeDefinition -> routes.contains(routeDefinition.getId()))
                .forEach(routeDefinition -> routeDefinition.getPredicates().stream()
                        .filter(predicateDefinition -> ("Path").equalsIgnoreCase(predicateDefinition.getName()))
                        .forEach(predicateDefinition -> resources.add(swaggerResource(routeDefinition.getId(),
                                predicateDefinition.getArgs().get(NameUtils.GENERATED_NAME_PREFIX + "0")
                                        .replace("/**", API_URI)))));
        return resources;
    }


    //把SwaggerInfo信息加载到SwaggerUI界面的方法
    private SwaggerResource swaggerResource(String name, String location) {

        SwaggerResource swaggerResource = new SwaggerResource();
        swaggerResource.setName(name);
        swaggerResource.setLocation(location);
        swaggerResource.setSwaggerVersion("2.0");
        return swaggerResource;
    }

}


------------------------------
代码转载自 逃往乌托邦 的博客,如需转载请注明出处
https://blog.csdn.net/weixin_43923229/article/details/106521151
3.创建响应器:API接口识别文件SwaggerHandler
Swagger-ui需要依赖的一些接口
import org.springframework.beans.factory.annotation.Autowired;
import org.springframework.http.HttpStatus;
import org.springframework.http.ResponseEntity;
import org.springframework.web.bind.annotation.GetMapping;
import org.springframework.web.bind.annotation.RestController;
import reactor.core.publisher.Mono;
import springfox.documentation.swagger.web.*;

import java.util.Optional;

@RestController
class SwaggerHandler {

    @Autowired(required = false)
    private SecurityConfiguration securityConfiguration;
    @Autowired(required = false)
    private UiConfiguration uiConfiguration;
    private final SwaggerResourcesProvider swaggerResources;

    @Autowired
    public SwaggerHandler(SwaggerResourcesProvider swaggerResources) {

        this.swaggerResources = swaggerResources;
    }


    @GetMapping("/swagger-resources/configuration/security")
    public Mono<ResponseEntity<SecurityConfiguration>> securityConfiguration() {

        return Mono.just(new ResponseEntity<>(
                Optional.ofNullable(securityConfiguration).orElse(SecurityConfigurationBuilder.builder().build()), HttpStatus.OK));
    }

    @GetMapping("/swagger-resources/configuration/ui")
    public Mono<ResponseEntity<UiConfiguration>> uiConfiguration() {

        return Mono.just(new ResponseEntity<>(
                Optional.ofNullable(uiConfiguration).orElse(UiConfigurationBuilder.builder().build()), HttpStatus.OK));
    }

    @GetMapping("/swagger-resources")
    public Mono<ResponseEntity> swaggerResources() {

        return Mono.just((new ResponseEntity<>(swaggerResources.get(), HttpStatus.OK)));
    }

    @GetMapping("/")
    public Mono<ResponseEntity> swaggerResourcesN() {

        return Mono.just((new ResponseEntity<>(swaggerResources.get(), HttpStatus.OK)));
    }

    @GetMapping("/csrf")
    public Mono<ResponseEntity> swaggerResourcesCsrf() {

        return Mono.just((new ResponseEntity<>(swaggerResources.get(), HttpStatus.OK)));
    }

}

------------------------------
代码转载自 逃往乌托邦 的博客,如需转载请注明出处
https://blog.csdn.net/weixin_43923229/article/details/106521151
4.gateway中的swagger配置
gateway项目上的配置文件bootstrap.yml或者nacos上gateway的配置文件需要加上服务路径:
spring:
  cloud:
    gateway:
      discovery:
        locator:
          enabled: true
      routes:
      	......
三:统一鉴权管理
1. 需求概述
由于项目涉及到需要认证的服务,又需要保持服务侧和网关侧代码的逻辑,所以将Swagger认证当作一个独立于项目主体之外的功能来开发。故而我选用了Swagger自带的安全机制Token,也就是 ApiKey 场景。
2.配置文件添加白名单
为了保证所有swaggerAPI路径都可以被授权访问,需要在服务侧的配置文件里设置白名单
#swagger 配置
swagger: '2.0'
info:
  .......

# 权限白名单
auth:
  white-list: /swagger-ui.html,/swagger-ui.html/**,/webjars/springfox-swagger-ui/**,/swagger-resources/**,/v2/api-docs,/v2/api-docs/**
需要注意的就是白名单设置一定要把所有swagger相关的路径都写出来,以防止由于路径无法访问而导致UI界面无法显示。
3.具体实现
一下内容引自@头顶青天_脚踏实地的博客,如需转载请注明出处
-
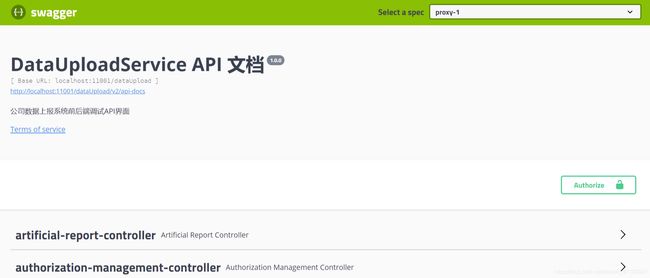
在SwaggerConfig.java中配置,重启后端项目后,在swagger页面的右上角会出现一个 Authorize 按钮
-
在securitySchemes的ApiKey中增加一个名名称为“Authorization”,类型为“header”的参数
private List<ApiKey> securitySchemes() {

    return newArrayList( new ApiKey("Authorization", "Authorization", "header"));
}
- 在securityContexts中添加你要 一次配置多次生效 的接口名称,forPaths() 中放入要生效的接口路径的正则表达式,如 .forPaths(PathSelectors.regex("^(?!menus).*$")) 表示所有带有 menus 的接口路径。此处,使用 PathSelectors.any() 表示所有接口路径都生效
private List<SecurityContext> securityContexts() {


    return newArrayList( SecurityContext.builder() .securityReferences(defaultAuth())

        // .forPaths(PathSelectors.regex("^(?!menus).*$"))

            .forPaths(PathSelectors.any())

            .build() );

}


List<SecurityReference> defaultAuth() {


    AuthorizationScope authorizationScope = new AuthorizationScope("global", "accessEverything");

    AuthorizationScope[] authorizationScopes = new AuthorizationScope[1];

    authorizationScopes[0] = authorizationScope;

    return newArrayList( new SecurityReference("Authorization", authorizationScopes));

}
- 在createRestApi 中加入以上两步配置的 securitySchemes 和 securityContexts
return new Docket(DocumentationType.SWAGGER_2).

    useDefaultResponseMessages(false) .select() .

    apis(RequestHandlerSelectors.any()) .

    paths(PathSelectors.regex("^(?!auth).*$")) .

     build() .

    securitySchemes(securitySchemes()) .

    securityContexts(securityContexts()) ;

}

作者:头顶青天_脚踏实地
链接:https://www.jianshu.com/p/2f965c13f2ff
来源:简书
著作权归作者所有。商业转载请联系作者获得授权,非商业转载请注明出处。
附上我的完整配置代码
import org.springframework.context.annotation.Bean;
import org.springframework.context.annotation.Configuration;
import springfox.documentation.builders.ApiInfoBuilder;
import springfox.documentation.builders.PathSelectors;
import springfox.documentation.builders.RequestHandlerSelectors;
import springfox.documentation.service.*;
import springfox.documentation.spi.DocumentationType;
import springfox.documentation.spi.service.contexts.SecurityContext;
import springfox.documentation.spring.web.plugins.Docket;
import springfox.documentation.swagger2.annotations.EnableSwagger2;

import java.util.ArrayList;
import java.util.List;


@EnableSwagger2
@Configuration
public class Swagger2Configuration {


    @Bean
    Docket createRestApi() {


        return new Docket(DocumentationType.SWAGGER_2)
                .apiInfo(apiInfo())
                .select()
                .apis(RequestHandlerSelectors.basePackage("com.kb.service.dataupload"))
                .paths(PathSelectors.any())
                .build()
                .securitySchemes(securitySchemes())
                .securityContexts(securityContexts())
                ;
    }

    private ApiInfo apiInfo() {

        return new ApiInfoBuilder()
                .title("DataUploadService API 文档")
                .description("公司数据上报系统前后端调试API界面")
                .termsOfServiceUrl("@Author 郭嘉栋/GUO jiadong")
                .version("1.0.0")
                .build();
    }

    private List<ApiKey> securitySchemes() {

        List<ApiKey> apiKeyList= new ArrayList<ApiKey>();
        apiKeyList.add(new ApiKey("Authorization", "Authorization", "header"));
        return apiKeyList;
    }

    private List<SecurityContext> securityContexts() {

        List<SecurityContext> securityContexts=new ArrayList<>();
        securityContexts.add(
                SecurityContext.builder()
                        .securityReferences(defaultAuth())
                        //.forPaths(PathSelectors.regex("^(?!auth).*$"))
                        //这里.any()代表所有形式的端口路径,上边的是menus的正则表达式
                        .forPaths(PathSelectors.any())
                        .build());
        return securityContexts;
    }

    List<SecurityReference> defaultAuth() {

        AuthorizationScope authorizationScope = new AuthorizationScope("global", "accessEverything");
        AuthorizationScope[] authorizationScopes = new AuthorizationScope[1];
        authorizationScopes[0] = authorizationScope;
        List<SecurityReference> securityReferences=new ArrayList<>();
        securityReferences.add(new SecurityReference("Authorization", authorizationScopes));
        return securityReferences;
    }
}
四:效果展示
1.SwaggerUI界面
2.Token注入+认证成功

3. 测试实例

五:剩余问题
目前的swaggerUI界面还很简陋,很多功能不齐。我把目前看到的问题列出来,还希望诸位大神能在评论区给些建议,提前拜谢!
Q1.Mono类用途不明
当前在网关侧有两个文件:MySwaggerSourceProvider和SwaggerHandler。
在SwaggerHandler内的Mono类用途我还不明确,私以为可以直接通过返还值的方式来实现简单的操作。
import reactor.core.publisher.Mono;
Q2.界面汉化处理
为了方便国内开发者使用,一直在找汉化swagger界面的办法。之前尝试了直接修改html文件并重新打包的方法,但是失败了。希望有经验的大神分享一下~
附录: 参考一览
逃往乌托邦:spring cloud gateway+nacos+多模块下整合swagger2的接口文档
头顶青天_脚踏实地:Swagger token认证,一次配置多次生效
林朝昆blog:swagger设置全局token,解决接口需要token验证的问题
Maven Groupe:Maven Repository
wendell_dev:Spring Boot集成swagger2生成接口文档
ITDragon龙:SpringBoot 集成Swagger2自动生成文档和导出成静态文件
X_Xian_ :spring boots利用wagger-bootstrap-ui生成好看的api文档
li123128:Swagger如何访问需要权限验证的Web API
高广超:Spring Cloud Gateway 2.1.0 中文官网文档