iOS硬解码总结
文章目录
-
-
- iOS 硬解码总结
-
- iOS 硬解码
-
- 数据转换
-
- 初始化Session 和解码器配置
- 解码
-
iOS 硬解码总结
在iOS 中解码从解码方式来讲,可以分为硬解码 和 软解码
- 硬解码: 由显卡核心的GPU 来对视频数据进行解码工作
- 软解码: 由CPU 来进行解码
| 画质 | 性能 | 内存消耗 | 支持格式 | 流畅度 | 总耗能 | |
|---|---|---|---|---|---|---|
| 硬解码 | 高 | 优 | 低 | 少 | 好 | 低 |
| 软解码 | 高 | 差 | 高 | 无限制 | 坏 | 高 |
iOS 硬解码
在iOS中使用硬解码是有系统提供的接口来完成的,即VideoToolbox框架。
硬解码的主要流程如下:
- 将实时视频流进行数据格式转换 annexB ->AVCC (因为VideoToolbox 只能解码AVCC 格式的H264)
- 初始化解码session和解码回调数,并设置SPS、PPS。
- 将转码之后的数据格式进行解码
数据转换
进行数据转换之前,我们需要保证在实时传输的过程中,数据保证是完整的一帧过来的,中间如何实现组包和重传本次就不描述了。
在数据转换时,我们通常可以拿到实时流的SPS、pps、SEI、IDR,需要将这些数据保存下来,用作硬解码H264的Description配置创建。
在我们目前的实时流中不存在B 帧,所以图像都是保存在I帧和P帧中,那只要把I帧和P帧数据送到解码器,就完成了图像的解码工作。
数据转换的操作步骤如下:
- 找到
StartCode - 判断帧类型
- 计算SPS、PPS的值
- 将图像数据帧传递到解码器
在H264的实时流中,所有NALU单元的StartCode 一定是0x000001或者0x00000001,所以我们需要遍历收到的buffer。
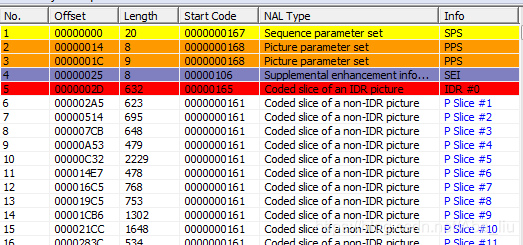
常见的起始码一般是4个字节,在使用H264分析工具查看后,发现我们的SPS/pps/IDR 都是4个字节,而P帧的startCode 为 3个字节,所以我们不能直接设定起始码位置。
先贴一个我们的H264码流截图
因为码流中存在2个PPS,我们必须将两个PPS 都要保存下来,不然在进行解码的时候无法正常的出图,会一直报错数据错误(-12909)
详细的代码如下:
for (int i = 0; i= 4 && buffer[0] == 0x0 && buffer[1] == 0x0 && buffer[2] == 0x0 && buffer[3] == 0x1) {
        return 4;
    } else if (size >= 3 && buffer[0] == 0x0 && buffer[1] == 0x0 && buffer[2] == 0x1) {
        return 3;
    }

    return 0;
}


- (BOOL)getSliceInfo:(const uint8_t *)videoBuf slice:(uint8_t **)sliceBuf size:(NSInteger *)size start:(NSInteger)start end:(NSInteger)end {
    BOOL isDif = NO;

    NSInteger len = end - start;
    uint8_t *tempBuf = (uint8_t *)(*sliceBuf);
    if (tempBuf) {
        if (len != *size || memcmp(tempBuf, videoBuf + start, len) != 0) {
            free(tempBuf);
            tempBuf = (uint8_t *)malloc(len);
            memcpy(tempBuf, videoBuf + start, len);

            *sliceBuf = tempBuf;
            *size = len;

            isDif = YES;
        }
    } else {
        tempBuf = (uint8_t *)malloc(len);
        memcpy(tempBuf, videoBuf + start, len);

        *sliceBuf = tempBuf;
        *size = len;
    }

    return isDif;
}
初始化Session 和解码器配置
- 创建视频格式参数配置
- 创建解码回调
- 创建解码用的session
- 配置的关键在于对SPS 和 PPS 的参数配置,这个决定了你解码图像是否能够成功,其中
CMVideoFormatDescriptionCreateFromH264ParameterSets的几个配置最为关键,我们需要把H264码流中的SPS/PPS都作为参数填充到该方法,此方法的释义可见源码解析。 - 创建
Session的回调也很关键,注意作为数据输出的自定义回调方法,在设置了回调之后VTDecompressionSessionDecodeFrame方法输出的imagebuffer是不会有值的。
- (BOOL)initH264HwDecoder
{
    if (mDeocderSession) {
        return YES;
    }
    const uint8_t *const parameterSetPointers[3] = {pSPS,pPPS,pLPPS};
    const size_t parameterSetSizes[3] = {mSpsSize,mPpsSize, mLppsSize};
    OSStatus status = CMVideoFormatDescriptionCreateFromH264ParameterSets(kCFAllocatorDefault, 3, parameterSetPointers, parameterSetSizes, 4, &mDecoderFormatDescription);

    if (status == noErr) {
          NSDictionary* destinationPixelBufferAttributes = @{
                                                           (id)kCVPixelBufferPixelFormatTypeKey : [NSNumber numberWithInt:kCVPixelFormatType_420YpCbCr8BiPlanarVideoRange],
                                                           (id)kCVPixelBufferWidthKey : [NSNumber numberWithInt:1920],
                                                           (id)kCVPixelBufferHeightKey : [NSNumber numberWithInt:1080],
                                                           //这里款高和编码反的
                                                           (id)kCVPixelBufferOpenGLCompatibilityKey : [NSNumber numberWithBool:YES]
          };

        VTDecompressionOutputCallbackRecord callBackRecord;
        callBackRecord.decompressionOutputCallback = didDecompress;
        callBackRecord.decompressionOutputRefCon = (__bridge void *)self;
        VTSessionSetProperty(mDeocderSession, kVTDecompressionPropertyKey_ThreadCount, (__bridge CFTypeRef)[NSNumber numberWithInt:1]);
        VTSessionSetProperty(mDeocderSession, kVTDecompressionPropertyKey_RealTime, kCFBooleanTrue);

        status = VTDecompressionSessionCreate(kCFAllocatorDefault,
                                          mDecoderFormatDescription,
                                          NULL, (__bridge CFDictionaryRef)destinationPixelBufferAttributes,
                                          &callBackRecord,
                                          &mDeocderSession);
        NSLog(@"Init H264 hardware decoder success");
    } else {
        NSLog(@"Init H264 hardware decoder fail");
        return NO;
    }
    return YES;
}
解码
解码过程没有太多需要注意的地方,网上的都比较一致,没有什么需要特别讲的
-(CVPixelBufferRef)decode:(uint8_t *)frame withSize:(NSInteger)frameSize
{
    CVPixelBufferRef outputPixelBuffer = NULL;

    CMBlockBufferRef blockBuffer = NULL;
    OSStatus status  = CMBlockBufferCreateWithMemoryBlock(NULL,
                                                          (void *)frame,
                                                          frameSize,
                                                          kCFAllocatorNull,
                                                          NULL,
                                                          0,
                                                          frameSize,
                                                          FALSE,
                                                          &blockBuffer);
    if(status == kCMBlockBufferNoErr) {
        CMSampleBufferRef sampleBuffer = NULL;
        const size_t sampleSizeArray[] = {frameSize};
        status = CMSampleBufferCreateReady(kCFAllocatorDefault,
                                           blockBuffer,
                                           mDecoderFormatDescription ,
                                           1, 0, NULL, 1, sampleSizeArray,
                                           &sampleBuffer);
        if (status == kCMBlockBufferNoErr && sampleBuffer) {
            VTDecodeFrameFlags flags = 0;
            VTDecodeInfoFlags flagOut = 0;
            OSStatus decodeStatus = VTDecompressionSessionDecodeFrame(mDeocderSession,
                                                                      sampleBuffer,
                                                                      flags,
                                                                      &outputPixelBuffer,
                                                                      &flagOut);

            if(decodeStatus == kVTInvalidSessionErr) {
                NSLog(@"IOS8VT: Invalid session, reset decoder session");
            } else if(decodeStatus == kVTVideoDecoderBadDataErr) {
                NSLog(@"IOS8VT: decode failed status=%d(Bad data)", (int)decodeStatus);
            } else if(decodeStatus != noErr) {
                NSLog(@"IOS8VT: decode failed status=%d", (int)decodeStatus);
            }
            CFRelease(sampleBuffer);
        }
        CFRelease(blockBuffer);
    }

    return outputPixelBuffer;
}

// 回调函数
static void didDecompress(void *decompressionOutputRefCon, void *sourceFrameRefCon, OSStatus status, VTDecodeInfoFlags infoFlags, CVImageBufferRef pixelBuffer, CMTime presentationTimeStamp, CMTime presentationDuration )
{
    if (pixelBuffer == NULL) {
        NSLog(@"数据解析为空:%d", status);
        return;
    }
    CMSampleTimingInfo sampleTime = {
        .presentationTimeStamp  = presentationTimeStamp,
        .decodeTimeStamp        = presentationTimeStamp
    };
    YJVideoDecode *decoder = (__bridge YJVideoDecode *)decompressionOutputRefCon;
    CMSampleBufferRef samplebuffer = [decoder createSampleBufferFromPixelbuffer:pixelBuffer videoRotate:180 timingInfo:sampleTime];
    if (samplebuffer) {
        if ([decoder.videoDelegate respondsToSelector:@selector(transportPixelBuffer:)] && decoder.videoDelegate) {

            [decoder.videoDelegate transportPixelBuffer:samplebuffer];
        }
        CFRelease(samplebuffer);
    }
}
