Stochastic Screen Space Reflections(三):实现与优化
必须在延迟管线下渲染,且在不透明后,半透明前渲染
本文在Xerxes1138的基础上进行改进
实现
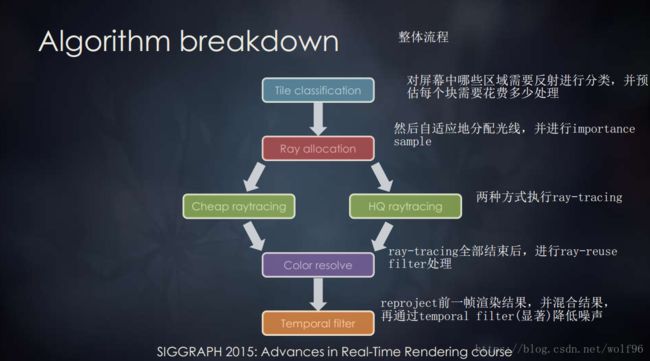
Xerxes1138的实现比Siggraph2015的步骤省略了不少内容
少了Tile分类和Hi-Z Trace
首先逐个pass来看他的实现过程
Recursive Pass
//uv-速度(回到上一帧uv)
float2 prevUV = uv - velocity;
//上一帧渲染结果
float4 sceneColor = SAMPLE_TEXTURE2D(_MainTex, sampler_MainTex,prevUV);
return sceneColor;
返回上一帧着色结果,包括上一帧的StoSSR结果,这样就能模拟出多Bounces的结果,接下来的RayTrace采样就是用这张RT
RayCast Pass
该Pass返回RayTrace hit到的点的位置为一张RT,RayMask为另一张RT表示没有反射到物体的情况
此处用的RayTrace类型只有一种,就是RayMarch获取hit点,这个方法精度是不如Hi-Z的,原文的步骤有一个块的分类,对重要的部分采用Hi-Z采样
Hi-Z
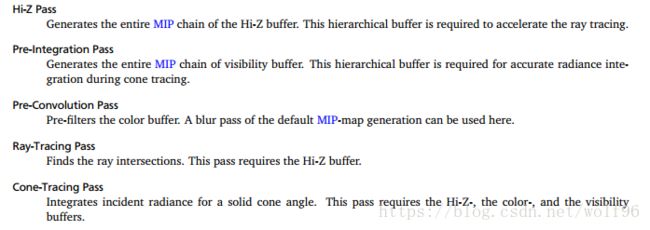
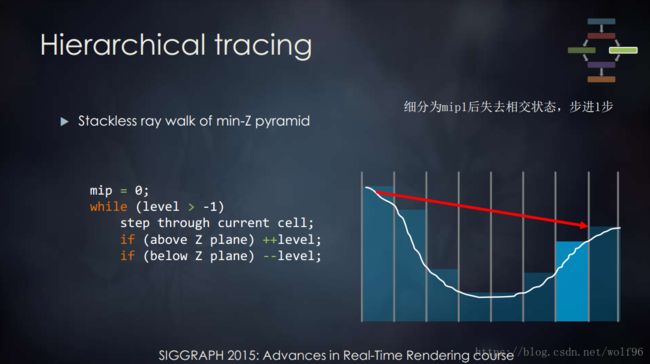
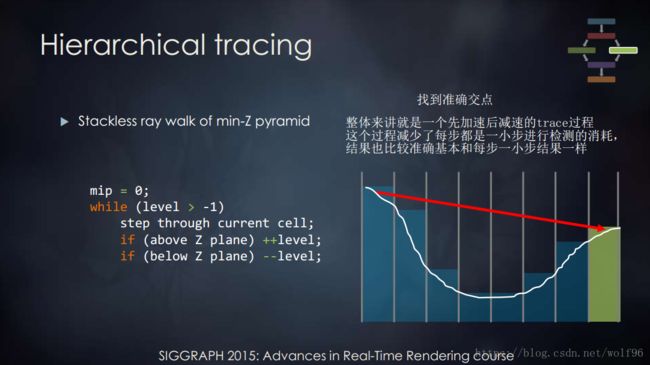
关于hierarchical tracing,在GPU Pro5中有详细介绍,
需要生成一个visible buffer的Mip Chain([Hermanns15])
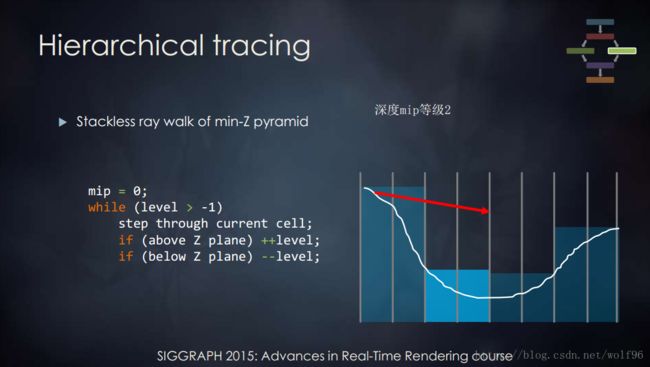
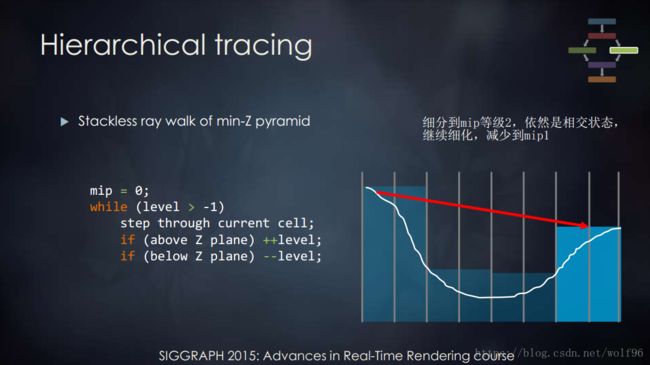
在Sig15里面的介绍:
整体来讲就是一个先加速后减速的trace过程,这个过程减少了每步都是一小步进行检测的消耗,结果也比较准确基本和每步一小步结果一样
MipMapBlur Pass
这一步就是构造一个Mip Chain,来模拟不同粗糙度的反射结果,使用5个Mip级别与Surge中相同
Xerxes1138中横向Blur一次+纵向Blur一次算一个Mip,相当于10次Pass,此处可以直接用mipmap处理比较省
Resolve Pass
此步骤使用Trace返回的hit点的位置与Mip chain根据粗糙度进行最终颜色处理,生成反射颜色
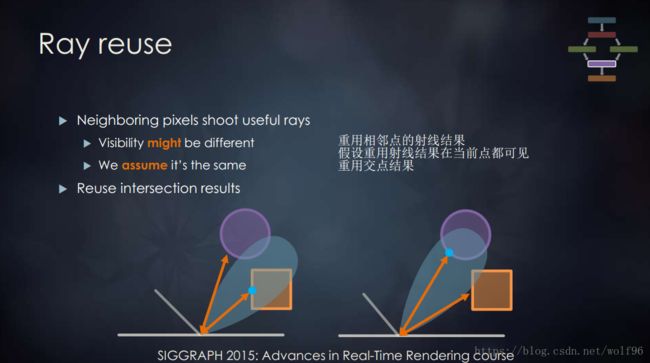
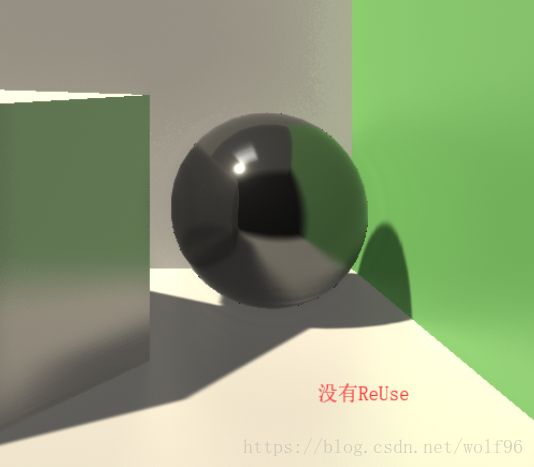
如果开启ReUse,那么就用相邻点(Xerxes1138中是4个)混合,来模拟Cone Trace
Temporal Pass
该步骤做TAA处理,可以大量降低噪声
原理就是与前一帧渲染结果(CPU传入,不是UV算的)做混合,前一阵渲染结果需要过滤,需要clamp在周围8个采样点包括当前点一共9个点的明暗范围之内
//
//pass:temporal(第五步)
//返回:TAA后结果
//与前一帧渲染结果做混合,前一阵渲染结果需要过滤,需要clamp在周围8个采样点包括当前点一共9个点的明暗范围之内
//
	void temporal (VaryingsDefault i, out half4 reflection : SV_Target)
	{
		float2 uv = i.texcoordStereo;
		//获取信息
		//深度/屏幕空间位置/速度/_RayCast?
		float depth = GetDepth(/*_CameraDepthTexture,*/ uv);
		float3 screenPos = GetScreenPos(uv, depth);
		float2 velocity = GetVelocity(uv); // 5.4 motion vector
		float2 hitPacked = SAMPLE_TEXTURE2D_LOD(_RayCast, sampler_RayCast, uv,0);//  tex2Dlod(_RayCast, float4(uv, 0.0, 0.0));

		float2 averageDepthMin = min(hitPacked, velocity);
		float2 averageDepthMax = max(hitPacked, velocity);

		//velocity = clamp(velocity, averageDepthMin, averageDepthMax);
		//获取上一帧UV
		float2 prevUV = uv - velocity;
		//当前RT
		float4 current =SAMPLE_TEXTURE2D(_MainTex, sampler_MainTex,uv);
		//上一帧RT,用上一帧UV取
		float4 previous = SAMPLE_TEXTURE2D(_PreviousBuffer, sampler_PreviousBuffer,prevUV);
		//一个像素长宽
		float2 du = float2(1.0 / _ScreenSize.x, 0.0);
		float2 dv = float2(0.0, 1.0 / _ScreenSize.y);
		//一个点周围8个采样
		float4 currentTopLeft =SAMPLE_TEXTURE2D(_MainTex, sampler_MainTex,uv.xy - dv - du);
		float4 currentTopCenter =SAMPLE_TEXTURE2D(_MainTex, sampler_MainTex, uv.xy - dv);
		float4 currentTopRight = SAMPLE_TEXTURE2D(_MainTex, sampler_MainTex,uv.xy - dv + du);
		float4 currentMiddleLeft = SAMPLE_TEXTURE2D(_MainTex, sampler_MainTex,uv.xy - du);
		float4 currentMiddleCenter = SAMPLE_TEXTURE2D(_MainTex, sampler_MainTex,uv.xy);
		float4 currentMiddleRight = SAMPLE_TEXTURE2D(_MainTex, sampler_MainTex, uv.xy + du);
		float4 currentBottomLeft = SAMPLE_TEXTURE2D(_MainTex, sampler_MainTex,uv.xy + dv - du);
		float4 currentBottomCenter = SAMPLE_TEXTURE2D(_MainTex, sampler_MainTex,uv.xy + dv);
		float4 currentBottomRight = SAMPLE_TEXTURE2D(_MainTex, sampler_MainTex,uv.xy + dv + du);
		//取最暗采样点
		float4 currentMin = min(currentTopLeft, min(currentTopCenter, min(currentTopRight, min(currentMiddleLeft, min(currentMiddleCenter, min(currentMiddleRight, min(currentBottomLeft, min(currentBottomCenter, currentBottomRight))))))));
		//取最明采样点
		float4 currentMax = max(currentTopLeft, max(currentTopCenter, max(currentTopRight, max(currentMiddleLeft, max(currentMiddleCenter, max(currentMiddleRight, max(currentBottomLeft, max(currentBottomCenter, currentBottomRight))))))));

		float scale = _TScale;
		//平均混合最明和最暗
		float4 center = (currentMin + currentMax) * 0.5f;
		//缩放明暗差
		currentMin = (currentMin - center) * scale + center;
		currentMax = (currentMax - center) * scale + center;
		//将上一帧Buffer clamp到 当前采样点 min max范围内
		previous = clamp(previous, currentMin, currentMax);
		//混合当前RT和移动前RT颜色,/velocity移动距离(速度)越大,约接近当前RT值/velocity移动距离(速度)越小,约接近移动前RT值
    	reflection = lerp(current, previous, saturate(_TResponse *  (1 - length(velocity) * 8)) );
	}
Combine Pass
混合场景颜色和反射颜色
根据mask混合_CameraReflectionsTexture和反射计算结果的值 再加上 (场景颜色-_CameraReflectionsTexture)
float4 sceneColor = SAMPLE_TEXTURE2D(_MainTex, sampler_MainTex,uv);//tex2D(_MainTex,  uv);
//场景色-cubeMap颜色
sceneColor.rgb = max(1e-5, sceneColor.rgb - cubemap.rgb);
//最终结果,混合反射结果和cubemap值
sceneColor.rgb += lerp(cubemap.rgb, reflection.rgb, mask);
此处的场景颜色为当前帧渲染source
问题
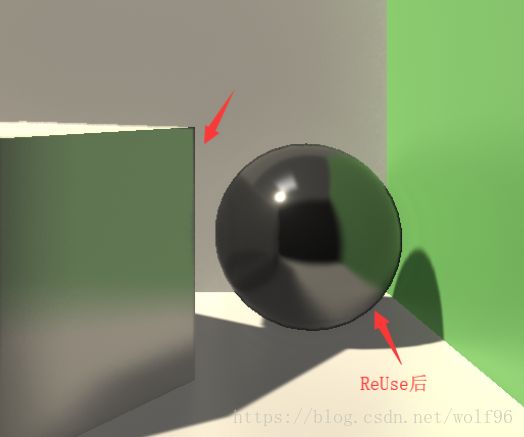
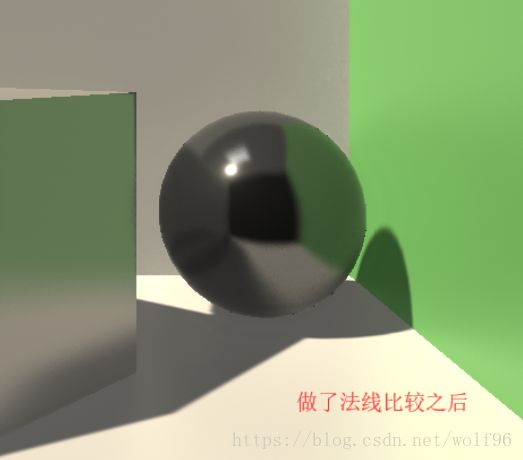
射线ReUse产生Artifact
此处可以加个判断,如果邻居点与当前点法线角度差太多就不混合结果。因为如果是粗糙表面,cone trace也有一个角度范围限制的,模拟一个面的反射,不会角度相差很多。
但是如果相邻点在角度差别不大的两个物体,依然会有artifact产生
参考:
1.[Hermanns15] Lukas Hermanns "Screen space cone tracing for glossy reflections"
http://publica.fraunhofer.de/documents/N-336466.html
----- by wolf96 https://blog.csdn.net/wolf96
