QT踩坑第十二天(网络编程实战)
QT网络编程中主要包含这几个类:
QAbstractSocket(QTcpSocket、QUdpSocket)
QNetworkInterface
QHostAdress
QUrl
QNetworkAccessManager
QNetworkReply
QWebSocket
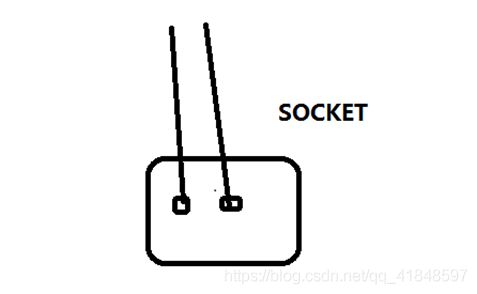
1、套接字是什么?
用一个比较形象的比喻墙上的一个插座就是一个socket(套接字)
实质上:socket是一个IO设备(基于poisx(文件锁))常见的socket包括哪些:以太网(有线 无线),CAN总线、蓝牙、NFC流式套接字、数据套接字、原始套接字
Socket简单的说就是一个IP地址加一个端口号。因为我们要传输数据,就要知道往哪个机子上传送,而IP地址确定了一台主机,但是这台机子上可能运行着各种各样的网络程序,我们要往哪个程序中发送呢?这时就要使用一个端口来指定UDP程序。所以说,Socket指明了数据报传输的路径。
2、TCP
通过NetAssist分析什么是TCP:
2.1 抓包演示三次握手
虚拟机设置:

使用虚拟网卡创建局域网让主机和虚拟机之间实现通信
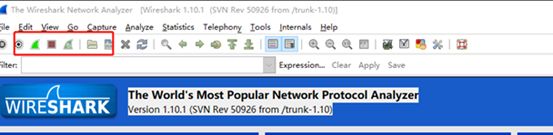
Wireshark设置网卡

启动抓包
过滤规则
udp.port = =8080

tcp.port==8080 TCP连接三次握手

连接:
Client->Server:SYN
Server->Client:SYN 、ACK
Client->Server:ACK
断开:
主动方断开:FIN、ACK被动方断开:ACK
Server->Client:FIN、ACK
Client->Server:ACK
2.2 TCP客户端开发
QtTcp通信模型:

需要掌握的接口:
connectToHost(const QHostAddress &address,quint16 port,…)//连接客户端
bool waitForConnected(int msecs=30000)//等待连接的时间
bool waitForReadyRead(int msece=3000)//实现读取数据的阻塞
void disconnectFromHost();//断开与主机的连接
void connected();//连接信号与槽
void disconnected();//断开信号与槽
void readyRead();
void bytesWritten(qint64bytes)
2.2.1、来个小程序连接Tcp服务器
TcpSocket类介绍:
tcpSocketSimpleDemo完成连接->发送->接收->关闭
pro添加模块
需要在pro文件中添加QT +=network
创建TcpSocketTest类,继承与QObject

TcpSocket.h
#ifndef TCPSOCKET_H
#define TCPSOCKET_H
#include
#include
class TcpSocket : public QObject
{
    Q_OBJECT
public:
    explicit TcpSocket(QObject *parent = nullptr);
    ~TcpSocket();
signals:
public:
    void connect2Server();
public slots:
private:
    QTcpSocket *socket=nullptr;

};

#endif // TCPSOCKET_H
main.cpp
#include
#include"TcpSocket.h"
int main(int argc, char *argv[])
{
    QCoreApplication a(argc, argv);

    TcpSocket  mTcpSocket;
    mTcpSocket.connect2Server();
    return a.exec();
}
TcpSocket.cpp
#include "TcpSocket.h"

TcpSocket::TcpSocket(QObject *parent) : QObject(parent)
{

}

TcpSocket::~TcpSocket()
{
    delete socket;
}

void TcpSocket::connect2Server()
{
    socket=new QTcpSocket;//没有它会造成内存泄漏
    socket->connectToHost("192.168.111.1",8080);//客户端连接
    if(socket->waitForConnected(300))
    {
        qDebug()<<"Connect2Server sucess";
        socket->write("hello server ,i'm client\r\n");//写信息发给服务器
        socket->waitForBytesWritten(1000);
        socket->waitForReadyRead(5000);
        qDebug()<<"Reading Data:"<bytesAvailable();
        QByteArray baData=socket->readAll();
        socket->disconnectFromHost();//断开连接
        if(socket->state()==QAbstractSocket::UnconnectedState||socket->waitForDisconnected(1000))
        {
            qDebug("Disconnected!");
        }
    }
    else
    {
        qDebug()<<"Connet2Server Error"<errorString();
    }

}
正常情况下:

服务器断开的情况下:

2.2.2 通过TcpClient小程序浅析QTcpSocket中的信号与槽

只展示一下比较重要的:
void connected();
void disconnected();
void readyRead();
void bytesWritten(qint64  bytes);
2.3.1 来个简单的TCP服务器
QTcpServer类介绍

从065535全部是标准端口,但是从01024号端口是系统端口,用户无法修改,从1025~65534端口是系统预留的端口,而65535号端口为系统保留;

插讲信号与槽的连接方式,
| 方式 | 值 | 描述 |
|---|---|---|
| Qt::AutoCounection | 0 | 默认参数:自动连接,自动选择是Direct或者Queued |
| Qt::DirectConnection | 1 | 槽函数立即执行,槽与信号再同一线程中执行 |
| – | – | – |
| Qt::QueuedConnection | 2 | 槽函数排队执行,槽函数在接收方的对象所在的线程中 |
| Qt::BlockingQueuedConnection | 3 | 阻塞式排队连接 |
| – | – | – |
| Qt::UniqueConnection | 4 | 一对一的自动连接 |
这纯属个人理解,如有需求还望查找官方文档:

如果我们使用默认参数这里会有警告:意思就是不能在不同的线程中进行操作:
![]()
这里还要讲一个线程中的归属问题,到底是thread对象中哪些属于该线程,那些属于父线程的。
推荐多线程中使用Qt::DirectConnection
使用QT做个带界面的TcpClient
在.pro中添加QT +=network(或QT +=core gui network)
widget.h
#ifndef WIDGET_H
#define WIDGET_H
#include
#include//添加此头文件时需先执行qmake
#include
#include
#include
namespace Ui {
class Widget;
}

class Widget : public QWidget
{
    Q_OBJECT

public:
    explicit Widget(QWidget *parent = 0);
    ~Widget();

private slots:
    void on_pushButtonConnectServer_clicked();

    void on_pushButton_clicked();

    void readyReadSlot();

    void disconnectedSlot();
private:
    Ui::Widget *ui;
    bool socketState;
    QTcpSocket *mSocket;
};
widget.cpp
#include "widget.h"
#include "ui_widget.h"

Widget::Widget(QWidget *parent) :
    QWidget(parent),
    ui(new Ui::Widget)
{
    ui->setupUi(this);
    mSocket =new QTcpSocket;
    socketState=false;
    connect(mSocket,SIGNAL(readyRead()),this,SLOT(readyReadSlot()));
}

Widget::~Widget()
{
    delete ui;
    delete mSocket;
}

void Widget::on_pushButtonConnectServer_clicked()
{
    QHostAddress serverAddress;
    QString serverAddressStr=ui->lineEditServerIp->text();//获取lineEditServerIp中的内容
    serverAddress=QHostAddress(serverAddressStr);//得到服务器的地址
    quint16 serverPort=ui->lineEditServerPort->text().toInt();//得到端口号
if(!socketState)
      {
    mSocket->connectToHost(serverAddress,serverPort);//连接服务器
        if(mSocket->waitForConnected(500))
        {
            qDebug()<<"connect sucess";
            ui->pushButtonConnectServer->setText(QStringLiteral("断开连接"));
            socketState=true;
        }
      else
        {
            QMessageBox::warning(this,"Connect Error",mSocket->errorString());
        }
}
else
{
    mSocket->close();
    socketState=false;
    ui->pushButtonConnectServer->setText(QStringLiteral("连接服务器"));

}


}

void Widget::on_pushButton_clicked()
{
    if(mSocket!=nullptr)
    {
        if(mSocket->isWritable())
        {
            QString sendStr=ui->plainTextEditSendData->toPlainText();//得到发送框中的内容
            QByteArray sendArray=sendStr.toLocal8Bit();//Local8Bit : 本地字符集GB与Unicode的转换
            mSocket->write(sendArray);//发送到服务器
        }
    }
}

void Widget::readyReadSlot()
{
    if(mSocket!=nullptr)
    {
        QByteArray recvArray=mSocket->readAll();//适合小数据的全部读取
        ui->textBrowserRecv->append(recvArray);
    }
}

void Widget::disconnectedSlot()
{

}
main.cpp
#include "widget.h"
#include

int main(int argc, char *argv[])
{
    QApplication a(argc, argv);
    Widget w;
    w.show();
    return a.exec();
}
运行结果:

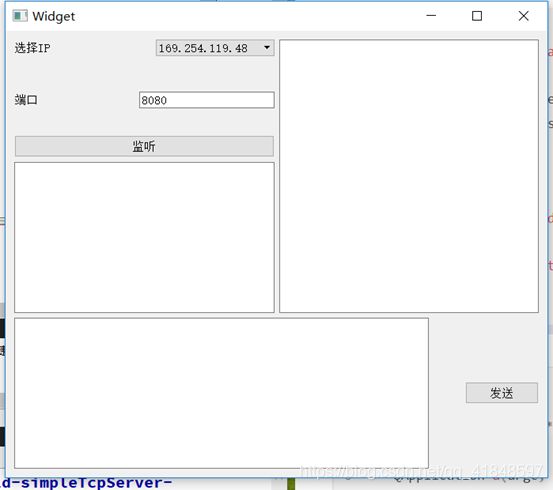
使用QT做个带界面的TcpServer
在.pro中添加QT +=network(或QT +=core gui network)
widget.h
#ifndef WIDGET_H
#define WIDGET_H

#include
#include//添加此头文件时需先执行qmake
#include
#include
#include
#include
#include
namespace Ui {
class Widget;
}

class Widget : public QWidget
{
    Q_OBJECT

public:
    explicit Widget(QWidget *parent = 0);
    ~Widget();

private slots:
    void on_pushButtonListen_clicked();
    void on_pushButton_clicked();
    void newConnectedSlot();
    void readyReadSlot();
    void disconnectedSlot();
private:
    void enumIpAddress();
private:
    Ui::Widget *ui;
    QTcpServer *mServer;
    QTcpSocket *mSocket=nullptr;
};

#endif // WIDGET_H
widget.cpp
#include "widget.h"
#include "ui_widget.h"
Widget::Widget(QWidget *parent) :
QWidget(parent),
ui(new Ui::Widget)
{
ui->setupUi(this);
mServer=new QTcpServer;
mSocket=new QTcpSocket;
enumIpAddress();
connect(mServer,SIGNAL(newConnection()),this,SLOT(newConnectedSlot()));
}
Widget::~Widget()
{
delete ui;
}
void Widget::enumIpAddress()//枚举监听到的所有的地址
{
qDebug()<<"hello";
QListlist=QNetworkInterface::allAddresses();//准备一个地址容器
QStringList addressStrList;
addressStrList.clear();
foreach(QHostAddress address,list)
{
if(address.isNull())
{
continue;
}
QAbstractSocket::NetworkLayerProtocol protocol=address.protocol();
if(protocol!=QAbstractSocket::IPv4Protocol)
continue;
addressStrList.append(address.toString());//找到一个IPv4地址添加到里面
}
ui->comboBoxAddress->addItems(addressStrList);
}
void Widget::on_pushButtonListen_clicked()
{
QString serverAddressStr=ui->comboBoxAddress->currentText();
QHostAddress serverAddress=QHostAddress(serverAddressStr);
quint16 port=ui->lineEditPort->text().toInt();
if(!mServer->isListening())
{
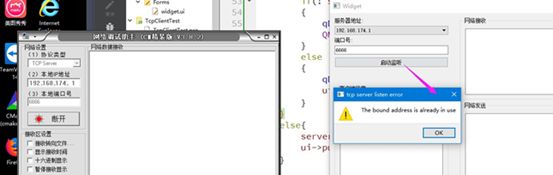
if(!mServer->listen(serverAddress,port))//判断有没有监听上
//如果没有监听上就开始监听
{
qDebug()<errorString();
QMessageBox::warning(this,"Tcp Server Listen Error",mServer->errorString());
}
else
{
qDebug()<<"listen Ok!!!!!!!!!!";
ui->pushButtonListen->setText(QStringLiteral("停止监听"));
}
}
else
{
mServer->close();
ui->pushButtonListen->setText(QStringLiteral("监听"));
mSocket=nullptr;
}
}
void Widget::on_pushButton_clicked()
{
if(mSocket!=nullptr)
{
if(mSocket->isWritable())
{
QString sendStr=ui->plainTextEditSendData->toPlainText();
QByteArray sendArray=sendStr.toLocal8Bit();
mSocket->write(sendArray);
}
}
}
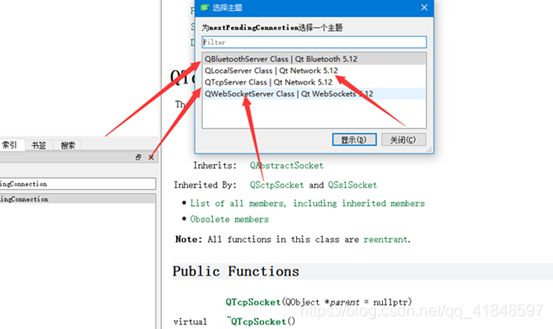
void Widget::newConnectedSlot()
{
QString clientInfo;
mSocket=mServer->nextPendingConnection();//窥视客户端消息
clientInfo="client Address:"+mSocket->peerAddress().toString()+"client Port:"+QString::number(mSocket->peerPort());
connect(mSocket,SIGNAL(readyRead()),this,SLOT(readyReadSlot()));
}
void Widget::readyReadSlot()
{
if(mSocket!=nullptr)
{
if(mSocket->isReadable())
{
QByteArray recvArry=mSocket->readAll();
ui->textBrowserRecv->append(recvArry);
}
}
}
void Widget::disconnectedSlot()
{
QMessageBox::information(this,"Tcp client close","client over");
}
main.cpp
#include "widget.h"
#include
int main(int argc, char *argv[])
{
    QApplication a(argc, argv);
    Widget w;
    w.show();

    return a.exec();
}
运行结果:
*
3.UDP
这里举个简单的例子来说明udp像qq一样当有很多用户,发送的大部分消息都是短消息,要求能及时响应,并且对安全性要求不是很高的情况下使用UDP协议。
3.1 单播
发送数据不用绑定,只要知道接收端的IP和端口即可;接收数据一定要绑定;像qq一样当有很多用户,发送的大部分消息都是短消息,要求能及时响应,并且对安全性要求不是很高的情况下使用UDP协议。

QString str=QString("[%1:%2:%3]").arg(sender.toString()).arg(port).arg(dataBuf);
3.2 广播
255.255.255.255
3.3 组播
组播地址是D类地址
1、绑定 2、加入组播 3、接收通过接收到的组播信息得到发送组播的地址、端口等等。
UDP通信实例:
widget.h
#ifndef WIDGET_H
#define WIDGET_H

#include
#include
namespace Ui {
class Widget;
}

class Widget : public QWidget
{
    Q_OBJECT
public:
    explicit Widget(QWidget *parent = 0);
    ~Widget();

private slots:
    void on_pushButtonbroadcast_clicked();

private:
    Ui::Widget *ui;
    QUdpSocket *sender;
};
#endif // WIDGET_H
widget.cpp
#include "widget.h"
#include "ui_widget.h"
Widget::Widget(QWidget *parent) :
QWidget(parent),
ui(new Ui::Widget)
{
ui->setupUi(this);
sender=new QUdpSocket(this);//析构时会自动回收其对象QUdpSocket
}
Widget::~Widget()
{
delete ui;
}
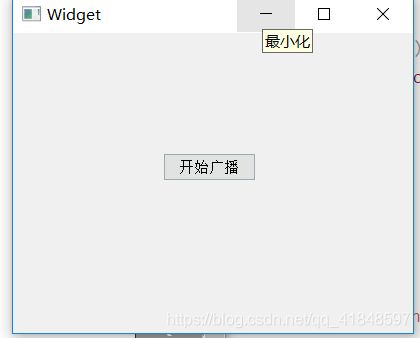
void Widget::on_pushButtonbroadcast_clicked()
{
QByteArray datagram="hello world";//定义了一个QByteArray类型的数据报datagram
//发送数据报
sender->writeDatagram(datagram.data(),//数据报的内容
datagram.size(),//数据报的大小(最好不要超过512字节)
QHostAddress::Broadcast,//使用的广播地址
8080);//端口
}
UdpReceive:
widget.h
#ifndef WIDGET_H
#define WIDGET_H

#include
#include
namespace Ui {
class Widget;
}

class Widget : public QWidget
{
    Q_OBJECT

public:
    explicit Widget(QWidget *parent = 0);
    ~Widget();
private slots:
    void processPendingDatagram();
private:
    Ui::Widget *ui;
    QUdpSocket *receiver;
};

#endif // WIDGET_H
widget.cpp
#include "ui_widget.h"
Widget::Widget(QWidget *parent) :
QWidget(parent),
ui(new Ui::Widget)
{
ui->setupUi(this);
receiver=new QUdpSocket(this);
receiver->bind(8080,QUdpSocket::ShareAddress);//将接受绑定到8080端口
connect(receiver,SIGNAL(readyRead()),this,SLOT(processPendingDatagram()));
}
Widget::~Widget()
{
delete ui;
}
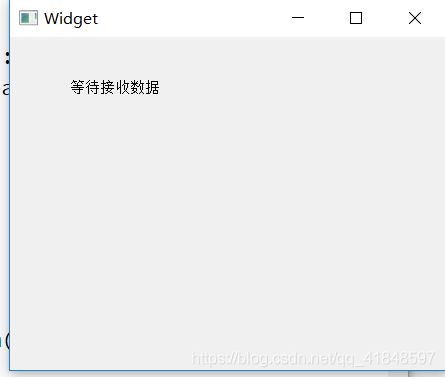
void Widget::processPendingDatagram()
{
while(receiver->hasPendingDatagrams())//拥有等待的数据报
{
QByteArray datagram;//拥有存放接收的数据报
//这里需要让datagram的大小为等待处理数据报的大小,这样才能收到完整的数据
datagram.resize(receiver->pendingDatagramSize());
receiver->readDatagram(datagram.data(),datagram.size());//接收数据报,将其存放在datagram中
ui->label->setText(datagram);
}
}
点击开始广播:
