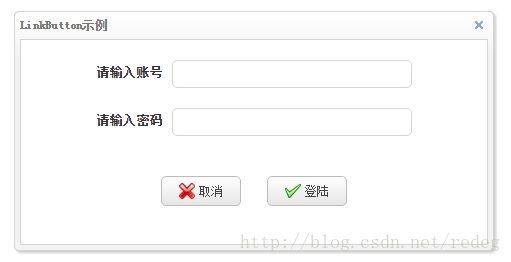
【连载】研究EasyUI系统— LinkButton组件
linkbutton是easyui框架中的按钮组件,也是其他诸如MenuButton等各种形式按钮组件的父组件。linkbutton基于html中标签创建,用户可以在按钮中添加图标和文字,是一种很常用的组件。

上图中的“取消”和“登陆”按钮就是linkbutton。来看一下具体代码。
linkbuttonDemo.php
<html>
    <head>
        <meta http-equiv="Content-Type" content="text/html; charset=UTF-8">
        <link rel="stylesheet" type="text/css" href="easyui/themes/bootstrap/easyui.css" />
        <link rel="stylesheet" type="text/css" href="easyui/themes/icon.css" />
        <script type="text/javascript" src="easyui/jquery.min.js">script>
        <script type="text/javascript" src="easyui/jquery.easyui.min.js">script>
        <title>linkbuttonDemotitle>
        <style>
            .container {
                text-align: center;
                width: 100%;
            }
            .inputContainer {
                width:400px;
                margin: auto;
                margin-top: 20px;
            }
            .inputLabel {
                font-size: 13px;
                padding-right: 10px;
                font-weight: bold;
            }
            .inputButton {
                margin-top: 40px;
            }
        style>
    head>
    <body>
        <div class="easyui-window" id="winButton">
            <div class="container">
                <div class="inputContainer">
                    <label class="inputLabel">请输入账号label>
                    <input class="easyui-textbox" data-options="height:28,width:240">
                div>
                <div class="inputContainer">
                    <label class="inputLabel">请输入密码label>
                    <input class="easyui-textbox" type="password" data-options="height:28,width:240">
                div>
                <a id="btnCancel" class="easyui-linkbutton inputButton" href="javascript:void(0)">a>
                <a id="btnLogin" class="easyui-linkbutton inputButton" href="javascript:void(0)" style="margin-left: 20px">a>
            div>
        div>
        <script>
            $("#winButton").window({
                title:'LinkButton示例',
                width:480,
                height:240,
                collapsible:false,
                minimizable:false,
                maximizable:false
            });

            $("#btnCancel").linkbutton({
                iconCls:'icon-cancel',
                width:80,
                height:30,
                text:'取消',
                onClick:function() {
                    $('#winButton').window('close');
                }
            });

            $("#btnLogin").linkbutton({
                iconCls:'icon-ok',
                width:80,
                height:30,
                text:'登陆'
            });
        script>
    body>
html>
上例代码我们只对“取消”按钮做了事件处理,点击“取消”按钮,隐藏整个对话框(window组件),但未对“登陆”按钮做任何处理,用户可以根据实际项目编写对应代码。
linkbutton组件属性
| 属性名称 | 属性值类型 | 属性默认值 | 描述 |
|---|---|---|---|
| width | 数值 | null | 组件宽度。 |
| height | 数值 | null | 组件高度。 |
| id | 字符串 | null | 组件id。 |
| disabled | 布尔值 | false | 是否禁用组件。 |
| toggle | 布尔值 | false | 值为true时可设定按钮处于选中或未选中状态。 1.3.3及以上版本支持。 |
| selected | 布尔值 | false | 如值为true,用户可将按钮设为选中状态。 1.3.3及以上版本支持。 |
| group | 字符串 | null | 通过设置组名将按钮分组。 |
| plain | 布尔值 | false | 值为true时按钮外观无凸起效果。 |
| text | 字符串 | ” | 按钮标题。 |
| iconCls | 字符串 | null | 按钮图标样式。 |
| iconAlign | 字符串 | ‘left’ | 按钮图标位置。 有’left’、’right’、’top’、’bottom’四个值。 1.3.2及以上版本支持。 |
| size | 字符串 | ‘small’ | 按钮大小。有’small’、’large’四个值。 1.3.6及以上版本支持。 |
disabled属性决定是否禁用按钮,一旦按钮禁用,按钮就无法点击,相关的事件也无法触发。下图展示“登陆”按钮禁用时的状态。

我们先看下面的效果图和一段代码,然后将toggle、selected、group三者结合起来讲述。

linkbuttonToggleDemo.php
<html>
    <head>
        <meta http-equiv="Content-Type" content="text/html; charset=UTF-8">
        <link rel="stylesheet" type="text/css" href="easyui/themes/bootstrap/easyui.css" />
        <link rel="stylesheet" type="text/css" href="easyui/themes/icon.css" />
        <script type="text/javascript" src="easyui/jquery.min.js">script>
        <script type="text/javascript" src="easyui/jquery.easyui.min.js">script>
        <title>linkbuttonToggleDemotitle>
    head>
    <body>
        <div class="container">
            <a id="btn1" class="easyui-linkbutton" href="javascript:void(0)">a>
            <a id="btn2" class="easyui-linkbutton" href="javascript:void(0)" style="margin-left: 20px">a>
            <a id="btn3" class="easyui-linkbutton" href="javascript:void(0)" style="margin-left: 20px">a>
            <a id="btn4" class="easyui-linkbutton" href="javascript:void(0)" style="margin-left: 20px">a>
        div>

        <script>
            $("#btn1").linkbutton({
                iconCls:'icon-ok',
                width:80,
                height:30,
                text:'按钮1',
                toggle:true,
                group:'g1'
            });

            $("#btn2").linkbutton({
                iconCls:'icon-add',
                width:80,
                height:30,
                text:'按钮2',
                toggle:true,
                group:'g1'
            });

            $("#btn3").linkbutton({
                iconCls:'icon-save',
                width:80,
                height:30,
                text:'按钮3',
                toggle:true,
                group:'g1'
            });

            $("#btn4").linkbutton({
                iconCls:'icon-cancel',
                width:80,
                height:30,
                text:'按钮4',
                toggle:true,
                group:'g1'
            });
        script>
    body>
html>
linkbuttonToggleDemo.php是上图的具体实现代码。可以看到,按钮2处于”selected”状态(即按下状态),这就是”selected”属性的效果,按钮的”selected”属性设置为true时,该按钮即为按下状态。
“toggle”属性的作用为是否允许按钮可以处于按下状态,如果为true,那么用户点击该按钮时,按钮就呈现按下状态,再点击一下,又恢复正常。
“group”属性对按钮分组,组名可以根据需要任意取名,本例为”g1”,且四个按钮group属性值都一样,均为”g1”,表明四个按钮属于同一组。分组属性一般配合toggle属性使用,在同一分组内的多个按钮,同一时刻只允许一个按钮处于”selected”状态(即按下状态)。上图中按钮2处于按下状态,一旦点击其他按钮(如按钮1)后,按钮1处于按下状态,按钮2同时复原。
plain指定外观是否为凸起。下图中左侧按钮plain属性为true,右侧为false。

text属性指定按钮文字,如“取消”、“登陆”。
iconCls指定图标样式,本文代码中的图标样式均为easyui框架自带。为方便查看,我们会将系统自带的图标样式做一个整理,单独一文呈现。
iconAlign指定图标位置,默认为”left”(左侧),本文效果图中按钮的图标均在左侧。除此之外,还可以是”right”、”top”、”bottom”(分别为右侧、顶部、底部)。
size属性指定按钮大小,只有两个值”small”和”large”,效果如下。

linkbutton组件方法
| 方法名称 | 参数 | 描述 |
|---|---|---|
| options | 无 | 返回所有属性。 |
| resize | param | 调整按钮大小。1.4及以上版本支持。 |
| disable | 无 | 禁用按钮。 |
| enable | 无 | 启用按钮。 |
| select | 无 | 使按钮处于选中状态。1.3.3及以上版本支持。 |
| unselect | 无 | 取消按钮的选中状态。1.3.3及以上版本支持。 |
resize方法参数是一个json对象,含宽度和高度,layout一文有介绍。
(http://blog.csdn.net/redeg/article/details/65443712)
其他方法很简单,不多做介绍。
linkbutton组件事件
| 事件名称 | 参数 | 描述 |
|---|---|---|
| onClick | 无 | 点击按钮时触发。1.3.6及以上版本支持。 |
该方法已在linkbuttonDemo.php中描述,此处不赘述。另外,用户也可直接使用标签中js原生的onclick事件,效果是一样的。