Spring Could+Ant Design Pro表格数据加载
由于公司最近项目使用Ant Design Pro,所以就学习了一下,以前公司使用的是easyui,所以这也是我的第一次学习尝试,记录一下,有不足大家帮忙指正。
后台是Spring Could,使用Nacos作为服务注册中心注册。
表格加载
打开Ant Design Pro项目
修改配置,解决跨域问题,让它能连接到我们的项目的网关
修改vue.config.js
找到节点devServer,修改如下:
devServer: {
    // development server port 8000
    port: 8000,
    open: true, //是否自动弹出浏览器页面
    proxy: {
      '/': {
        target: 'http://localhost:9014/', //API服务器的地址(spring could网关端口号)
        ws: false,  //代理websockets
        changeOrigin: true, // 虚拟的站点需要更管origin
        pathRewrite: {   //重写路径 比如'/api/aaa/ccc'重写为'/aaa/ccc'
          '^/': ''
        }
      }
    },
  },
为了不影响其他演示的页面,我们在 src/utils下新增一个springRequest.js,基本上是复制了request.js,我们只是对其做了一点点的修改,修改baseURL,让它连接到我们的网关中
import axios from 'axios'
import store from '@/store'
import {
  VueAxios
} from './axios'
import notification from 'ant-design-vue/es/notification'
// import {
//   ACCESS_TOKEN
// } from '@/store/mutation-types'

// 创建 axios 实例
const request = axios.create({
  // API 请求的默认前缀
  baseURL: '/',
  timeout: 6000 // 请求超时时间
})

// 异常拦截处理器
const err = (error) => {
  if (error.response) {
    const data = error.response.data
    const token = localStorage.getItem('token')
    if (error.response.status === 403) {
      notification.error({
        message: 'Forbidden',
        description: data.message
      })
    }
    if (error.response.status === 401 && !(data.result && data.result.isLogin)) {
      notification.error({
        message: 'Unauthorized',
        description: 'Authorization verification failed'
      })
      if (token) {
        store.dispatch('Logout').then(() => {
          setTimeout(() => {
            window.location.reload()
          }, 1500)
        })
      }
    }
  }
  return Promise.reject(error)
}

// request interceptor
request.interceptors.request.use(config => {
  const token = localStorage.getItem('token')
  if (token) {
    config.headers['Access-Token'] = token // 让每个请求携带自定义 token 请根据实际情况自行修改
  }
  return config
}, err)

// response interceptor
request.interceptors.response.use((response) => {
  return response.data
}, err)

const installer = {
  vm: {},
  install (Vue) {
    Vue.use(VueAxios, request)
  }
}

export default request

export {
  installer as VueAxios,
  request as axios
}
在我们的src/api文件夹中,新增bizConfig.js文件
让它访问我们的网关
import { axios } from '@/utils/springRequest'
const api = {
  tbInspectFileList: '/api/TbInspectFileController/tbInspectFile/list',
  get_type_name: '/api/TbInspectFileController/tbInspectFile/getTypeName'
}
export default api
//表格
export function tbInspectFileList (param) {
  return axios({
    url: api.tbInspectFileList,
    method: 'post',
    params: param
  })
},
//下拉框
export function getTypeName () {
  return axios({
    url: api.get_type_name,
    method: 'post'
  })
}
在src/views下,新增bizConfig文件,新增Search_Value_Set.vue
<template>
  <a-card :bordered="false">
    <div class="table-page-search-wrapper">
      <a-form layout="inline">
        <a-row>
          <a-col :md="10" :sm="24">
            <a-form-item
              label="名称">
              <!--              <a-input v-model="queryParam.typeName" placeholder=""/>-->
              <a-select showSearch v-model="queryParam.typeName">
                <a-select-option v-for="d in templateDatas" :key="d.value" :value="d.value">{{ d.text }}</a-select-option>
              </a-select>
            </a-form-item>
            <a-form-item
              label="别名">
              <a-input v-model="queryParam.typeAlias" placeholder=""/>
            </a-form-item>
          </a-col>
          <a-col :md="10" :sm="24">
            <a-form-item
              label="上传人">
              <a-input v-model="queryParam.typeValue" placeholder=""/>
            </a-form-item>
            <a-form-item
              label="类型">
              <a-select v-model="queryParam.enabled" default-Value="2" placeholder="请选择">
                <a-select-option value="2">视频</a-select-option>
                <a-select-option value="1">图片</a-select-option>
              </a-select>
            </a-form-item>
          </a-col>
          <a-col :md="10" :sm="24">
            <div class="table-operator" >
            </div>
          </a-col>
          <a-col :md="10" :sm="24">
            <span class="table-page-search-submitButtons" :style="{ float: 'right', overflow: 'hidden' } || {} ">
              <a-button type="primary" icon="plus" :style="{'margin-right':'20px'}" @click="$refs.createModal.add(templateDatas)">新建</a-button>
              <a-button type="primary" @click="$refs.table.refresh(true)">查询</a-button>
            </span>
          </a-col>
        </a-row>
      </a-form>
    </div>
    <s-table
      ref="table"
      size="default"
      rowKey="id"
      :columns="columns"
      :data="loadData"
      hideOnSinglePage="false"
      showPagination="auto">
      <template slot="operation" slot-scope="text, record">
        <span>
          <a-divider type="vertical"/>
          <a-popconfirm title="是否要删除此行?" @confirm="remove(record.id)">
            <a>删除</a>
          </a-popconfirm>
        </span>
      </template>
    </s-table>
    <create-form ref="createModal" @ok="handleOk"/>
  </a-card>
</template>

<script>
  import { STable, Ellipsis } from '@/components'
  import CreateForm from './modules/CreateForm'
  import { tbInspectFileList, getTypeName } from '@/api/bizConfig'

  export default {
    name: 'SearchValueSet',
    components: {
      STable,
      Ellipsis,
      CreateForm
    },
    data () {
      return {
        mdl: {},
        // 查询参数
        queryParam: {},
        // 表头
        columns: [
          {
          title: '行号',
          // scopedSlots: { customRender: 'serial' }
          width: 80,
          // customRender: (text, record, index) => `${index + 1}`
          customRender: function (text, record, index) {
            return index + 1
          }
          },
          {
          title: '主键',
          dataIndex: 'id'
          },
          {
            title: '此次记录所对应的工单编号',
            dataIndex: 'orderCode'
          },
          {
            title: '图片或视频存储的路径信息',
            dataIndex: 'filePath'
          },
          {
            title: '类型',
            dataIndex: 'fileExtType',
            customRender: function (text) {
              if (text === 1){ //eslint-disable-line
                return '图片'
              } else {
                return '视频'
              }
            }
          },
          {
            title: '上传人',
            dataIndex: 'uploadUser'
          },
          {
            title: '操作',
            key: 'action',
            scopedSlots: { customRender: 'operation' }
          }
        ],
        // 加载数据方法 必须为 Promise 对象
        loadData: parameter => {
          return tbInspectFileList(Object.assign(parameter, this.queryParam))
            .then(res => {
              return res.result
            })
        },
        optionAlertShow: true,
        templateDatas: []
      }
    },
    filters: {
      // enabledFilter (type) {
      //   return enabledMap[type].text
      // },
      // enabledValueFilter (type) {
      //   return enabledMap[type].enabled
      // }
    },
    created () {
      this.fetchTypeNameData()
      // this.queryParam.enabled = '2'
      // getRoleList({ t: new Date() })
    },
    methods: {
    //加载下拉框
      fetchTypeNameData () {
        getTypeName().then((res) => {
          const result = res.result
          result.forEach((r) => {
            this.templateDatas.push({
              value: r.orderCode,
              text: r.id
            })
          })
        })
      }
    }
  }
</script>

<style scoped>

</style>
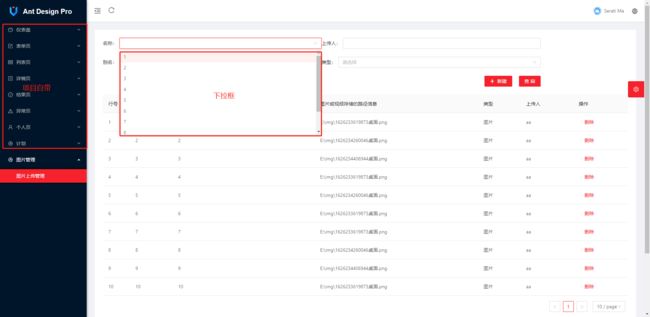
到这一步就算写完了,新增菜单的方法可以在网上找。本来在我本地还做了增删改查的方法,但在本文中我给删掉了,下面是效果:

后台传入数据

分页效果也可以自己改,在components/Table/index.js中159行,可以全局修改,如下所示:
result.then(r => {
          this.localPagination = Object.assign({}, this.localPagination, {
            current: r.pageNo, // 返回结果中的当前分页数
            total: r.totalCount, // 返回结果中的总记录数
            showSizeChanger: this.showSizeChanger,
            pageSize: (pagination && pagination.pageSize) ||
              this.localPagination.pageSize
          })
          // 为防止删除数据后导致页面当前页面数据长度为 0 ,自动翻页到上一页
          if (r.data.length === 0 && this.localPagination.current !== 1) {
            this.localPagination.current--
            this.loadData()
            return
          }

          // 这里用于判断接口是否有返回 r.totalCount 或 this.showPagination = false
          // 当情况满足时,表示数据不满足分页大小,关闭 table 分页功能

          (!this.showPagination || !r.totalCount && this.showPagination === 'auto') && (this.localPagination = false)
          this.localDataSource = r.data // 返回结果中的数组数据
          this.localLoading = false
        })