用mmdetection训练和测试自己的数据集(LabelImg,xml,VOC格式)
前提:当你安装好mmdetection后
1.用LabelImg标注自己的数据集,获得与照片对应的一堆xml文件
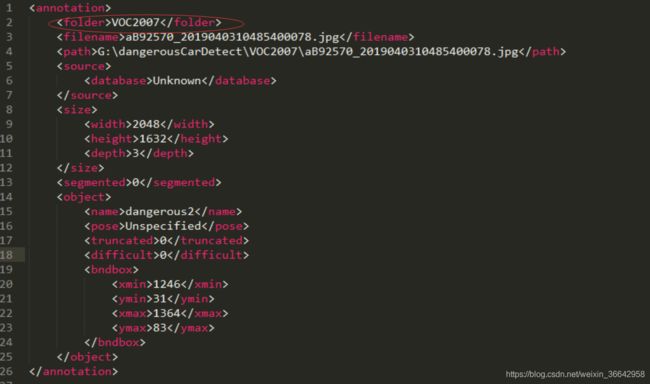
(注:如果你是先在别的电脑用LabelImg标注,xml文件里的
图片文件名不要有中文
2.按VOC的格式放置好自己的数据集
在mmdetection文件夹下新建一个“data”文件夹
在data文件夹下再新建一个“VOCdevkit”文件夹(注意大小写)
在VOCdevkit文件夹下新建一个文件夹叫“VOC2007”或“VOC2012”
之后就是开始放置数据集了:
在VOC2007数据集下分别建“Annotations”和“ImageSets”和“JPEGImages”三个文件夹
在“Annotations”文件夹中放入你所有的xml标注文件
在“JPEGImages”文件夹中放入你数据集里的所有照片
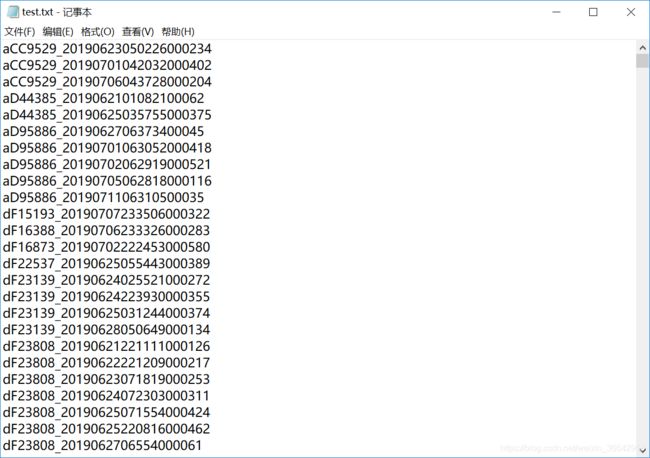
在“ImgaeSets”文件夹中再新建一个“Main”文件夹,在“Main”中放入“train.txt”,"trainval.txt","val.txt","test.txt"。(一开始训练阶段时没有test.txt也可以运行train.py)
这些txt文件里保存的是图片的名字,如图
这里提供一个简易的划分数据集代码(获得四个txt)
import os
import random

trainval_percent = 0.8
train_percent = 0.75
xmlfilepath = 'G:\dangerousCarDetect\VOC2007\Annotations'
txtsavepath = 'G:\dangerousCarDetect\VOC2007\main'
total_xml = os.listdir(xmlfilepath)

num=len(total_xml)
list=range(num)
tv=int(num*trainval_percent)
tr=int(tv*train_percent)
trainval= random.sample(list,tv)
train=random.sample(trainval,tr)

ftrainval = open(r'G:\dangerousCarDetect\VOC2007\main\trainval.txt', 'w')
ftest = open(r'G:\dangerousCarDetect\VOC2007\main\test.txt', 'w')
ftrain = open(r'G:\dangerousCarDetect\VOC2007\main\train.txt', 'w')
fval = open(r'G:\dangerousCarDetect\VOC2007\main\val.txt', 'w')

for i  in list:
    name=total_xml[i][:-4]+'\n'
    if i in trainval:
        ftrainval.write(name)
        if i in train:
            ftrain.write(name)
        else:
            fval.write(name)
    else:
        ftest.write(name)

ftrainval.close()
ftrain.close()
fval.close()
ftest .close()
3.下载预训练模型
https://github.com/open-mmlab/mmdetection/blob/master/MODEL_ZOO.md
在官网上根据你想选的网络和版本,下载其中一个model
在mmdetection文件夹下新建一个“checkpoints”文件夹将下载好的model放到里面
4. 修改配置文件
mmdetection虽然支持VOC格式的数据,但是它的代码默认是调用COCO格式相关的函数的,所以有一些代码和操作会与使用coco数据集有所不同。
1)首先先来改mmdetection/configs/你下载的那个预训练模型的名字.py(比如我下载的是faster_rcnn_r50_fpn_1x_20181010-3d1b3351.pth,对应的我修改的配置文件就是faster_rcnn_r50_fpn_1x.py)
# model settings
model = dict(
    type='FasterRCNN',
    pretrained='modelzoo://resnet50',
    backbone=dict(
        type='ResNet',
        depth=50,
        num_stages=4,
        out_indices=(0, 1, 2, 3),
        frozen_stages=1,
        style='pytorch'),
    neck=dict(
        type='FPN',
        in_channels=[256, 512, 1024, 2048],
        out_channels=256,
        num_outs=5),
    rpn_head=dict(
        type='RPNHead',
        in_channels=256,
        feat_channels=256,
        anchor_scales=[8],
        anchor_ratios=[0.5, 1.0, 2.0],
        anchor_strides=[4, 8, 16, 32, 64],
        target_means=[.0, .0, .0, .0],
        target_stds=[1.0, 1.0, 1.0, 1.0],
        loss_cls=dict(
            type='CrossEntropyLoss', use_sigmoid=True, loss_weight=1.0),
        loss_bbox=dict(type='SmoothL1Loss', beta=1.0 / 9.0, loss_weight=1.0)),
    bbox_roi_extractor=dict(
        type='SingleRoIExtractor',
        roi_layer=dict(type='RoIAlign', out_size=7, sample_num=2),
        out_channels=256,
        featmap_strides=[4, 8, 16, 32]),
    bbox_head=dict(
        type='SharedFCBBoxHead',
        num_fcs=2,
        in_channels=256,
        fc_out_channels=1024,
        roi_feat_size=7,
        num_classes=4,   #改成你的数据集的类别数+1
        target_means=[0., 0., 0., 0.],
        target_stds=[0.1, 0.1, 0.2, 0.2],
        reg_class_agnostic=False,
        loss_cls=dict(
            type='CrossEntropyLoss', use_sigmoid=False, loss_weight=1.0),
        loss_bbox=dict(type='SmoothL1Loss', beta=1.0, loss_weight=1.0)))
# model training and testing settings
train_cfg = dict(
    rpn=dict(
        assigner=dict(
            type='MaxIoUAssigner',
            pos_iou_thr=0.7,
            neg_iou_thr=0.3,
            min_pos_iou=0.3,
            ignore_iof_thr=-1),
        sampler=dict(
            type='RandomSampler',
            num=256,
            pos_fraction=0.5,
            neg_pos_ub=-1,
            add_gt_as_proposals=False),
        allowed_border=0,
        pos_weight=-1,
        debug=False),
    rpn_proposal=dict(
        nms_across_levels=False,
        nms_pre=2000,
        nms_post=2000,
        max_num=2000,
        nms_thr=0.7,
        min_bbox_size=0),
    rcnn=dict(
        assigner=dict(
            type='MaxIoUAssigner',
            pos_iou_thr=0.5,
            neg_iou_thr=0.5,
            min_pos_iou=0.5,
            ignore_iof_thr=-1),
        sampler=dict(
            type='RandomSampler',
            num=512,
            pos_fraction=0.25,
            neg_pos_ub=-1,
            add_gt_as_proposals=True),
        pos_weight=-1,
        debug=False))
test_cfg = dict(
    rpn=dict(
        nms_across_levels=False,
        nms_pre=1000,
        nms_post=1000,
        max_num=1000,
        nms_thr=0.7,
        min_bbox_size=0),
    rcnn=dict(
        score_thr=0.05, nms=dict(type='nms', iou_thr=0.5), max_per_img=100)
    # soft-nms is also supported for rcnn testing
    # e.g., nms=dict(type='soft_nms', iou_thr=0.5, min_score=0.05)
)
# dataset settings
dataset_type = 'VOCDataset'  #改数据集类型
data_root = 'data/VOCdevkit/'  #改数据集路径
img_norm_cfg = dict(
    mean=[123.675, 116.28, 103.53], std=[58.395, 57.12, 57.375], to_rgb=True)
data = dict(
    imgs_per_gpu=2,
    workers_per_gpu=2,
    train=dict(
        type=dataset_type,
        ann_file=data_root + 'VOC2007/ImageSets/Main/trainval.txt', #改路径
        img_prefix=data_root + 'VOC2007/',  #改路径
        img_scale=(1333, 800),
        img_norm_cfg=img_norm_cfg,
        size_divisor=32,
        flip_ratio=0.5,
        with_mask=False,
        with_crowd=True,
        with_label=True),
    val=dict(
        type=dataset_type,
        ann_file=data_root + 'VOC2007/ImageSets/Main/val.txt',  #改路径
        img_prefix=data_root+ 'VOC2007/',  #改路径
        img_scale=(1333, 800),
        img_norm_cfg=img_norm_cfg,
        size_divisor=32,
        flip_ratio=0,
        with_mask=False,
        with_crowd=True,
        with_label=True),
    test=dict(
        type=dataset_type,
        ann_file=data_root + 'VOC2007/ImageSets/Main/test.txt',  #改路径
        img_prefix=data_root + 'VOC2007/',  #改路径
        img_scale=(1333, 800),
        img_norm_cfg=img_norm_cfg,
        size_divisor=32,
        flip_ratio=0,
        with_mask=False,
        with_label=False,
        test_mode=True))
# optimizer
optimizer = dict(type='SGD', lr=0.02, momentum=0.9, weight_decay=0.0001)
optimizer_config = dict(grad_clip=dict(max_norm=35, norm_type=2))
# learning policy
lr_config = dict(
    policy='step',
    warmup='linear',
    warmup_iters=500,
    warmup_ratio=1.0 / 3,
    step=[8, 11])
checkpoint_config = dict(interval=1)
# yapf:disable
log_config = dict(
    interval=50,  #如果数据集很小的话可以改小点
    hooks=[
        dict(type='TextLoggerHook'),
        # dict(type='TensorboardLoggerHook')
    ])
# yapf:enable
# runtime settings
total_epochs = 12
dist_params = dict(backend='nccl')
log_level = 'INFO'
work_dir = './work_dirs/faster_rcnn_r50_fpn_1x'
load_from = None
resume_from = None
workflow = [('train', 1)]
上面代码中有中文注释的地方是需要修改的地方。
其中 num_classes如果没有修改的话,train和test的时候都没有问题,但如果要看evaluation的结果时会报错显示不了。
interval也不一定要改,只是在你数据集很小的情况下如果还没有显示loss就跑完了可以把它改小看一下训练过程。
这些参数的定义可以在网上找到解释
2)修改mmdetection/mmdet/datasets/voc.py
from .registry import DATASETS
from .xml_style import XMLDataset


@DATASETS.register_module
class VOCDataset(XMLDataset):

    CLASSES = ('dangerous1', 'dangerous2', 'dangerous3') #括号内的类别改成你的数据集的类别

    def __init__(self, **kwargs):
        super(VOCDataset, self).__init__(**kwargs)
        if 'VOC2007' in self.img_prefix:
            self.year = 2007
        elif 'VOC2012' in self.img_prefix:
            self.year = 2012
        else:
            raise ValueError('Cannot infer dataset year from img_prefix')
将CLASSES内的类别改为自己数据集里的类别
3)修改mmdetection/mmdet/core/evaluation/class_names.py
import mmcv


def wider_face_classes():
    return ['face']


def voc_classes():
    return [
        'dangerous1', 'dangerous2', 'dangerous3'
    ]
    #改类别名

...
把return里的类别名改为你数据集里的类别名
5. 训练自己的数据集
官网有命令的参数介绍,这里放本文的例子
python tools/train.py configs/faster_rcnn_r50_fpn_1x.py6.测试自己的数据集
例子:
python tools/test.py configs/faster_rcnn_r50_fpn_1x.py work_dirs/faster_rcnn_r50_fpn_1x/latest.pth --show选择--show就是把结果图片展示出来,不会把结果保存
work_dirs/faster_rcnn_r50_fpn_1x/latest.pth是我训练模型的最近结果
用test.py测试的图片都需要有对应的xml标注,因为后面要计算正确率等。
7.evaluation
官网上说直接在测试的时候加上--eval bbox 之类的就可以了,但这是针对coco数据集的,test.py里直接调用了coco_eval,要修改的地方很多。
所以应该要先将结果保存(--out后面是保存的路径)
python tools/test.py configs/faster_rcnn_r50_fpn_1x.py work_dirs/faster_rcnn_r50_fpn_1x/latest.pth --out work_dirs/result.pkl
然后再另外调用voc_eval.py,就可以看到结果啦
python tools/voc_eval.py work_dirs/result.pkl configs/faster_rcnn_r50_fpn_1x.py8.测试还未标注过的图片
demo.py
from mmdet.apis import init_detector, inference_detector, show_result
import os
import os.path

config_file = 'configs/faster_rcnn_r50_fpn_1x.py'
checkpoint_file = 'work_dirs/model4.pth'

model = init_detector(config_file, checkpoint_file)


#img = 'test.jpg'
#result = inference_detector(model, img)
#show_result(img, result, model.CLASSES, out_file='testOut.jpg')


#imgs = ['test.jpg', 'test1.jpg', 'test2.jpg']

path = 'testImg_notag/6/'
imgs = []
for file in os.listdir(path):
  file_path = os.path.join(path, file)
  imgs.append(file_path)

for i, result in enumerate(inference_detector(model, imgs)):
    show_result(imgs[i], result, model.CLASSES, out_file='testImg_result/6/'+os.path.basename(imgs[i]))


