springboot源码阅读之Application.run()--new SpringApplication(primarySources)
1.通过SpringApplication.run(DemoApplication.class, args);进入run方法。
2.用一个Class数组把传入的Class对象装起来,调用另一个run方法。
public static ConfigurableApplicationContext run(Class primarySource, String... args) {
        return run(new Class[]{primarySource}, args);
    }
3.这个方法就是对SpringApplication进行初始化,初始化参数为传入的Class[],然后调用SpringApplication实例的run方法,传入系统参数args。
public static ConfigurableApplicationContext run(Class[] primarySources, String[] args) {
        return (new SpringApplication(primarySources)).run(args);
    }
4.创建了一个为null的ResouceLoader,调用另一个构造函数,这里primarySources是Class[]类,里面有一个元素DemoApplication.class。
public SpringApplication(Class... primarySources) {
        this((ResourceLoader)null, primarySources);
    }
5.SpringApplication的构造函数,对下列的组件进行了初始化。然后将我们传入的DemoApplication.class放在了一个LinkedHashSet结构的primarySources属性里面,然后开始最后四行代码的初始化。
public SpringApplication(ResourceLoader resourceLoader, Class... primarySources) {
        this.sources = new LinkedHashSet();
        this.bannerMode = Mode.CONSOLE;
        this.logStartupInfo = true;
        this.addCommandLineProperties = true;
        this.addConversionService = true;
        this.headless = true;
        this.registerShutdownHook = true;
        this.additionalProfiles = new HashSet();
        this.isCustomEnvironment = false;
        this.lazyInitialization = false;
        this.resourceLoader = resourceLoader;
        Assert.notNull(primarySources, "PrimarySources must not be null");
//把DemoApplication.class放到primarySources中
        this.primarySources = new LinkedHashSet(Arrays.asList(primarySources));
//根据依赖的jar包推断该项目是Reactive还是Servlet项目
        this.webApplicationType = WebApplicationType.deduceFromClasspath();
//把从META-INF/spring.factory文件下获取到的ApplicationContextInitializer.class的实例保存到initializers属性当中
        this.setInitializers(this.getSpringFactoriesInstances(ApplicationContextInitializer.class));
//把从META-INF/spring.factory文件下获取到的ApplicationListener.class的实例保存到listeners属性当中
        this.setListeners(this.getSpringFactoriesInstances(ApplicationListener.class));
//根据堆栈轨迹推断调用当前方法的main的类名,然后保存到mainApplicationClass属性当中
        this.mainApplicationClass = this.deduceMainApplicationClass();
    }
6-1.WebApplicationType.deduceFromClassPath()该方法从类路径推断,返回的WebApplicationType是一个枚举类型包含了三个参数,NONE、SERVLET、REACTIVE,根据我们引入的依赖包来判断当前项目是Servlet项目还是Reactive项目。 代码内部主要是通过反射获取类路径下的DispatcherHandler、DispatcherServlet等类,如果没有找到相应的类则ClassUtil.ispresent()返回false。
static WebApplicationType deduceFromClasspath() {
        if (ClassUtils.isPresent("org.springframework.web.reactive.DispatcherHandler", (ClassLoader)null) && !ClassUtils.isPresent("org.springframework.web.servlet.DispatcherServlet", (ClassLoader)null) && !ClassUtils.isPresent("org.glassfish.jersey.servlet.ServletContainer", (ClassLoader)null)) {
            return REACTIVE;
        } else {
            String[] var0 = SERVLET_INDICATOR_CLASSES;
            int var1 = var0.length;

            for(int var2 = 0; var2 < var1; ++var2) {
                String className = var0[var2];
                if (!ClassUtils.isPresent(className, (ClassLoader)null)) {
                    return NONE;
                }
            }

            return SERVLET;
        }
    }
6-2.this.setInitializers(this.getSpringFactoriesInstances(ApplicationContextInitializer.class));该方法跟进去走到最后,主要是调用了loadSpringFactories(@Nullable ClassLoader classLoader)方法,先是从缓存cache中获取结果,如果没有则用类加载器加载META-INF/spring.factories文件,有指定的类加载器就使用指定的,没有就使用系统类加载器。loadSpringFactories(@Nullable ClassLoader classLoader)方法的作用其实就是加载META-INF/spring.factories中的字符串,将spring.factories中配置的接口对应的实现类名称获取到,存入到result的map当中,经过处理之后返回一个names的Set集合,然后创建实例。
private  Collection getSpringFactoriesInstances(Class type) {
        return this.getSpringFactoriesInstances(type, new Class[0]);
    }

private  Collection getSpringFactoriesInstances(Class type, Class[] parameterTypes, Object... args) {
        ClassLoader classLoader = this.getClassLoader();
//获取到type接口的所有实现类的全限定名
        Set names = new LinkedHashSet(SpringFactoriesLoader.loadFactoryNames(type, classLoader));
//根据spring.factories中的实现类的全限定名去加载类
        List instances = this.createSpringFactoriesInstances(type, parameterTypes, classLoader, args, names);
//对获取到的实例集合进行排序
        AnnotationAwareOrderComparator.sort(instances);
        return instances;
    }

public static List loadFactoryNames(Class factoryType, @Nullable ClassLoader classLoader) {
        String factoryTypeName = factoryType.getName();
        return (List)loadSpringFactories(classLoader).getOrDefault(factoryTypeName, Collections.emptyList());
    }

private static Map> loadSpringFactories(@Nullable ClassLoader classLoader) {
        MultiValueMap result = (MultiValueMap)cache.get(classLoader);
        if (result != null) {
            return result;
        } else {
            try {
    //urls中包含了spring.factories配置的类
                Enumeration urls = classLoader != null ? classLoader.getResources("META-INF/spring.factories") : ClassLoader.getSystemResources("META-INF/spring.factories");
                LinkedMultiValueMap result = new LinkedMultiValueMap();

                while(urls.hasMoreElements()) {
                    URL url = (URL)urls.nextElement();
                    UrlResource resource = new UrlResource(url);
                    Properties properties = PropertiesLoaderUtils.loadProperties(resource);
                    Iterator var6 = properties.entrySet().iterator();

                    while(var6.hasNext()) {
                        Entry entry = (Entry)var6.next();
                        String factoryTypeName = ((String)entry.getKey()).trim();
                        String[] var9 = StringUtils.commaDelimitedListToStringArray((String)entry.getValue());
                        int var10 = var9.length;

                        for(int var11 = 0; var11 < var10; ++var11) {
                            String factoryImplementationName = var9[var11];
    //把每个配置的接口的名称和实现类的名称都添加到result这个map当中
                            result.add(factoryTypeName, factoryImplementationName.trim());
                        }
                    }
                }
//这个cache应该是存储了所有类加载器对应加载的类的族,此处只是猜想,没有验证
                cache.put(classLoader, result);
                return result;
            } catch (IOException var13) {
                throw new IllegalArgumentException("Unable to load factories from location [META-INF/spring.factories]", var13);
            }
        }
    }

private Class deduceMainApplicationClass() {
        try {
//获取调用到当前方法调用堆栈轨迹
            StackTraceElement[] stackTrace = (new RuntimeException()).getStackTrace();
            StackTraceElement[] var2 = stackTrace;
            int var3 = stackTrace.length;
//遍历堆栈轨迹
            for(int var4 = 0; var4 < var3; ++var4) {
                StackTraceElement stackTraceElement = var2[var4];
//找到main入口,返回调用main方法的类
                if ("main".equals(stackTraceElement.getMethodName())) {
                    return Class.forName(stackTraceElement.getClassName());
                }
            }
        } catch (ClassNotFoundException var6) {
            ;
        }

        return null;
    }
下图是spring-boot-autoconfigure包里的部分内容,具体该文件的其他作用后面再研究。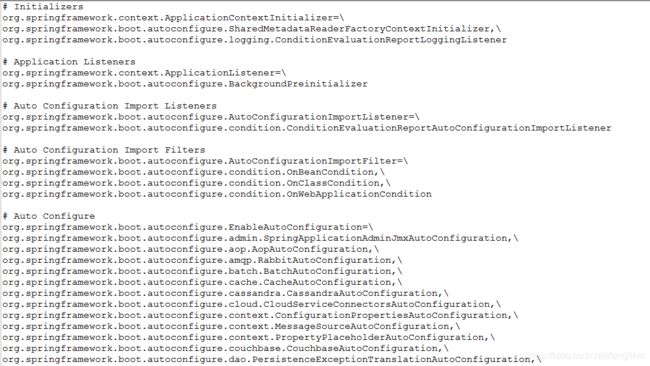
上面就是new SpringApplication(primarySources)的构造过程了,主要就是对SpringApplication类进行了初始化,下期再分析run(args)方法的源码。(避免大家看到这里忘掉前面说的东西,把入口代码在下面再贴一次)
public static ConfigurableApplicationContext run(Class[] primarySources, String[] args) {
        return (new SpringApplication(primarySources)).run(args);
    }