Android Studio实现网络版音乐播放器(简单易上手)
项目目录
- 一、项目概述
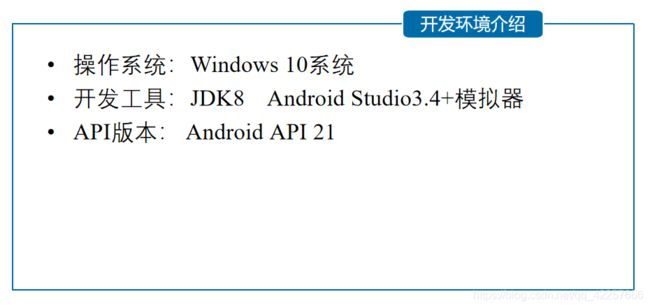
- 二、开发环境
- 三、准备工作
-
- 1、安装和配置好JDK
- 2、安装和配置好Tomcat
- 3、放置音乐和视频文件
- 4、获取本地网络地址
- 四、MediaPlayer类播放音频
-
- 1、功能简介
- 2、常用方法
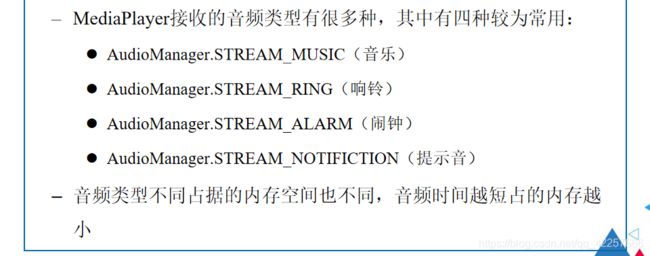
- 3、创建和设置音频类型
- 4、设置数据源
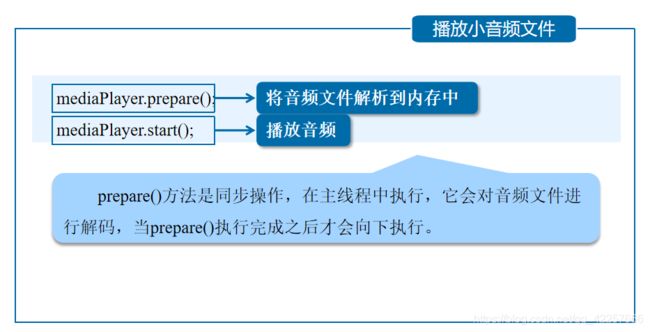
- 5、播放音频
- 6、暂停播放
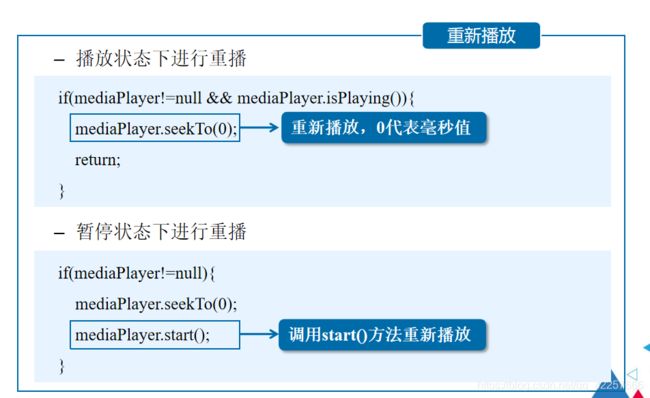
- 7、重新播放
- 8、停止播放
- 五、VideoView控件播放视频
-
- 1、概念和功能
- 2、常用方法
- 3、使用VideoView控件
- 4、添加控制器
- 5、SurfaceView控件
- 6、addCallback()方法
- 7、MediaPlayer播放视频
- 六、类和布局文件介绍
-
- 1、类的介绍
-
- 1.1、MainActivity类
- 1.2、frag1类
- 1.3、frag2类
- 1.4、MusicService类
- 1.5、Music_Activity类
- 1.6、video_Activity类
- 2、布局文件设计
-
- 2.1、主界面
- 2.2、音乐列表界面
- 2.3、布局条目
- 2.4、音乐播放器界面
- 2.5、视频列表界面
- 2.6、视频条目
- 2.7、视频播放界面
- 七、运行效果
- 八、项目总结
- 九、源码下载
一、项目概述
这次的网络版音乐视频播放器是在前面讲到的音乐播放器项目(Android Studio如何实现音乐播放器)基础上,将音乐文件与项目文件独立开,放在服务器的文件夹里面进行访问,除此之外还添加了视频播放器功能,视频文件也是放在服务器中进行访问。
二、开发环境
三、准备工作
1、安装和配置好JDK
关于为何在使用Tomcat前安装JDK,大家可以参考文章 Tomcat安装之前为什么要安装JDK
还有就是大家对于JDK和JRE这两者搞不清楚的话,可以学习文章 JDK和JRE的区别和联系
看完这篇文章就可以彻底弄懂这部分概念。
2、安装和配置好Tomcat
Tomcat 服务器是一个免费的开放源代码的Web 应用服务器,属于轻量级应用服务器,在中小型系统和并发访问用户不是很多的场合下被普遍使用,是开发和调试JSP 程序的首选。对于一个初学者来说,可以这样认为,当在一台机器上配置好Apache 服务器,可利用它响应HTML(标准通用标记语言下的一个应用)页面的访问请求。
关于如何安装和配置好Tomcat可以参考文章 如何安装和配置Tomcat(全网最详)
3、放置音乐和视频文件
在Tomcat服务器的webapps里面的ROOT文件夹中新建三个文件夹,分别为music,pic和video。

music里面放置三首歌曲,分别命名为music0、music1、music2;
pic里面放置三张圆形的封面图片,播放音乐时候会旋转,同样命名为music0、music1、music2;
video里面放置三部MV,分别对应刚刚放的歌曲,命名为video0、video1、video2。
4、获取本地网络地址
因为要访问网络资源,所以需要写服务器地址,里面用到我们电脑的网络地址,网络——>属性——>属性,查看IPV4地址,复制下来,将源码的以下三处更换为自己的地址。


四、MediaPlayer类播放音频
1、功能简介
MediaPlayer 类用于播放音频和视频文件,该类提供了全面的方法支持多种格式的音频文件(比如mp3、mp4等)。
2、常用方法
在常用方法中我们用到的是start()方法:开始或继续播放视频;pause()方法:暂停播放音频;reset( )方法: 重置播放器。
3、创建和设置音频类型
 	MediaPlayer mediaPlayer = new MediaPlayer(); #创建MediaPlayer
    mediaPlayer.setAudioStreamType(AudioManager.STREAM_MUSIC);#设置音频类型
4、设置数据源
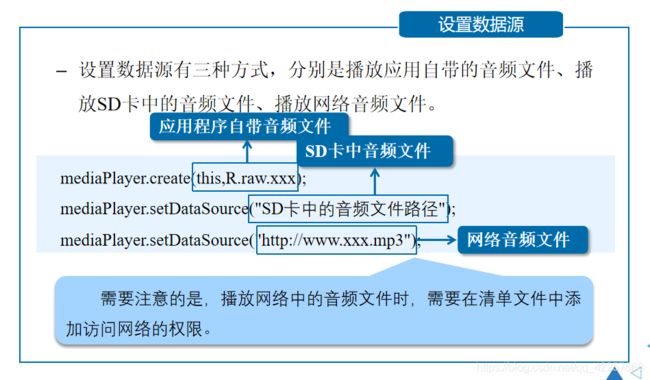
设置数据源有三种方式,分别是播放应用自带的音频文件、播放SD卡中的音频文件、播放网络音频文件。我们这里使用的就是网络音频文件,所以需要在清单文件中添加访问网络的权限。关于如何
添加访问网络的权限请参考 Android Studio如何允许访问网络资源
5、播放音频
6、暂停播放
7、重新播放
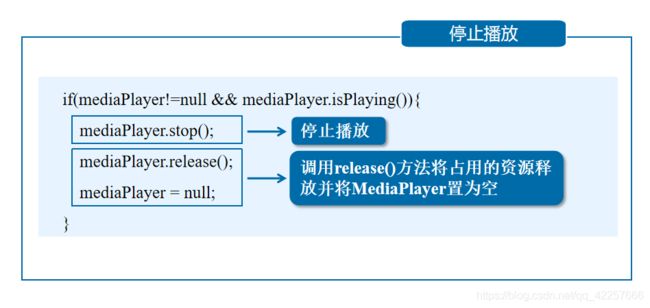
8、停止播放
五、VideoView控件播放视频
1、概念和功能
VideoView控件是播放视频用的,借助它可以完成一个简易的视频播放器。
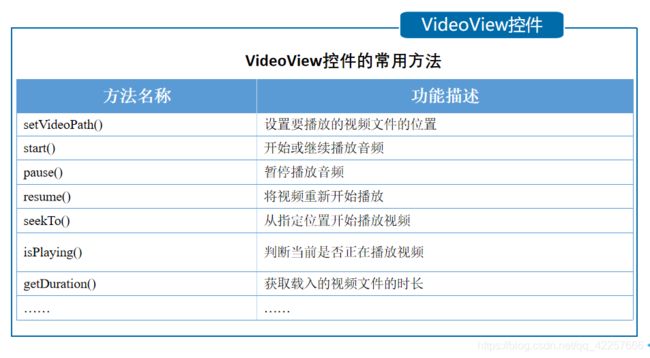
2、常用方法
3、使用VideoView控件
在布局文件中添加VideoView控件
 <VideoView
     android:id="@+id/videoview"
     android:layout_width="match_parent"
     android:layout_height="match_parent" />
视频的播放
	VideoView videoView = (VideoView) findViewById(R.id.videoview);
    videoView.setVideoPath("mnt/sdcard/apple.avi"); #播放本地视频
    videoView.setVideoURI(Uri.parse("http://www.xxx.avi"));#加载网络视频
    videoView.start();
4、添加控制器
5、SurfaceView控件
在项目中通过MediaPlayer类和SurfaceView控件播放视频

6、addCallback()方法
使用SurfaceView控件时,一般情况下还要对其创建、销毁、改变时的状态进行监听,此时就需要调用addCallback()方法,在该方法中监听Surface(Surface是一个用来画图形或图像的地方)的状态。

7、MediaPlayer播放视频
使用MediaPlayer类播放音频与播放视频的步骤类似,唯一不同的是,播放视频需要把视频显示在SurfaceView控件上。实现代码如下:
 	MediaPlayer mediaplayer = new MediaPlayer();
    mediaplayer.setAudioStreamType(AudioManager.STREAM_MUSIC); #设置视频声音类型
    mediaplayer.setDataSource("视频资源路径"); #设置视频文件路径
    mediaplayer.setDisplay(holder); #SurfaceView控件与MediaPlayer类进行关联
    mediaplayer.prepareAsync(); #将视频文件解析到内存中
    mediaplayer.start(); #播放视频
六、类和布局文件介绍
1、类的介绍
1.1、MainActivity类
MainActivity类是整个工程的主类,包含了两个菜单文件:frag1(歌曲)和frag2(MV),默认情况下加载frag1 歌曲界面,点击切换显示frag2 MV界面。
1.2、frag1类
frag1类是音乐列表界面,主要是创建onCreateView方法,参数分别为inflater(布局填充器),container(容器),savedInstanceState(保存实例状态)。首先声明一个变量view,用布局填充器的方法显示为music_list的布局文件,然后listView通过findViewById的方法,绑定lv布局文件中的对应控件。因为要显示音乐列表,所以得将主文件绑定到布局文件,然后声明一个新的适配器MyBaseAdapter,适配器就是用列表时候必须使用的类,能将看不到的变为可视的,然后listView加载适配器进去。最后listView设置监听器,创建意图对象,只要点击frag1音乐列表界面的一首歌,就会跳到音乐播放器Main_Activity界面。putExtra是将歌曲名字和歌曲的下标值传过去,知道了下标就相当于知道了是哪首歌曲。然后startActivity(intent),开启意图,成功跳转。
public class frag1 extends Fragment {

    private View view;
    public String[] name={
     "邓紫棋——光年之外","蔡健雅——红色高跟鞋","Taylor Swift——Love Story"};
    public static int[] icons={
     R.drawable.music0,R.drawable.music1,R.drawable.music2};
    @Override
    public View onCreateView(final LayoutInflater inflater, ViewGroup container, Bundle savedInstanceState){

        view=inflater.inflate(R.layout.music_list,null);
        ListView listView=view.findViewById(R.id.lv);
        MyBaseAdapter adapter=new MyBaseAdapter();
        listView.setAdapter(adapter);
        listView.setOnItemClickListener(new AdapterView.OnItemClickListener() {

            @Override
            public void onItemClick(AdapterView<?> parent, View view, int position, long id) {

                Intent intent=new Intent(frag1.this.getContext(),Music_Activity.class);//创建Intent对象,启动check
                //将数据存入Intent对象
                intent.putExtra("name",name[position]);
                intent.putExtra("position",String.valueOf(position));
                startActivity(intent);
            }
        });
        return view;
    }
1.3、frag2类
frag2类为视频列表界面,定义两个数组video_name,放视频名称,video_icons放视频的封面图片,可以从视频里面截图。用法和frag1类相似。
public class frag2 extends Fragment {

    private View view;
    public String[] video_name={
     "邓紫棋——光年之外","蔡健雅——红色高跟鞋","Taylor Swift——Love Story"};
    public static int[] video_icons={
     R.drawable.video0,R.drawable.video1,R.drawable.video2};
    @Override
    public View onCreateView(final LayoutInflater inflater, ViewGroup container, Bundle savedInstanceState){

        view=inflater.inflate(R.layout.frag2_layout,null);
        ListView listView=view.findViewById(R.id.vl);
        MyBaseAdapter adapter=new MyBaseAdapter();
        listView.setAdapter(adapter);
        listView.setOnItemClickListener(new AdapterView.OnItemClickListener() {

            @Override
            public void onItemClick(AdapterView<?> parent, View view, int position, long id) {

                Intent intent=new Intent(frag2.this.getContext(),video_Activity.class);//创建Intent对象,启动check
                //将数据存入Intent对象
                intent.putExtra("name",video_name[position]);
                intent.putExtra("position",String.valueOf(position));
                startActivity(intent);
            }
        });
        return view;
    }
1.4、MusicService类
音乐服务类,没有它,即使有音乐布局文件和类文件,音乐也无法播放,因为它提供了播放的服务功能。在MusicControl类中定义了四个方法。最主要的是uri,它的地址是本机服务器的地址。前面的网络就是本机的网络地址,端口号为8080。
class MusicControl extends Binder{
     //Binder是一种跨进程的通信方式
        public void play(int i){
     //String path
                //Uri uri=Uri.parse("android.resource://"+getPackageName()+"/raw/"+"music"+i);
                Uri uri=Uri.parse("http://192.168.0.104:8080/music/music"+i+".mp3");
                try{

                    player.reset();//重置音乐播放器
                    //加载多媒体文件
                    player=MediaPlayer.create(getApplicationContext(),uri);
                    player.start();//播放音乐
                    addTimer();//添加计时器
                }catch(Exception e){

                    e.printStackTrace();
            }
        }
        public void pausePlay(){

            player.pause();//暂停播放音乐
        }
        public void continuePlay(){

            player.start();//继续播放音乐
        }
        public void seekTo(int progress){

            player.seekTo(progress);//设置音乐的播放位置
        }
    }
1.5、Music_Activity类
音乐播放的核心类,创建服务连接对象,并绑定服务,通过findViewById方法和布局文件里面的控件绑定。还为进度条添加事件监听器,声明的animator变量用来播放动画。
public class Music_Activity extends AppCompatActivity implements View.OnClickListener{

    private static SeekBar sb;
    private static TextView tv_progress,tv_total,name_song;
    private ObjectAnimator animator;
    private MusicService.MusicControl musicControl;
    String name;
    Intent intent1,intent2;
    MyServiceConn conn;
    private boolean isUnbind =false;//记录服务是否被解绑
    @Override
    protected void onCreate(Bundle savedInstanceState) {

        super.onCreate(savedInstanceState);
        setContentView(R.layout.activity_music);
        intent1=getIntent();
        init();
    }
    private void init(){

        tv_progress=(TextView)findViewById(R.id.tv_progress);
        tv_total=(TextView)findViewById(R.id.tv_total);
        sb=(SeekBar)findViewById(R.id.sb);
        name_song=(TextView)findViewById(R.id.song_name);

        findViewById(R.id.btn_play).setOnClickListener(this);
        findViewById(R.id.btn_pause).setOnClickListener(this);
        findViewById(R.id.btn_continue_play).setOnClickListener(this);
        findViewById(R.id.btn_exit).setOnClickListener(this);

        name=intent1.getStringExtra("name");
        name_song.setText(name);
        intent2=new Intent(this,MusicService.class);//创建意图对象
        conn=new MyServiceConn();//创建服务连接对象
        bindService(intent2,conn,BIND_AUTO_CREATE);//绑定服务
        //为滑动条添加事件监听
        sb.setOnSeekBarChangeListener(new SeekBar.OnSeekBarChangeListener() {

            @RequiresApi(api = Build.VERSION_CODES.KITKAT)
            @Override
            public void onProgressChanged(SeekBar seekBar, int progress, boolean fromUser) {

                //进度条改变时,会调用此方法
                if (progress==seekBar.getMax()){
     //当滑动条到末端时,结束动画
                    animator.pause();//停止播放动画
                }
            }
            @Override
            public void onStartTrackingTouch(SeekBar seekBar) {
     //滑动条开始滑动时调用
            }
            @Override
            public void onStopTrackingTouch(SeekBar seekBar) {
     //滑动条停止滑动时调用
                //根据拖动的进度改变音乐播放进度
                int progress=seekBar.getProgress();//获取seekBar的进度
                musicControl.seekTo(progress);//改变播放进度
            }
        });
        ImageView iv_music=(ImageView)findViewById(R.id.iv_music);
        String position= intent1.getStringExtra("position");
        //int i=parseInt(position);
        //iv_music.setImageResource(frag1.icons[i]);
        Glide.with(this).load("http://192.168.0.104:8080/pic/music"+position+".png").into(iv_music);


        animator=ObjectAnimator.ofFloat(iv_music,"rotation",0f,360.0f);
        animator.setDuration(10000);//动画旋转一周的时间为10秒
        animator.setInterpolator(new LinearInterpolator());//匀速
        animator.setRepeatCount(-1);//-1表示设置动画无限循环
    }
1.6、video_Activity类
视频播放的核心类,定义显示视频的videoView变量和媒体控制controller变量,还定义了一个iv_play,用于显示播放按钮的图片。底下方法的调用与音乐播放器大同小异。
public class video_Activity extends AppCompatActivity implements View.OnClickListener {

    private VideoView videoView;
    private MediaController controller;
    ImageView iv_play;

    @Override
    protected void onCreate(Bundle savedInstanceState) {

        super.onCreate(savedInstanceState);
        setContentView(R.layout.activity_video);
        videoView=findViewById(R.id.videoview);
        iv_play=findViewById(R.id.bt_play);
        Intent intent=getIntent();
        String position=intent.getStringExtra("position");
        //拼出在资源文件夹下的视频文件路径String字符串
        //String url="android.resource://"+getPackageName()+"/"+R.raw.video;
        String url="http://192.168.0.104:8080/video/video"+position+".mp4";
        //字符串解析成Uri
        Uri uri=Uri.parse(url);
        //设置videoview的播放资源
        videoView.setVideoURI(uri);
        //VideoView绑定控制器

        controller=new MediaController(this);
        videoView.setMediaController(controller);

        iv_play.setOnClickListener(this);
    }
2、布局文件设计
2.1、主界面
activity_main为主界面布局文件,放置“我喜欢”、“歌曲”还有“MV”三个TextView。
底下就是一个FrameLayout用于放置音乐和视频列表。
<?xml version="1.0" encoding="utf-8"?>
<LinearLayout
    xmlns:android="http://schemas.android.com/apk/res/android"
    xmlns:app="http://schemas.android.com/apk/res-auto"
    xmlns:tools="http://schemas.android.com/tools"
    android:layout_width="match_parent"
    android:layout_height="match_parent"
    tools:context=".MainActivity"
    android:orientation="vertical">
    <LinearLayout
        android:layout_width="match_parent"
        android:layout_height="wrap_content"
        android:orientation="horizontal">
        <TextView
            android:layout_width="0dp"
            android:layout_height="wrap_content"
            android:layout_weight="1"
            android:gravity="center"
            android:text="我喜欢"
            android:textSize="35dp"/>
    </LinearLayout>
    <LinearLayout
        android:layout_width="match_parent"
        android:layout_height="wrap_content"
        android:orientation="horizontal">
    <TextView
        android:id="@+id/menu1"
        android:layout_width="0dp"
        android:layout_height="wrap_content"
        android:layout_weight="1"
        android:gravity="center"
        android:text="歌曲"
        android:textSize="25dp"/>
    <TextView
        android:id="@+id/menu2"
        android:layout_width="0dp"
        android:layout_height="wrap_content"
        android:layout_weight="1"
        android:gravity="center"
        android:text="MV"
        android:textSize="25dp"/>
    </LinearLayout>
    <FrameLayout
        android:id="@+id/content"
        android:layout_width="match_parent"
        android:layout_height="0dp"
        android:layout_weight="9">
    </FrameLayout>

</LinearLayout>
2.2、音乐列表界面
music_list为音乐列表界面,放置了一个ListView控件,显示列表,前面文章讲的很清楚,这里不再详细讲解。

2.3、布局条目
item_layout为布局条目文件,和music_list共同显示音乐列表的内容。

2.4、音乐播放器界面
activity_music为音乐播放器界面,主要是歌曲图片、歌曲名和四个控制按钮,采用的都是LinearLayout线性布局。

<?xml version="1.0" encoding="utf-8"?>
<LinearLayout
    xmlns:android="http://schemas.android.com/apk/res/android"
    xmlns:tools="http://schemas.android.com/tools"
    android:layout_width="match_parent"
    android:layout_height="match_parent"
    android:background="@drawable/music_bg"
    tools:context=".Music_Activity"
    android:gravity="center"
    android:orientation="vertical">
    <ImageView
        android:id="@+id/iv_music"
        android:layout_width="240dp"
        android:layout_height="240dp"
        android:layout_gravity="center_horizontal"
        android:layout_margin="15dp"
        android:src="@drawable/music0"/>
    <TextView
        android:id="@+id/song_name"
        android:layout_width="wrap_content"
        android:layout_height="wrap_content"
        android:text="歌曲名"
        android:textSize="20sp"/>
    <SeekBar
        android:id="@+id/sb"
        android:layout_width="match_parent"
        android:layout_height="wrap_content" />
    <RelativeLayout
        android:layout_width="match_parent"
        android:layout_height="wrap_content"
        android:paddingLeft="8dp"
        android:paddingRight="8dp">
        <TextView
            android:id="@+id/tv_progress"
            android:layout_width="wrap_content"
            android:layout_height="wrap_content"
            android:text="00:00"/>
        <TextView
            android:id="@+id/tv_total"
            android:layout_width="wrap_content"
            android:layout_height="wrap_content"
            android:layout_alignParentRight="true"
            android:text="00:00"/>
    </RelativeLayout>
    <LinearLayout
        android:layout_width="match_parent"
        android:layout_height="wrap_content"
        android:orientation="horizontal">
        <Button
            android:id="@+id/btn_play"
            android:layout_width="0dp"
            android:layout_height="40dp"
            android:layout_margin="8dp"
            android:layout_weight="1"
            android:background="@drawable/btn_bg_selector"
            android:text="播放音乐"/>
        <Button
            android:id="@+id/btn_pause"
            android:layout_width="0dp"
            android:layout_height="40dp"
            android:layout_margin="8dp"
            android:layout_weight="1"
            android:background="@drawable/btn_bg_selector"
            android:text="暂停播放"/>
        <Button
            android:id="@+id/btn_continue_play"
            android:layout_width="0dp"
            android:layout_height="40dp"
            android:layout_margin="8dp"
            android:layout_weight="1"
            android:background="@drawable/btn_bg_selector"
            android:text="继续播放"/>
        <Button
            android:id="@+id/btn_exit"
            android:layout_width="0dp"
            android:layout_height="40dp"
            android:layout_margin="8dp"
            android:layout_weight="1"
            android:background="@drawable/btn_bg_selector"
            android:text="退出"/>
    </LinearLayout>

</LinearLayout>
2.5、视频列表界面
2.6、视频条目
2.7、视频播放界面
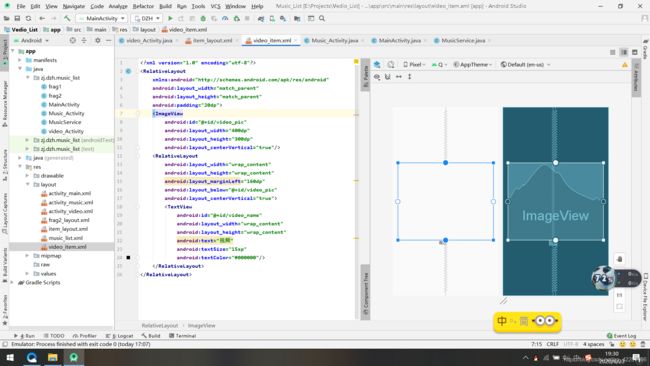
放置一个ImageView,用于显示播放按钮的图片,layout_alignParentBottom="true"将其放置在父容器的最下面,layout_centerHorizontal="true"是居中显示layout_marginBottom="100dp"与底面间距100dp。然后在上方放置一个VideoView,直接显示视频。
<?xml version="1.0" encoding="utf-8"?>
<RelativeLayout
    xmlns:android="http://schemas.android.com/apk/res/android"
    xmlns:tools="http://schemas.android.com/tools"
    android:layout_width="match_parent"
    android:layout_height="match_parent"
    tools:context=".video_Activity">
    <ImageView
        android:id="@+id/bt_play"
        android:layout_width="80dp"
        android:layout_height="80dp"
        android:layout_alignParentBottom="true"
        android:layout_centerHorizontal="true"
        android:layout_marginBottom="100dp"
        android:src="@drawable/bf"/>
    <VideoView
        android:id="@+id/videoview"
        android:layout_width="match_parent"
        android:layout_height="300dp"/>

</RelativeLayout>
七、运行效果
1、打开Tomcat服务器,检测是否启动成功。
关于测试Tomcat是否启动成功,可以参考文章 如何测试Tomcat是否启动成功

2、不要关闭服务器,运行模拟器,如果没有模拟器可以新建,出现主页面音乐列表。

3、选择第一首《光年之外》播放,立马跳转到播放器界面。

4、点击播放音乐按钮,音乐开始播放,进度条开始走,图片开始旋转。
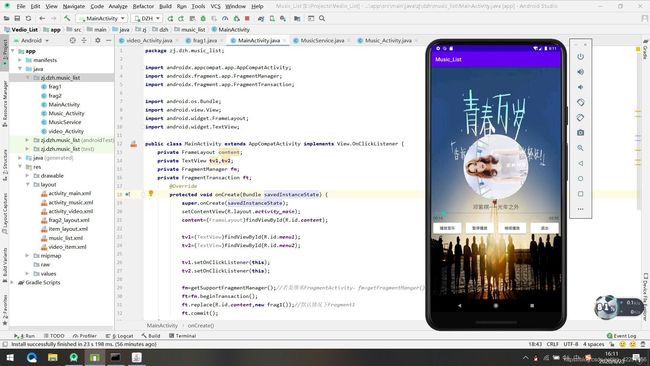
5、点退出按钮,回到音乐列表界面,选择第三首《Love Story》播放。

6、点暂停播放按钮,音乐暂停播放,图片动画也停止旋转。
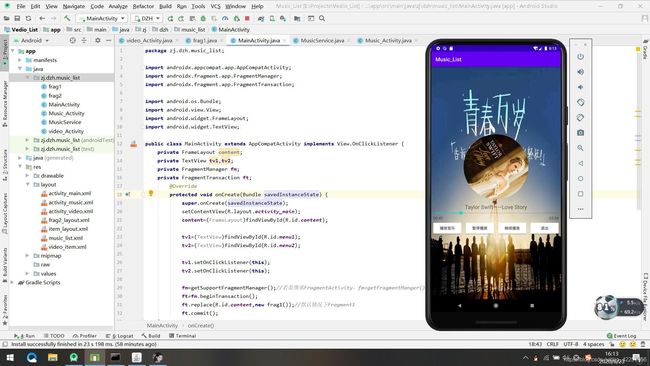
7、可以拖动进度条,然后点继续播放就可以播放到任意位置。、
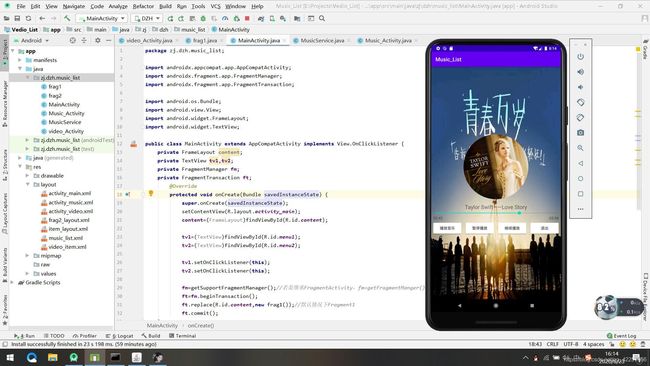
8、点退出按钮,回到主界面,点MV选项卡,跳转到frag2的视频列表界面。
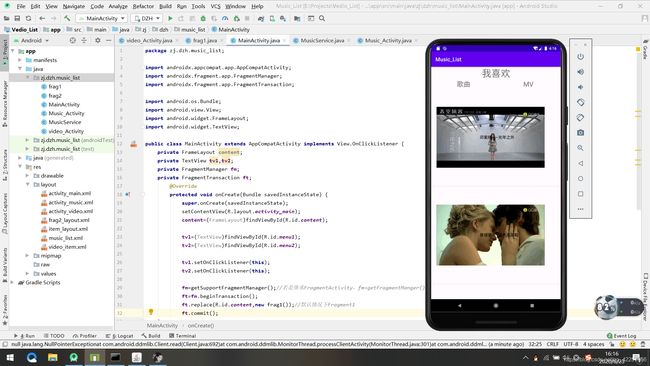
9、选择第一首《光年之外》播放,跳转到视频播放界面。
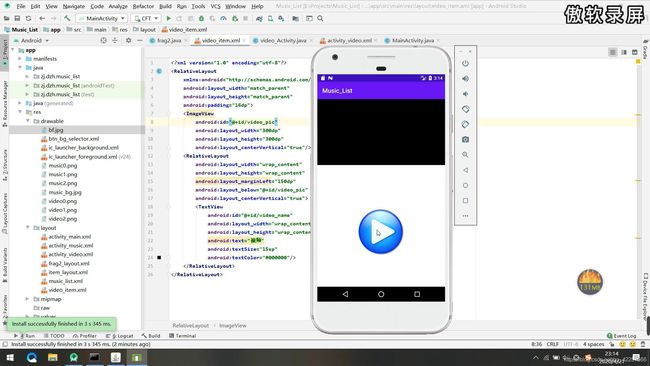
10、点击播放按钮,视频开始播放,再点下就会暂停。

八、项目总结
本次项目综合了Android几乎所有知识,可以让大家熟练掌握Android程序开发的基本技术,涉及Android 基础知识、UI界面、数据存储、四大组件、网络编程、高级编程、多媒体播放器、适配器配置等。大家熟练掌握可以对以后的Android开发有非常大的帮助。
九、源码下载
源代码的百度网盘链接和提取码如下,码字不易,别忘点个赞哦:
链接:https://pan.baidu.com/s/1TSnO0BuwbmBYQkuJIVAx-Q
提取码:5zxy
当你某一天醒来,发现你的生命不应该这么浪费,你可以活得更加精彩,你可以用自己现在的年轻和精力去追求那些你很遥远却又可以实现的梦想。不然到老时,你只会后悔,你会说当时年轻时候我居然什么都没做啊,可现在想做也做不了,可以重来吗?
