Prometheus 初次使用
文章目录
- Prometheus概念
- 收集数据
- 安装
- Prometheus运作方式[猜测]
- 使用每个组件
- 使用客户端
- 使用Prometheus
- 使用告警
- 效果图
- 最后
Prometheus概念
普罗米修斯是专注于做监控的一个开源软件,它集成了收集,监控和告警三个大的模块。
收集数据
根据官方介绍,待监控的服务都可以提供一个 /metrics URL来供Prometheus拉取数据,也可以把这些需要收集的数据先放到一个特定的地方,Prometheus之后再来拉取。
安装
安装方式
Prometheus运作方式[猜测]
1.Prometheus 也提供了一些语言的客户端,这个跟OpenTracing差不多,也是需要在代码里面插入一些Prometheus客户端的代码,里面的API会包括Prometheus的四大类型[Counter, Gauge, Histogram, Summary]的生成,并且提供一个默认的HTTP Handler 来供Prometheus拉取数据。
2.Prometheus根据配置文件定期地去这些服务拉取相关的数据,并保存到磁盘上[默认15天清空数据],如果需要数据库持久保存的话,需要时序数据库来保存。
3.如果有告警功能的话,那么还需要去安装官方自带的Alert Manager。
4.通过PromQL查询语言来拉取特定的字段的数据变化图。
5.图表展示的话可以使用Prometheus自带的视图,也可以使用官方推荐的Grafana。
使用每个组件
使用客户端
客户端下载地址和Doc
写了一个简单的监控Gauge数据类型的Go文件
package main

import (
    "github.com/prometheus/client_golang/prometheus"
    "github.com/prometheus/client_golang/prometheus/promhttp"
    _ "sync"
    "time"
    "net/http"
    "fmt"
    "log"
)

var (
    opsQueued = prometheus.NewGauge(prometheus.GaugeOpts {
        Namespace : "our_company",
        Subsystem : "blob_storage",
        Name : "ops_queued",
        Help : "Number of blob storage operations waiting to be processed.",})
)

func main() {
    prometheus.MustRegister(opsQueued)
    http.Handle("/metrics", promhttp.Handler())
    fmt.Printf("Start Operate The Metrics.\n")
    go func() {
        for i := 0; i < 30; i++ {
            opsQueued.Add(10)
            time.Sleep(10 * time.Second)
        }
    }()
    for i := 0; i < 2; i++ {
        go func() {
            for i := 0; i < 150; i++ {
                opsQueued.Dec()
                time.Sleep(time.Second)
            }
        }()
    }
    log.Fatal(http.ListenAndServe(":8080", nil))
}
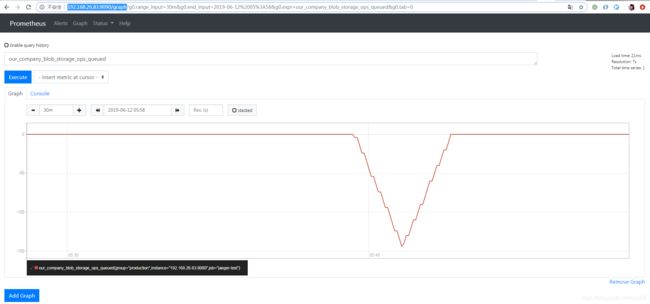
也就是对opsQueued这个变量进行自增或自减,然后看这个变量的变化趋势。
使用Prometheus
首先要去编写Prometheus的配置文件,采用的是YAML标记语言。
global:
  scrape_interval:     5s # Set the scrape interval to every 15 seconds. Default is every 1 minute.
  evaluation_interval: 10s # Evaluate rules every 15 seconds. The default is every 1 minute.

rule_files:
  - "first_rules.yml"

scrape_configs:
  # The job name is added as a label `job=` to any timeseries scraped from this config.
  - job_name: 'jaeger-test'

    static_configs:
    - targets: ['192.168.26.83:8080']
      labels:
          group: 'production'

alerting:
  alertmanagers:
  - static_configs:
    - targets:
      - '192.168.26.83:9093'
关于上面的配置,有几点需要注意的:
1.scrape_interval : 这个是去访问每个服务metrics接口的间隔时间。
2.evaluation_interval : 这个是检查告警条件是否满足的间隔时间。
3.first_rules.yml : 这个是告警规则的设置
4.alerting : 这个是alerting manager 的服务IP和端口。
下面是first_rule.yml
groups:
  - name: test-alerting
    rules:
    - alert: TestAlerting
      expr: our_company_blob_storage_ops_queued < -100
      for: 5s
      labels:
        team: Golang
      annotations:
        summary: "Over Threshold"
        description: "Over Threshold"
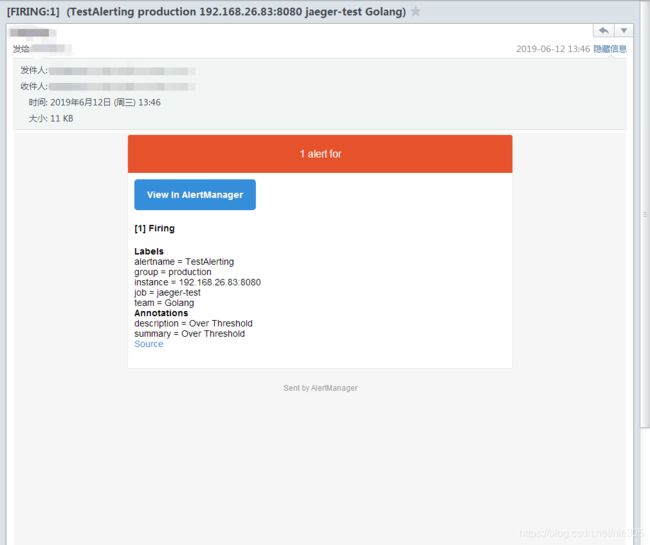
其中expr 是表达式的意思,for是持续时间的意思,如果expr表达式成立了for这么长时间的话,那么Prometheus就会把这个告警发给Alert Manager。
到现在就可以启动Prometheus了:
./prometheus
使用告警
先按照官网上面的安装步骤把AlertManager安装好了。然后在alertmanager当前文件夹下面新建一个alertmanager.yml,编辑这个yml:
global:
  smtp_smarthost: 'example.company.com:465'
  smtp_from: 'yourEmaiAddress' #[email protected]
  smtp_auth_username: '你的邮箱账户'
  smtp_auth_password: '你的邮箱密码'
  smtp_require_tls: false  #[是否支持TLS]
route:
  receiver: Test
  group_wait: 10s  # 分组等待时间
  group_interval: 5m # 分组尝试再次发送告警的时间间隔
  repeat_interval: 4h # 重复发送同一条告警间隔
  routes:
  - receiver: Test
    group_wait: 10s
    match:
      team: Golang
receivers:
- name: Test
  email_configs:
  - to: '你要发送到哪个邮箱'
到现在就可以启动alertmanager了:
./alertmanager
效果图
在分别启动了alertmanager,Prometheus,和自己写的程序之后,我们可以在 http://localhost:9090/graph
这个url下面查看我们监控的数据的变化情况:

可以看到这个图大致是符合代码里面写的逻辑的。
最后
1.初步使用了Prometheus 监控,还是比较顺利的,在Prometheus、AlertManager的配置和Client API的使用上面可能需要花一些时间,并且在这个Demo版本里面没有持久化数据,如果是需要把记录全部保存的话,那么需要时序数据库。
2.Prometheus也支持服务发现,而不是只能在配置文件里面写死需要监控的服务,这个东西还需要等我把服务发现的东西学了才能添加上去。
3.Prometheus也可以是集群的,这些服务的管控是需要其他的软件的。
4.上面的配置都是一些基本的配置,AlertManager还可以过滤一些告警,这个在需要的时候要查一下文档。
5.AlertManager不光只是支持邮箱这种形式,还能支持微信,钉钉,webhook等其他方式,只需要修改配置文件就OK了,很方便。
6.官方上面有很多的exporter,有对于主机资源的exporter,有对于MongoDB的exporter,有对于MySQL的exporter,这些exporter都是已经写好了的,直接在GitHub上面clone出来编译即可使用。
