linux 管道实现解析
介绍
管道是进程间通信的一种方式,分为无名管道和有名管道两种。使用无名管道可以进行相关进程间通信(也就是父子进程),使用有名管道可以进行不相关进程(没有父子关系的进程)之间的通信。下边主要介绍下无名管道的实现机制。
用户态创建无名管道函数有pipe()和pipe2(),通常在命令行的一个命令输出中查找一些特定数据时,也常用到管道技术,如“ps -elf | grep program”,其也是调用pipe函数来创建一个管道进行通信。系统API函数如下:
#includeint pipe(int pipefd[2]);#define _GNU_SOURCE /* See feature_test_macros(7) */#include/* Obtain O_* constant definitions */ #includeint pipe2(int pipefd[2], int flags);
linux内核管道就是内存中的一个管道缓冲区pipe_buf,可以理解为存在于内存中的一个文件
源码分析
接下来具体分析下管道的内核实现代码,两个函数陷入内核调用:
/** sys_pipe() is the normal C calling standard for creating* a pipe. It's not the way Unix traditionally does this, though.*/SYSCALL_DEFINE2(pipe2, int __user *, fildes, int, flags){struct file *files[2];int fd[2];int error;//__do_pipe_flags为内核管道创建两个file结构体对象,并分配两个空的文件描述符fd,并进行填充error = __do_pipe_flags(fd, files, flags);if (!error) {/* 将上一步和管道关联的2个fd拷贝到用户空间,copy_to_user函数执行成功,则接着执行else后边语句,否则执行if语句块中的部分。unlikely()表示括号中的表达式极小的可能执行失败,若执行失败,则执行if语句块,否则执行else语句块。此处是将fd数组先拷贝至至用户空间,然后将fd与file对象关联,*/if (unlikely(copy_to_user(fildes, fd, sizeof(fd)))) {fput(files[0]);fput(files[1]);put_unused_fd(fd[0]);put_unused_fd(fd[1]);error = -EFAULT;} else {//把fd和file的映射关系更新到该进程的文件描述符表中fdtablefd_install(fd[0], files[0]);fd_install(fd[1], files[1]);}}return error;}SYSCALL_DEFINE1(pipe, int __user *, fildes){return sys_pipe2(fildes, 0);}
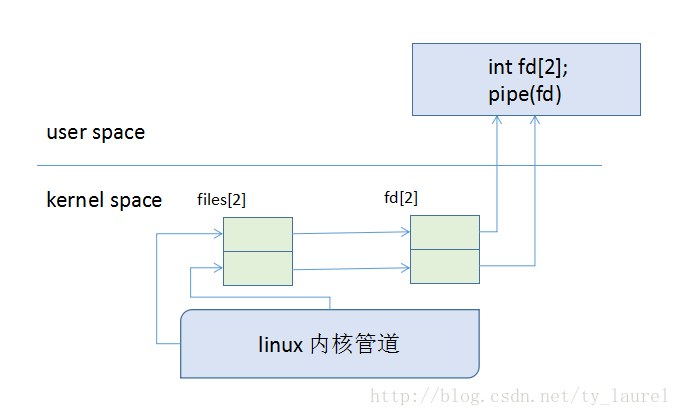
SYSCALL_DEFINE2中主要是调用__do_pipe_flags函数创建内核管道文件及指向管道文件的两个file结构体对象和两个新的文件描述符号,以上步骤没有报错则将文件描述符数组fd[]拷贝至用户态fildes数组,成功则将__do_pipe_flags中创建的的files对象添加至当前进程的文件描述符表fdtable中,即就是将文件描述符和文件对象关联,使得通过当前进程的files_struct对象(文件系统介绍可以参照博客)可以找到内核管管道文件。
static int __do_pipe_flags(int *fd, struct file **files, int flags){int error;int fdw, fdr;if (flags & ~(O_CLOEXEC | O_NONBLOCK | O_DIRECT))return -EINVAL;//为管道创建两个file结构体error = create_pipe_files(files, flags);if (error)return error;//get_unused_fd_flags分配一个文件描述符,并标记为busyerror = get_unused_fd_flags(flags);if (error < 0)goto err_read_pipe;fdr = error;error = get_unused_fd_flags(flags);if (error < 0)goto err_fdr;fdw = error;audit_fd_pair(fdr, fdw); //设置审计数据信息fd[0] = fdr;fd[1] = fdw;return 0;err_fdr:put_unused_fd(fdr);err_read_pipe:fput(files[0]);fput(files[1]);return error;}
create_pipe_files函数实现主要是创建管道的file对象,接着调用的get_unused_fd_flags函数是对__alloc_fd函数的封装,调用__alloc_fd函数主要是分配一个文件描述符,并设置为busy,其大致过程为:首先对用户打开文件表files_struct结构体对象加锁,获取当前进程的文件描述符表,依次遍历该文件描述符表,找到一个未使用的文件描述符号,最后释放files_struct的对象锁。
接下来主要看下create_pipe_files函数:
int create_pipe_files(struct file **res, int flags){int err;struct inode *inode = get_pipe_inode(); //为管道创建一个inode并进程初始化struct file *f;struct path path;static struct qstr name = { .name = "" };if (!inode)return -ENFILE;err = -ENOMEM;//分配一个目录项path.dentry = d_alloc_pseudo(pipe_mnt->mnt_sb, &name);if (!path.dentry)goto err_inode;path.mnt = mntget(pipe_mnt); //引用计数加1d_instantiate(path.dentry, inode);err = -ENFILE;//alloc_file函数分配并初始化一个写管道的file结构体对象,并传入pipe文件操作函数结构体对象f = alloc_file(&path, FMODE_WRITE, &pipefifo_fops);if (IS_ERR(f))goto err_dentry;f->f_flags = O_WRONLY | (flags & (O_NONBLOCK | O_DIRECT));f->private_data = inode->i_pipe;//创建并初始化读管道的file对象res[0] = alloc_file(&path, FMODE_READ, &pipefifo_fops);if (IS_ERR(res[0]))goto err_file;path_get(&path);res[0]->private_data = inode->i_pipe;res[0]->f_flags = O_RDONLY | (flags & O_NONBLOCK);res[1] = f;return 0;err_file:put_filp(f);err_dentry:free_pipe_info(inode->i_pipe);path_put(&path);return err;err_inode:free_pipe_info(inode->i_pipe);iput(inode);return err;}
该函数中最重要的两个函数就是get_pipe_inode和alloc_file。其中调用alloc_file函数完成file结构体对象的分配并初始化,在该函数中首先调用get_empty_filp函数找到一个未使用的file结构体对象,然后初始化file结构体的一些属性信息,如inode、读写权限、操作函数fop等。最后返回该初始化完成的file结构体对象。
get_pipe_inode函数主要为管道创建一个inode并初始化,如下:
static struct inode * get_pipe_inode(void){struct inode *inode = new_inode_pseudo(pipe_mnt->mnt_sb);struct pipe_inode_info *pipe;if (!inode)goto fail_inode;//分配一个inode号inode->i_ino = get_next_ino();//分配一个linux内核级管道pipepipe = alloc_pipe_info();if (!pipe)goto fail_iput;inode->i_pipe = pipe;pipe->files = 2;pipe->readers = pipe->writers = 1;inode->i_fop = &pipefifo_fops;/** Mark the inode dirty from the very beginning,* that way it will never be moved to the dirty* list because "mark_inode_dirty()" will think* that it already _is_ on the dirty list.*/inode->i_state = I_DIRTY;inode->i_mode = S_IFIFO | S_IRUSR | S_IWUSR;inode->i_uid = current_fsuid();inode->i_gid = current_fsgid();inode->i_atime = inode->i_mtime = inode->i_ctime = CURRENT_TIME;return inode;fail_iput:iput(inode);fail_inode:return NULL;}
该函数中调用new_inode_pseudo函数分配一个inode结构体对象并分配inode号;调用alloc_pipe_info函数分配一个linux内核级管道pipe并初始化引用该管道的file结构体对象数为2(对应管道中的读写);然后将上一步分配的inode结构体的i_pipe成员赋值为分配的管道pipe,之后再进行一些inode的属性初始化即可。
alloc_pipe_info函数分配内核管道
当索引节点指的是管道时,其i_pipe字段指向一个如下所示的内核管道结构体pipe_inode_info:
struct pipe_inode_info {struct mutex mutex; //互斥锁mutex保护整个事件wait_queue_head_t wait; //reader/writer等待,以防止empty/full管道unsigned int nrbufs, curbuf, buffers; //nrbufs 这个管道缓冲区中非空的大小//curbuf 当前管道缓冲区的入口//buffers 缓冲区总的大小(应该为2的幂次方)unsigned int readers; //管道当前readers的大小unsigned int writers; //管道当前writers的大小unsigned int files; //引用该管道的file结构体数(受->i_lock保护)unsigned int waiting_writers; //阻塞等待writers的数目unsigned int r_counter; //reader计数器unsigned int w_counter;struct page *tmp_page;struct fasync_struct *fasync_readers; //用于通过信号进行的异步IO通知struct fasync_struct *fasync_writers;struct pipe_buffer *bufs; //管道缓冲区描述符地址};
管道除了一个索引节点和两个文件对象外,每个管道都还有自己的管道缓冲区pipe_buffer,pipe_inode_info结构体的bufs字段指向一个具有16个pipe_buffer对象的数组。
struct pipe_buffer {struct page *page; //管道缓冲区页框的描述符地址unsigned int offset, len; //页框内有效数据的位置及长度const struct pipe_buf_operations *ops; //管道缓冲区方法表的地址unsigned int flags;unsigned long private;};
接下来看下linux中是如何分配一个linux内核管道pipe的。进一步查看alloc_pipe_info函数:
struct pipe_inode_info *alloc_pipe_info(void){struct pipe_inode_info *pipe;//用kzalloc函数给pipe对象分配内存并初始化为0,相当于kmalloc+memsetpipe = kzalloc(sizeof(struct pipe_inode_info), GFP_KERNEL);if (pipe) {//给管道pipe的缓冲区buf分配内存,每个管道的bufs存放一个具有16个pipe_buffer对象的数组pipe->bufs = kzalloc(sizeof(struct pipe_buffer) * PIPE_DEF_BUFFERS, GFP_KERNEL);if (pipe->bufs) {init_waitqueue_head(&pipe->wait); //初始化等待队列头,空/满阻塞pipe->r_counter = pipe->w_counter = 1;pipe->buffers = PIPE_DEF_BUFFERS;mutex_init(&pipe->mutex);return pipe;}kfree(pipe);}return NULL;}
该函数主要是分配pipe_inode_info结构体对象和管道的缓冲区。并且管道添加到内核等待队列头中,此处使用等待队列实现管道的特性,管道为空时,读端阻塞;管道写满时,写端阻塞。然后设置管道读写计数器为1.
总结
以上就是linux 无名管道的大致实现过程。管道实际就是借助文件系统的file结构和inode实现的。VFS中的inode索引节点指向内核中创建一个内核缓冲区,通过将两个file结构指向该inode索引节点。之后将这两个file结构体对象和files_struct结构体中的文件描述符号表进行关联,最后将文件描述符表fd[2]拷贝至用户态即可。

