Druid实战--数据摄入案例
Durid摄入数据的方式
- 通过imply的UI界面配置摄入数据规范Ingestion Spec
- 手动创建摄入数据规范Ingestion Spec,通过http请求执行
说明:下面以摄入kafka的数据为例进行步骤解析,kafka的数据格式json
{"current_timestamp":"1560321490664","age12":"22","name":"wangzh","type":"String"}
UI界面摄入kafka数据
第一步:点击右上角的 Load data
我们选择kafka并点进去
说明:我们也可以点击other,然后通过编辑Ingestion Spec的方式摄入kafka的数据
进入页面后需要我们配置kafka的broker地址,需要摄入数据的topic名称,以及topic中数据的格式,推荐使用json格式
点击执行过一会,解析topic中的数据,检查数据正确继续点击下一步
接下来会让我们选择时间列以及时间戳的格式 ,一定要和数据中时间戳的格式一样,以及上不上卷
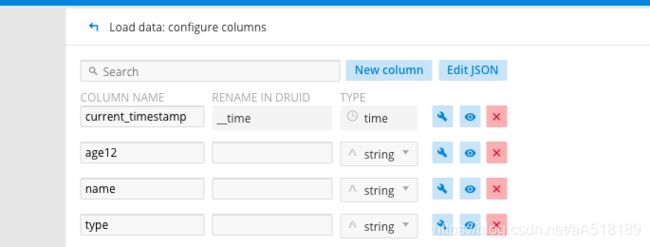
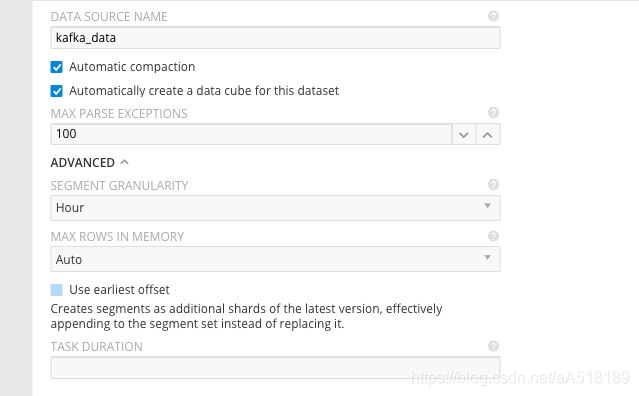
最后设置数据列,以及聚合的时间间隔,data source的名称可以去掉不需要的字段
到此界面的方式摄入kafka的数据结束。
自定义Ingestion Spec摄入kafka数据
第一步
自定义Ingestion Spec需要我们自己创建一个json文件,kafka-index.json ,编写Ingestion Spec,然后通过http的方式执行即可,下面展示kafka的自定义Ingestion Spec案例
{
  "type": "kafka",
  "dataSchema": {
    "dataSource": "kafka2druid",
    "parser": {
      "type": "string",
      "parseSpec": {
        "format": "json",
        "dimensionsSpec": {
          "dimensions": [
            "age",
            "name",
            "type"
          ]
        },
        "timestampSpec": {
          "column": "current_timestamp",
          "format": "millis"
        }
      }
    },
    "metricsSpec": [],
    "granularitySpec": {
      "type": "uniform",
      "segmentGranularity": "HOUR",
      "queryGranularity": {
        "type": "none"
      },
      "rollup": false,
      "intervals": null
    },
    "transformSpec": {
      "filter": null,
      "transforms": []
    }
  },
  "tuningConfig": {
    "type": "kafka",
    "maxRowsInMemory": 1000000,
    "maxBytesInMemory": 0,
    "maxRowsPerSegment": 5000000,
    "maxTotalRows": null,
    "intermediatePersistPeriod": "PT10M",
    "basePersistDirectory": "/Users/apple/Desktop/imply-2.9.16/var/tmp/1563703527303-0",
    "maxPendingPersists": 0,
    "indexSpec": {
      "bitmap": {
        "type": "concise"
      },
      "dimensionCompression": "lz4",
      "metricCompression": "lz4",
      "longEncoding": "longs"
    },
    "buildV9Directly": true,
    "reportParseExceptions": false,
    "handoffConditionTimeout": 0,
    "resetOffsetAutomatically": false,
    "segmentWriteOutMediumFactory": null,
    "workerThreads": null,
    "chatThreads": null,
    "chatRetries": 8,
    "httpTimeout": "PT10S",
    "shutdownTimeout": "PT80S",
    "offsetFetchPeriod": "PT30S",
    "intermediateHandoffPeriod": "P2147483647D",
    "logParseExceptions": false,
    "maxParseExceptions": 100,
    "maxSavedParseExceptions": 10,
    "skipSequenceNumberAvailabilityCheck": false
  },
  "ioConfig": {
    "topic": "flink_log",
    "replicas": 1,
    "taskCount": 1,
    "taskDuration": "PT3600S",
    "consumerProperties": {
      "bootstrap.servers": "ip1:9092,ip2,ip3:9092"
    }
    "pollTimeout": 100,
    "startDelay": "PT5S",
    "period": "PT30S",
    "useEarliestOffset": false,
    "completionTimeout": "PT1800S",
    "lateMessageRejectionPeriod": null,
    "earlyMessageRejectionPeriod": null,
    "stream": "flink_log",
    "useEarliestSequenceNumber": false
  },
  "context": null,
  "suspended": false
}
第二步:执行摄入数据的命令
curl -X 'POST' -H 'Content-Type:application/json' -d @kafka-index.json http://host:8090/druid/indexer/v1/task自定义Ingestion Spec摄入hdfs数据
步骤和摄入kafka的数据一样下面只展示摄入hdfs的自定义Ingestion Spec,其中xxxx是hdfs的域名
{
    "type" : "index_hadoop",
    "spec" : {
            "dataSchema" : {
            "dataSource" : "rollup-tutorial",
            "parser" : {
                    "type" : "string",
                    "parseSpec" : {
                    "format" : "json",
                    "dimensionsSpec" : {
                        "dimensions" : [
                                "http_user_agent",
                                "user_id",
                                "event",
                                "label"
                             ]
                     },
                    "timestampSpec": {
                        "column": "create_time",
                        "format": "iso"
                      }
                  }
               },
              "metricsSpec" : [],
              "granularitySpec" : {
                    "type" : "uniform",
                    "segmentGranularity" : "day",
                    "queryGranularity" : "none",
                    "intervals" : ["20019-06-01/2019-0-03"],
                    "rollup" : false
                }
            },
         "ioConfig" : {
                "type" : "hadoop",
                "inputSpec" : {
                      "type" : "static",
                      "paths" : "hdfs://xxxx/data/test.json"
                  }
           },
        "tuningConfig" : {
            "type" : "hadoop",
            "targetPartitionSize" : 5000000,
            "maxRowsInMemory" : 25000,
            "forceExtendableShardSpecs" : true,
            "jobProperties" : {
                    "mapreduce.job.classloader" : "true"
               }
          }
        },
        "hadoopDependencyCoordinates" : [
              "org.apache.hadoop:hadoop-client:3.1.1"
          ]
  }
扫一扫加入大数据公众号和技术交流群,了解更多大数据技术,还有免费资料等你哦
扫一扫加入大数据公众号和技术交流群,了解更多大数据技术,还有免费资料等你哦
扫一扫加入大数据公众号和技术交流群,了解更多大数据技术,还有免费资料等你哦
![]()
![]()


