Tomcat容器入门介绍
Tomcat容器入门介绍
Tomcat环境配置
PS:JDK的安装这里就不讲了,找到安装包直接下一步下一步就行了。
1、配置JDK
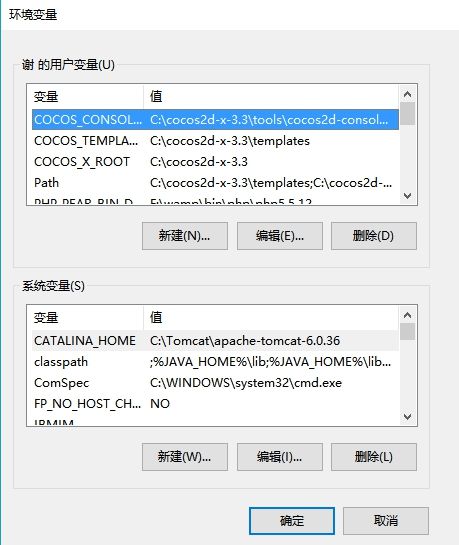
在Windows10下,找到环境变量
在环境变量中添加JDK主目录
格式为:JAVA_HOME= 指向你的jdk的主目录(并不是bin文件目录)
在环境变量中添加路径
格式为:path = %JAVA_HOME%\bin;
在环境变量中添加classpath
格式为:classpath: .;%JAVA_HOME%\lib\dt.jar;%JAVA_HOME%\lib\tools.jar;
至此,JDK就配置完了。
PS:如果在不配置JAVAHOME的前提下可以用如下方法启动tomcat
在startup.bat的第25行中添加set JAVA_HOME=JKD路径
2、启动tomcat
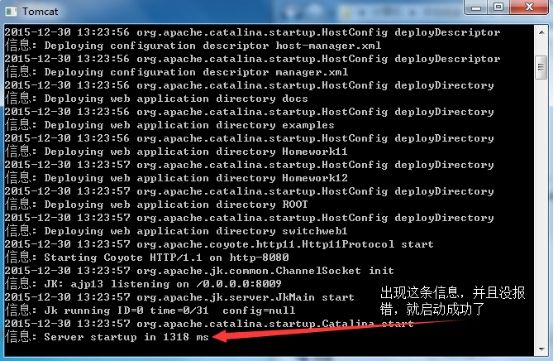
到 tomcat 主目录下的bin/startup.bat点击启动
3、验证是否安装成功
在浏览器中输入http://127.0.0.1:8080(8080是默认端口,如果该端口被占用需要到主目录/conf/server.xml中改端口号)
出现这个界面,就表示tomcat已经配置成功了。
Tomcat配置异常及其解决
1、JAVA_HOME 配置错误,或者没有配置
这时候,可以按照上面的步骤在来一次,在命令行中输入java -version,如果显示
就表示成功了。
2、如果你的机器已经占有了8080 端口,则无法启动
解决方法
(1) 你可以8080 先关闭
netstat –an
netstat –anb 来查看谁占用该8080
(2) 主动改变tomcat的端口.
到 conf/server.xml 文件中修改
3、 能够正常启动,但是会导航到另外一个页面
去修改工具->管理加载项,把默认的导航给禁用即可
4、浏览器显示404 Not Found
在访问 tomcat时候,一定要保证 tomcat 服务器是启动,不然就会出现这种错误。
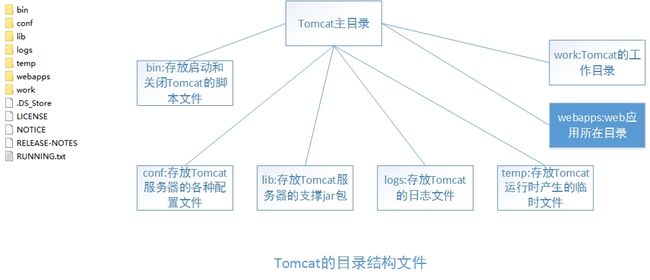
Tomcat的目录结构文件
bin: 启动和关闭tomcat的bat文件
conf: 配置文件
-->server.xml : 该文件用于配置和 server 相关的信息, 比如 tomcat启动端口后,配置Host, 配置Context 即web应用
-->web.xml : 该文件配置与 web应用(web应用就相当于是一个 web站点)
-->tomcat-users.xml: 该文件用户配置tomcat 的用户密码 和 权限
lib 目录: 该目录放置运行tomcat 运行需要的jar包
logs 目录:存放日志, 当我们需要去查看日志的时候,很有用!,当我们启动tomcat错误时候,可以查询信息.
webapps 目录: 该目录下,放置我们的web应用(web 站点), 比如:
建立 web1 目录 下面放置我们的html 文件 jsp 文件..图片... 则 web1就被当做一个web应用管理起来(☞ 特别说明tomcat 6.0 以后支持 tomcat 5 版本 还有别的设置)
work: 工作目录: 该目录用于存放jsp被访问后 生成的对应的 server文件 和.class文件
如何访问一个web应用的某个文件
PS:想要访问一个WEB应用中的某个文件可以采用url(Uniform Resource Locator)统一资源定位符来访问,其格式如上。
Tomcat应用部署目录结构规范
Tomcat管理虚拟目录
需求:当希望将web应用部署到非webapps目录下时,怎么解决这问题。
PS:可以通过虚拟目录配置技术解决。
配置步骤
1、找到server.xml文件
2、编辑host节点,添加Context path
例如:要访问该web应用根目录下的hello.html文件
实际访问时输入的地址:http://localhost:8088/应用名/hello.html
3、重启、重新部署生效
context的几个属性的说明
path: 应用名称
docbase: web应用所在的绝对路径
reloadable: 如果设为ture ,表示 tomcat 会自动更新 web应用,但是这个开销大,建议在开发过程中,可以设为true, 但是真的发布了,则应当设为false
upackWAR: 如果设为 ture ,则自动解压,否则不自动解压.
PS:war包的打包和Tomcat怎么部署war包可以使用搜索引擎找到。
配置域名
实现的步骤如下:
(1) 在C:\WINDOWS\system32\drivers\etc 下的host文件 添加127.0.0.1 www.myweb.com
(2) 在tomcat 的server.xml文件添加主机名
(3) 在d:\web3 加入了一个 /WEB-INF/web.xml 把 hello2.html设为首页面,如果连端口都不希望带,则可以把tomcat的启动端口设为80即可.
(4) 重启生效
Tomcat框架机制
Tomcat配置默认主机
在tomcat/conf/server.xml 文件
如:
Tomcat配置线程池
Connector是可以配置共享线程池的,其作用是在访问量多的情况下,自动增加线程数量,直到maxThread为止,访问量趋于平缓之后渐渐减少线程数量,最少到minSpareThreads。开启Tomcat,该线程池即有minSpareThread条线程。
Executor标签即为线程池
maxThreads属性即为最大线程数
minSpareThreads即为最小空闲的线程数
Connector标签即为连接器
executor属性即为指定线程池
PS:Connector标签可以配置,maxThread,minSpareThreads两个属性,其作用和配置executor属性一样,但同时配置了executor和maxThread,minSpareThread。Connector会优先选择executor配置的线程池。
PS:建议使用executor属性和Executor标签来配置线程池,这样不仅可设置的线程池参数更多,而且也可以实现几个Connector共享一个线程池的配置,注意:不是共享一个线程池。
Tomcat配置访问日志
className:类名,默认的访问日志类为org.apache.catalina.valves.AccessLogValve
directory:文件存放目录,默认是:logs,其相对路径是Tomcat的主目录
prefix:前缀
suffix:后缀
fileDateFormat:按照什么时间给日志切片(分成不同日志文件,防止单一日志文件过大)。官方文档的描述:The default value is yyyy-MM-dd. If you wish to rotate every hour, then set this value to yyyy-MM-dd.HH.
rotatable:该属性是与fileDateFormat配套使用的,默认为true,如果设置为false,日志文件将不切片。
pattern:输出文件的模式(格式)。
有以下模式:(截取自官方文档)
- %a - Remote IP address
- %A - Local IP address
- %b - Bytes sent, excluding HTTP headers, or '-' if zero
- %B - Bytes sent, excluding HTTP headers
- %h - Remote host name (or IP address if
enableLookupsfor the connector is false) - %H - Request protocol
- %l - Remote logical username from identd (always returns '-')
- %m - Request method (GET, POST, etc.)
- %p - Local port on which this request was received. See also
%{xxx}pbelow. - %q - Query string (prepended with a '?' if it exists)
- %r - First line of the request (method and request URI)
- %s - HTTP status code of the response
- %S - User session ID
- %t - Date and time, in Common Log Format
- %u - Remote user that was authenticated (if any), else '-'
- %U - Requested URL path
- %v - Local server name
- %D - Time taken to process the request, in millis
- %T - Time taken to process the request, in seconds
- %F - Time taken to commit the response, in millis
- %I - Current request thread name (can compare later with stacktraces)
There is also support to write information incoming or outgoing headers, cookies, session or request attributes and special timestamp formats. It is modeled after the Apache HTTP Server log configuration syntax. Each of them can be used multiple times with different xxx keys:
%{xxx}iwrite value of incoming header with namexxx%{xxx}owrite value of outgoing header with namexxx%{xxx}cwrite value of cookie with namexxx%{xxx}rwrite value of ServletRequest attribute with namexxx%{xxx}swrite value of HttpSession attribute with namexxx%{xxx}pwrite local (server) port (xxx==local) or remote (client) port (xxx=remote)%{xxx}twrite timestamp at the end of the request formatted using the enhanced SimpleDateFormat patternxxx
手工方式打WAR包
第一步:进入到要打包的目录下,注意,目录结构必须符合Tomcat规范。
SwitchdeMacBook-Pro:webapps switch$ cd Restaurant/
第二步:使用jar cvf 打包后文件名 打包的文件夹
SwitchdeMacBook-Pro:Restaurant switch$ jar cvf Restaurant.war .
已添加清单
正在添加: SoybeanMilk.html(输入 = 58) (输出 = 48)(压缩了 17%)
正在添加: WEB-INF/(输入 = 0) (输出 = 0)(存储了 0%)
正在添加: WEB-INF/classes/(输入 = 0) (输出 = 0)(存储了 0%)
正在添加: WEB-INF/classes/com/(输入 = 0) (输出 = 0)(存储了 0%)
正在添加: WEB-INF/classes/com/netease/(输入 = 0) (输出 = 0)(存储了 0%)
正在添加: WEB-INF/classes/com/netease/NoodlesServlet.class(输入 = 1114) (输出 = 608)(压缩了 45%)
正在添加: WEB-INF/classes/com/netease/NoodlesServlet.java(输入 = 740) (输出 = 318)(压缩了 57%)
正在添加: WEB-INF/web.xml(输入 = 361) (输出 = 173)(压缩了 52%)
PS:可以看到打包成功了
SwitchdeMacBook-Pro:Restaurant switch$ ls
Restaurant.war SoybeanMilk.html WEB-INF
第三步:将打包好的文件移动至应用目录,默认为:Tomcat主目录下的webapps
SwitchdeMacBook-Pro:Restaurant switch$ mv Restaurant.war ..
PS:可以看到移动到了webapps目录下
SwitchdeMacBook-Pro:Restaurant switch$ cd ..
SwitchdeMacBook-Pro:webapps switch$ ls
ROOT Restaurant Restaurant.war docs examples host-manager manager
PS:这是将原来的应用删除
SwitchdeMacBook-Pro:webapps switch$ rm -rf Restaurant
PS:原来的应用已被删除
SwitchdeMacBook-Pro:webapps switch$ ls
ROOT Restaurant.war docs examples host-manager manager
PS:启动Tomcat
SwitchdeMacBook-Pro:webapps switch$ ../bin/startup.sh
Using CATALINA_BASE: /Users/switch/apache-tomcat-7.0.70
Using CATALINA_HOME: /Users/switch/apache-tomcat-7.0.70
Using CATALINA_TMPDIR: /Users/switch/apache-tomcat-7.0.70/temp
Using JRE_HOME: /Library/Java/JavaVirtualMachines/jdk1.8.0_40.jdk/Contents/Home
Using CLASSPATH: /Users/switch/apache-tomcat-7.0.70/bin/bootstrap.jar:/Users/switch/apache-tomcat-7.0.70/bin/tomcat-juli.jar
Tomcat started.
PS:访问该应用
SwitchdeMacBook-Pro:webapps switch$ curl http://localhost:8080/Restaurant/noodles
Noodles with Tomcat
PS:可以看到webapps目录下自动生成了该war包对应的应用
SwitchdeMacBook-Pro:webapps switch$ ls
ROOT Restaurant Restaurant.war docs examples host-manager manager
SwitchdeMacBook-Pro:webapps switch$
----------参考《Apache Tomcat 7 Configuration Reference (7.0.70) - The Valve Component》
----------参考《韩顺平.细说Servlet》


