CentOS7.4.1708下mysql5.7.30主从配置
前言:两个服务器,172.16.56.177为主,172.16.56.178为从。
1、删除mysql
我的服务器原来安装的是mysql数据库,需要彻底删除,如果是别的数据库自行BD||GG。
(1)、查看安装的mysql,并删除,命令合二为一。
rpm -ev $(rpm -qa|grep -i mysql)
(2)、如果mysql数据库在使用,杀死进程
ps -ef | grep mysql
执行上面命令得到进程号
kill -9 进程号
(3)、删除mysql残留文件
rm -rf $(find / -name mysql)
rm -rf /etc/my.cnf
2、安装mysql
(1)、下载mysql的tar包
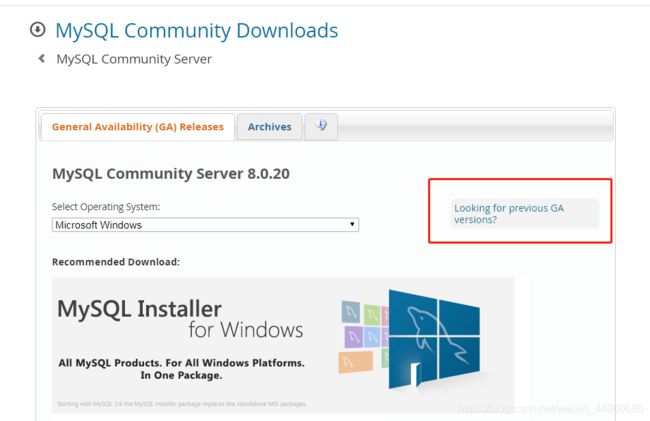
mysql官网:https://dev.mysql.com/downloads/mysql/

点击上图中Looking for previous GA versions?,可以选择历史版本

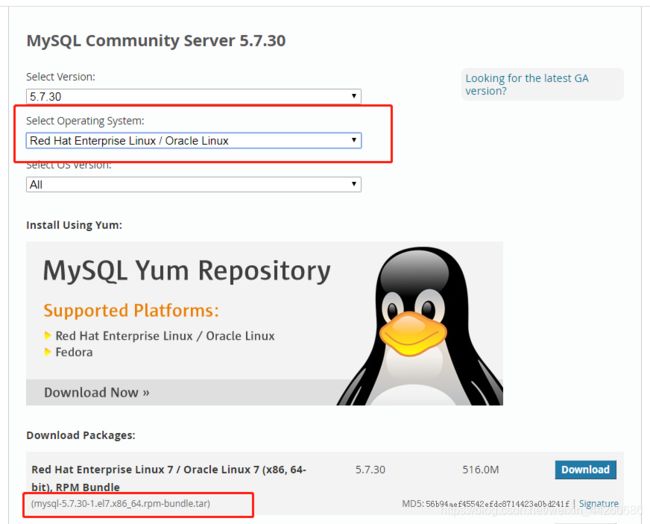
进入上图选择自己服务器的版本,不知道自己服务器版本的BD||GG,下载(mysql-5.7.30-1.el7.x86_64.rpm-bundle.tar)版本。
(2)、安装
下载完成
root用户登录服务器,在服务器上创建/usr/local/mysql文件夹,将下载的tar包上传到服务器:/usr/local/mysql路径下,在/usr/local/mysql路径下执行解压命令:
tar -xvf mysql-5.7.30-1.el7.x86_64.rpm-bundle.tar
依次执行(几个包有依赖关系,所以执行有先后)下面命令安装
rpm -ivh mysql-community-common-5.7.30-1.el7.x86_64.rpm
rpm -ivh mysql-community-libs-5.7.30-1.el7.x86_64.rpm
rpm -ivh mysql-community-client-5.7.30-1.el7.x86_64.rpm
rpm -ivh mysql-community-server-5.7.30-1.el7.x86_64.rpm
中间如果有错误,自行BD||GG解决
(3)、初始化数据库
执行初始化命令
mysqld --initialize --user=mysql
初始化成功后生成密码,查看密码命令:
cat /var/log/mysqld.log
找到 A temporary password is generated for root@localhost: )1r3gi,hjgQa,root@localhost:字符串后面就是密码,前面空格不要复制
启动数据库服务
systemctl start mysqld.service
登录数据库:
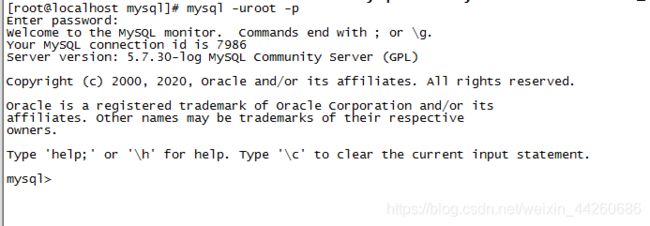
mysql -uroot -p
在Enter password:后面输入刚才初始化密码,输入的密码是看不见的,登录成功后

由于第一次登录,需要修改密码:
ALTER USER 'root'@'localhost' IDENTIFIED BY '新密码';
(4)、解决远程连接错误 " is not allowed to connect to this MYSOL server"
在服务器中登录mysql,
use mysql;
update user set host='%' where user ='root';
其中的‘%’是允许所有地址访问,也可以是设置为具体IP
(5)、在从服务器上重复以上步骤,安装mysql
(6)、主数据库配置
在主库mysql中创建一个用于主从读写的用户,赋予SLAVE权限,%是允许所有地址访问,也可以改为从库IP地址。
GRANT REPLICATION SLAVE ON *.* TO '用户名'@'%' IDENTIFIED BY '密码';
与上面行命令一样效果,只是用户拥有全部权限
GRANT ALL PRIVILEGES ON *.* TO '用户名'@'%' IDENTIFIED BY '密码';
使用一下命令验证是否生效
show grants for '用户名'@'%';
select * from user where user = '用户名';
(7)、修改主库my.cnf,重启
[mysqld]
#
# Remove leading # and set to the amount of RAM for the most important data
# cache in MySQL. Start at 70% of total RAM for dedicated server, else 10%.
# innodb_buffer_pool_size = 128M
#
# Remove leading # to turn on a very important data integrity option: logging
# changes to the binary log between backups.
# log_bin
#
# Remove leading # to set options mainly useful for reporting servers.
# The server defaults are faster for transactions and fast SELECTs.
# Adjust sizes as needed, experiment to find the optimal values.
# join_buffer_size = 128M
# sort_buffer_size = 2M
# read_rnd_buffer_size = 2M
datadir=/var/lib/mysql
socket=/var/lib/mysql/mysql.sock

# Disabling symbolic-links is recommended to prevent assorted security risks
symbolic-links=0

server-id=1 # (机器的唯一标识)
gtid_mode=on #开启gtid模式
enforce_gtid_consistency=on #强制gtid一致性
log-bin=master #开启二进制日志
binlog_format=row
# 指定需要复制的数据库名
binlog-do-db = djcofzs


log-error=/var/log/mysqld.log
pid-file=/var/run/mysqld/mysqld.pid

# 忽略表明大小写
lower_case_table_names = 1
重启后,查看效果
show master status;
show variables like '%server_id%';
第一个是查看主表日志记录,第二个是查看server-id值;
其他相关命令
锁表:flush tables with read lock;
解除锁表:unlock tables;
重置主从:reset master
(8)、从数据库配置
进入从库mysql,配置从库访问主库信息
change master to master_host='主库IP地址',master_user='用户名',master_password='密码',master_auto_position=1;
(9)、修改从库my.cnf,重启
[mysqld]
#
# Remove leading # and set to the amount of RAM for the most important data
# cache in MySQL. Start at 70% of total RAM for dedicated server, else 10%.
# innodb_buffer_pool_size = 128M
#
# Remove leading # to turn on a very important data integrity option: logging
# changes to the binary log between backups.
# log_bin
#
# Remove leading # to set options mainly useful for reporting servers.
# The server defaults are faster for transactions and fast SELECTs.
# Adjust sizes as needed, experiment to find the optimal values.
# join_buffer_size = 128M
# sort_buffer_size = 2M
# read_rnd_buffer_size = 2M
datadir=/var/lib/mysql
socket=/var/lib/mysql/mysql.sock

# Disabling symbolic-links is recommended to prevent assorted security risks
symbolic-links=0

log-error=/var/log/mysqld.log
pid-file=/var/run/mysqld/mysqld.pid
server-id=2

gtid_mode=on #开启gtid模式
enforce_gtid_consistency=on
log-bin=master
binlog_format=row
# 指定需要复制的数据库名为
replicate-do-db = djcofzs

# 忽略表明大小写
lower_case_table_names = 1
注意 server-id不要和主库一样!!!!!
重启后主从自动启动,查看是否有效启动
Show slave status;
主要看一下两列的值为Yes,说明成功

其他相关命令:
开启主从:start slave;
重置主从:reset slave;
关闭主从:stop slave;
(10)、问题
1、Slave_IO_Running值为Connecting
1.1 我这里因为配置从库访问主库信息时,master_host的值写成从库IP
change master to master_host='主库IP地址',master_user='用户名',master_password='密码',master_auto_position=1;
1.2 在从库执行如下命令,从库读取日志文件起点数和主库不统一,导致该问题
CHANGE MASTER TO MASTER_HOST='主库IP地址', MASTER_USER='用户名', MASTER_PASSWORD='密码', master_auto_position=1;
解决方式,从库不在使用master_auto_position=1这种自动同步模式,改为手动
change master to master_auto_position=0;
再执行
change master to master_host='主库IP地址',master_user='用户名',master_password='密码',MASTER_LOG_FILE='主库日志文件名',MASTER_LOG_POS=主库position值;
其中主库日志文件名和主库position值在主库执行如下命令查看
show master status;
2、Slave_SQL_Running值为No
我是在从库停止主从:stop slave;
在主库重置主从:reset master
然后回到从库:change master to master_host='主库IP地址',master_user='用户名',master_password='密码',master_auto_position=1;
再开启主从:start slave;


