UIGraphicsGetCurrentContext 和CGBitmapContextCreate 使用CGContextAddArc的奇怪处
看了别人使用CGContextRef来绘制各种图形. 参考网页是: [link] (http://blog.csdn.net/rhljiayou/article/details/9919713). 后来在纠结他的CGContextAddArc画弧时, 跟想的不一样. 再看别人的绘图源码时, 发现他是使用CGBitmapContextCreate返回的CGContextRef, 绘图逻辑跟正常人的思维一样了. 但是仍然有点诡谲的地方, 今天mark一下. 以后等知识面大了, 看能不能解惑.
准备测试工作.
- 使用xcode8 新建一个工程.
- 在AppDelegate.m里的didFinishLaunchingWithOptions添加下面语句, 将view显示控制切到ViewController.m中.
- (BOOL)application:(UIApplication *)application didFinishLaunchingWithOptions:(NSDictionary *)launchOptions {
    // Override point for customization after application launch.
    self.window = [[UIWindow alloc] initWithFrame:[[UIScreen mainScreen] bounds]];
    // Override point for customization after application launch.

    [self.window setRootViewController:[[ViewController alloc] init] ];

        [self.window makeKeyAndVisible];
    return YES;
}
- 新建TestArc, 继承UIControl类. 并将他add到ViewController中. 在ViewController.m中添加下面代码
#import "TestArc.h"

- (void)viewDidLoad {
    [super viewDidLoad];
    self.view.backgroundColor = [UIColor whiteColor];

    TestArc *arc = [[TestArc alloc]initWithFrame:CGRectMake(50, 50, 320, self.view.frame.size.height)];

    [self.view addSubview:arc];
}- 准备工作做好之后, 就修改TestArc.m里的- (void)drawRect:(CGRect)rect方法就好
使用UIGraphicsGetCurrentContext返回CGContextRef
- 直接把TestArc.m贴上
#import "TestArc.h"
#define ToRadian(_degrees)            ((M_PI * (_degrees))/180)// (radian*(M_PI/180.0))
@implementation TestArc


- (id)initWithFrame:(CGRect)frame
{
    self = [super initWithFrame:frame];
    if (self) {
        // Initialization code

    }
    return self;
}

// Only override drawRect: if you perform custom drawing.
// An empty implementation adversely affects performance during animation.
- (void)drawRect:(CGRect)rect {
    // Drawing code

    CGContextRef context = UIGraphicsGetCurrentContext();//使用UIGraphicsGetCurrentContext创建CGContextRef

    CGContextSetRGBFillColor (context,  1, 0, 0, 1.0);//设置填充颜色
    CGContextFillRect(context,CGRectMake(0, 0, 200, 200));//填充框


    //边框圆
    CGContextSetRGBStrokeColor(context,1,1,1,1.0);//画笔线的颜色
    CGContextSetLineWidth(context, 3.0);//线的宽度
    //void CGContextAddArc(CGContextRef c,CGFloat x, CGFloat y,CGFloat radius,CGFloat startAngle,CGFloat endAngle, int clockwise)1弧度=180°/π (≈57.3°) 度=弧度×180°/π 360°=360×π/180 =2π 弧度
    // x,y为圆点坐标,radius半径,startAngle为开始的弧度,endAngle为 结束的弧度,clockwise 0为顺时针,1为逆时针。
//    CGContextAddArc(context, 100, 20, 15, 0, 2*M_PI, 0); //添加一个圆

    CGContextAddArc(context, 50, 50, 50, ToRadian(-40), ToRadian(90), YES);
    CGContextAddArc(context, 50, 50, 0, ToRadian(0), ToRadian(0), YES);//这句话是让这里endPoint连接到原点.
    CGContextClosePath(context);

    CGContextDrawPath(context, kCGPathStroke); //绘制路径

}


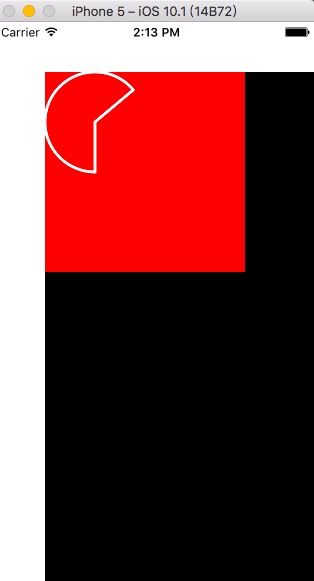
@end- 我们看一下他绘制的弧形

- 这里很明显, 他上半部分是-90~0度, 下半部分是0~90. 跟正常人思维不一样了. 把clockwise设为YES是逆时针画图的.
- 绘图起始原点是左上角, 跟正常人思维一样.
使用CGBitmapContextCreate返回CGContextRef
- 修改的TestArc.m文件如下:
#import "TestArc.h"
#define ToRadian(_degrees)            ((M_PI * (_degrees))/180)// (radian*(M_PI/180.0))

@interface TestArc ()
{
    UIImageView *       _contentView; //有这个貌似CGBitmapContextCreate才能绘图
}

@end

@implementation TestArc


- (id)initWithFrame:(CGRect)frame
{
    self = [super initWithFrame:frame];
    if (self) {
        // Initialization code
        [self setUserInteractionEnabled:YES];

        _contentView = [[UIImageView alloc] initWithFrame: CGRectMake(0, 0, 250, 250)];
        [_contentView setBackgroundColor:[UIColor blueColor]];
        [self addSubview:_contentView];

    }
    return self;
}

// Only override drawRect: if you perform custom drawing.
// An empty implementation adversely affects performance during animation.
- (void)drawRect:(CGRect)rect {
    // Drawing code

    CGContextRef context = CGBitmapContextCreate(NULL, 200, 200, 8, 4 * self.bounds.size.width, CGColorSpaceCreateDeviceRGB(), kCGImageAlphaPremultipliedFirst);//使用CGBitmapContextCreate创建CGContextRef


    CGContextSetRGBFillColor (context,  1, 0, 0, 1.0);//设置填充颜色
    CGContextFillRect(context,CGRectMake(0, 0, 100, 100));//填充框, 这里改小一点, 便于看图层结构

    //边框圆
    CGContextSetRGBStrokeColor(context,1,1,1,1.0);//画笔线的颜色
    CGContextSetLineWidth(context, 3.0);//线的宽度
    //void CGContextAddArc(CGContextRef c,CGFloat x, CGFloat y,CGFloat radius,CGFloat startAngle,CGFloat endAngle, int clockwise)1弧度=180°/π (≈57.3°) 度=弧度×180°/π 360°=360×π/180 =2π 弧度
    // x,y为圆点坐标,radius半径,startAngle为开始的弧度,endAngle为 结束的弧度,clockwise 0为顺时针,1为逆时针。
    //    CGContextAddArc(context, 100, 20, 15, 0, 2*M_PI, 0); //添加一个圆

    CGContextAddArc(context, 50, 50, 50, ToRadian(-40), ToRadian(90), YES);
    CGContextAddArc(context, 50, 50, 0, ToRadian(0), ToRadian(0), YES);//这句话是让这里endPoint连接到原点.
    CGContextClosePath(context);

    CGContextDrawPath(context, kCGPathStroke); //绘制路径

    //下面是使用CGBitmapContextCreate后才能显示所绘图形
    CGImageRef imageMasked = CGBitmapContextCreateImage(context);
    CGContextRelease(context);
    UIImage *newImage = [UIImage imageWithCGImage:imageMasked];
    CGImageRelease(imageMasked);

    [_contentView setImage:newImage];

}

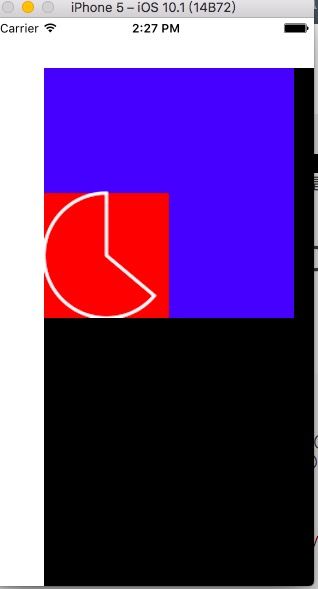
@end- 我们看一下他绘制的弧形

3.画那个弧形, 跟正常人思维差不多了. 下半部是-90~0度, 上半部分是0~90. 把clockwise设为YES是顺时针画图的. - 有一点让我惊讶的是, 他的原点居然是跑到左下角. 这个跟正常人思维有点不一样了.
总结
使用UIGraphicsGetCurrentContext和CGBitmapContextCreate都能达到绘图的目的,但是他们的使用效果有点差别. 这个需要注意. 根据应用场景来选择合适的Context.
初学ios, 有很多不懂的. 望见谅. ~囧~