接口管理这下总会了吧?
接口管理这下总会了吧?
文章目录
- 接口管理这下总会了吧?
-
- 使用方式
-
- 引入依赖
- 添加 Swagger 注解
- 配置扫描规则 application.yaml
- 效果
- 实现原理
- 小结
利用 Spring Boot 快速集成 Swagger 实现
Swagger 作为一款优秀的 API 接口文档管理框架,在过往的使用过程中,着实踩了不少坑。一开始,也在自己的博客上整理了使用说明文档,它的配置,说老实话,很多刚上手的同学还是觉得很难使用。
我就这个问题思考了下,决定基于 Spring Boot 的装配机制,写个简单好用的 Api Starter Jar 包,让使用的人专注于接口自身,而非陷于一堆配置中无法自拔。
主要目的:
- 多种扫描方式(包路径、路由前缀)
- 自定义前缀
- 接口分组管理
- 无需额外配置,专注于接口文档自身
使用方式
引入依赖
pub.dsb.framework.boot:dsb-boot-api-starter:0.0.4.RELEASE
添加 Swagger 注解
- controller
package pub.dsb.api.controller.business;

import io.swagger.annotations.Api;
import io.swagger.annotations.ApiOperation;
import org.springframework.http.MediaType;
import org.springframework.web.bind.annotation.RequestBody;
import org.springframework.web.bind.annotation.RequestMapping;
import org.springframework.web.bind.annotation.RequestMethod;
import org.springframework.web.bind.annotation.RestController;
import pub.dsb.api.object.dto.ProductInfoDTO;
import pub.dsb.api.object.dto.UserInfoDTO;
import pub.dsb.framework.boot.rest.R;
import pub.dsb.framework.boot.security.annotation.Decrypt;

@Api(value = "/v1/business", tags = {
     "业务处理模块"})
@RestController
@RequestMapping("/v1/business")
public class BusinessController {


    /**
     * 下单
     *
     * @param productInfo
     * @return
     */
    @RequestMapping(value = "/order", method = RequestMethod.POST)
    @ApiOperation(value = "下单", notes = "下单,返回订单号", consumes = MediaType.APPLICATION_JSON_VALUE, produces = MediaType.APPLICATION_JSON_VALUE)
    public R<String> userInfo(ProductInfoDTO productInfo) {

        return R.ok("business_id_45454545478");
    }
}
- dto
package pub.dsb.api.object.dto;

import io.swagger.annotations.ApiModel;
import io.swagger.annotations.ApiModelProperty;
import lombok.AllArgsConstructor;
import lombok.Builder;
import lombok.Data;
import lombok.NoArgsConstructor;

@Data
@AllArgsConstructor
@NoArgsConstructor
@Builder
@ApiModel(description = "商品信息:流水号、信息、数量")
public class ProductInfoDTO {


    @ApiModelProperty(value = "订单流水号", example = "20200812452404", dataType = "int")
    private int orderNumber;
    @ApiModelProperty(value = "商品名称", example = "Mac 笔记本", dataType = "string")
    private String productName;
    @ApiModelProperty(value = "数量", example = "2", dataType = "int")
    private int count;


}
配置扫描规则 application.yaml
dsb:
  webmvc:
    swagger:
    	# 默认分组参数,配置了的话生成默认分组下的接口扫描文档
    	# base-package: x.x.x
      # 接口分组集合
      api-groups:
        - group-name: 业务处理模块
          # 接口前缀
          path-mapping: /api/biz/
          # 包路径匹配
          apis: pub.dsb.api.controller.business
          # 路由匹配
          paths: /v1/**
          api-info:
            title: 接口文档标题
            description: 接口文档描述
            terms-of-service-url: 服务地址
            name: 接口负责人:姓名
            url: 接口负责人:个人地址
            email: [email protected]
            license: License 授权
            license-url: License 地址
            version: 接口文档版本号
        - group-name: 基础信息管理
          # 接口前缀
          path-mapping: /api/docs/
          # 包路径匹配
          apis: pub.dsb.api.controller.user
          # 路由匹配
          paths: /v1/**
          api-info:
            title: 接口文档标题
            description: 接口文档描述
            terms-of-service-url: 服务地址
            name: 接口负责人:姓名
            url: 接口负责人:个人地址
            email: [email protected]
            license: License 授权
            license-url: License 地址
            version: 接口文档版本号
效果
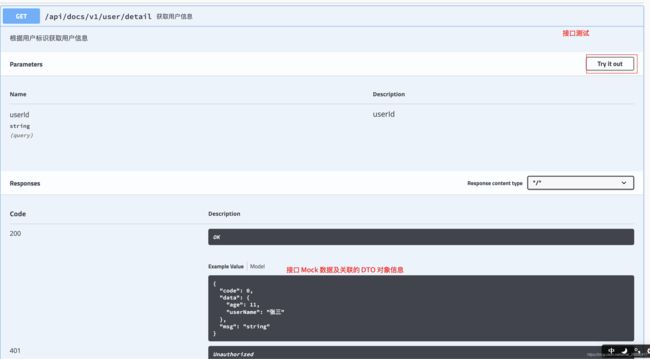
- 访问
http://127.0.0.1:8080/swagger-ui.html
- 请求参数
实现原理
基于 Spring Boot 的约定大于配置,根据 YAML 中配置的接口分组信息,直接生成对应所需 Docket Bean
核心源码逻辑
package pub.dsb.framework.boot.webmvc.configuration;

import com.google.common.base.Predicate;
import com.google.common.base.Predicates;
import org.apache.commons.collections4.CollectionUtils;
import org.apache.commons.lang3.StringUtils;
import org.springframework.beans.BeansException;
import org.springframework.beans.factory.BeanFactory;
import org.springframework.beans.factory.BeanFactoryAware;
import org.springframework.beans.factory.config.ConfigurableBeanFactory;
import org.springframework.boot.autoconfigure.condition.ConditionalOnClass;
import org.springframework.boot.autoconfigure.condition.ConditionalOnProperty;
import org.springframework.context.annotation.Bean;
import org.springframework.context.annotation.Configuration;
import org.springframework.context.annotation.Import;
import pub.dsb.framework.boot.webmvc.configuration.Swagger2Configuration;
import pub.dsb.framework.boot.webmvc.properties.SwaggerProperties;
import springfox.documentation.RequestHandler;
import springfox.documentation.builders.ApiInfoBuilder;
import springfox.documentation.builders.PathSelectors;
import springfox.documentation.builders.RequestHandlerSelectors;
import springfox.documentation.service.Contact;
import springfox.documentation.spi.DocumentationType;
import springfox.documentation.spring.web.plugins.ApiSelectorBuilder;
import springfox.documentation.spring.web.plugins.Docket;

import java.util.ArrayList;
import java.util.List;

/**
 *
 * Swagger API Docket 配置
 *
 *
 * @author Yiyuery
 * @date 2020/8/21
 * @since 0.0.1
 */
@Configuration
@Import({
     Swagger2Configuration.class, SwaggerProperties.class})
@ConditionalOnProperty(prefix = "dsb.webmvc.swagger", value = "enabled", matchIfMissing = true)
@ConditionalOnClass(Docket.class)
public class SwaggerDocketConfiguration implements BeanFactoryAware {


    private BeanFactory beanFactory;

    @Override
    public void setBeanFactory(BeanFactory beanFactory) throws BeansException {

        this.beanFactory = beanFactory;
    }

    /**
     * 注册 Docket
     *
     * @param swaggerProperties
     * @return
     */
    @Bean
    public List<Docket> registerDocket(SwaggerProperties swaggerProperties) {

        ConfigurableBeanFactory configurableBeanFactory = (ConfigurableBeanFactory) beanFactory;
        List<Docket> beans = new ArrayList();
        List<SwaggerProperties.ApiGroup> apiGroups = swaggerProperties.getApiGroups();
        if (CollectionUtils.isNotEmpty(apiGroups)) {

            registerDockets(apiGroups, beans, configurableBeanFactory);
        } else if (StringUtils.isNotEmpty(swaggerProperties.getBasePackage())) {

            //配置了默认包路径的扫描配置
            Docket docket = new Docket(DocumentationType.SWAGGER_2)
                    .groupName("DEFAULT_GROUP")
                    .select()
                    .apis(RequestHandlerSelectors.basePackage(swaggerProperties.getBasePackage()))
                    .build();
            beans.add(docket);
            configurableBeanFactory.registerSingleton(docket.getGroupName() + "_Docket", docket);
        }
        return beans;
    }

    /**
     * 解析配置 注册 Docket
     *
     * @param apiGroups
     * @param beans
     * @param configurableBeanFactory
     */
    private void registerDockets(List<SwaggerProperties.ApiGroup> apiGroups, List<Docket> beans, ConfigurableBeanFactory configurableBeanFactory) {


        for (SwaggerProperties.ApiGroup apiGroup : apiGroups) {

            SwaggerProperties.ApiInfo apiInfo = apiGroup.getApiInfo();
            Docket docket = new Docket(DocumentationType.SWAGGER_2)
                    .apiInfo(new ApiInfoBuilder()
                            .contact(new Contact(apiInfo.getName(), apiInfo.getUrl(), apiInfo.getEmail()))
                            .description(apiInfo.getDescription())
                            .title(apiInfo.getTitle())
                            .version(apiInfo.getVersion())
                            .termsOfServiceUrl(apiInfo.getTermsOfServiceUrl())
                            .license(apiInfo.getLicense())
                            .licenseUrl(apiInfo.getLicenseUrl()).build())
                    .groupName(apiGroup.getGroupName());
            ApiSelectorBuilder select = docket.select();
            if (CollectionUtils.isNotEmpty(apiGroup.getApis())) {

                Predicate<RequestHandler>[] apis = new Predicate[apiGroup.getApis().size()];
                int index = 0;
                for (String pack : apiGroup.getApis()) {

                    apis[index++] = RequestHandlerSelectors.basePackage(pack);
                }
                select.apis(Predicates.or(apis));
            }
            if (CollectionUtils.isNotEmpty(apiGroup.getPaths())) {

                Predicate<String>[] paths = new Predicate[apiGroup.getPaths().size()];
                int index = 0;
                for (String path : apiGroup.getPaths()) {

                    paths[index++] = PathSelectors.ant(path);
                }
                select.paths(Predicates.or(paths));
            }

            select.build();
            if (StringUtils.isNotEmpty(apiGroup.getPathMapping())) {

                docket.pathMapping(apiGroup.getPathMapping());
            }
            beans.add(docket);
            configurableBeanFactory.registerSingleton(docket.getGroupName() + "_Docket", docket);
        }
    }
}
小结
基于 dsb-boot-api-starter,对于接口文档的提供便只剩接口的注解和扫描路径等必要的配置工作了,是不是忍不住要赶快试试了呢?
适用场景:
- 敏捷开发
- 微服务 API 过多
- 前后端分离
- …
Tips:使用过程中遇到问题可以直接加小编反馈哦,光速修复信不信?


