Ansible批量执行shell脚本,检查服务器的磁盘使用情况
实战ansible
前言
本次实战目的:
- 批量管理200-300台机器,执行shell脚本任务等功能。
- 检查服务器的磁盘使用情况
- 在此,我们使用几台机器进行模拟即可。
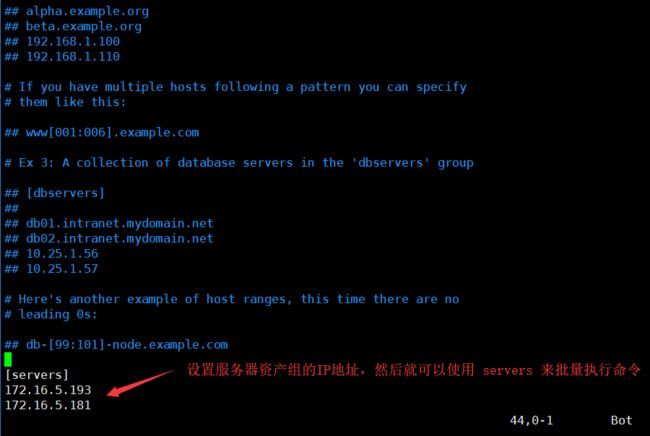
配置ansible的host文件(/etc/ansible/hosts),设置需要执行的服务器IP地址
执行一个简单的shell命令,使用管道符号等
[root@server81 ansible]# ansible servers -m shell -a "df -h | grep dev"
172.16.5.193 | CHANGED | rc=0 >>
/dev/mapper/centos-root   37G   12G   26G  32% /
devtmpfs                 473M     0  473M   0% /dev
tmpfs                    489M     0  489M   0% /dev/shm
/dev/sda1               1014M  179M  836M  18% /boot
/dev/sr0                 4.3G  4.3G     0 100% /run/media/root/CentOS 7 x86_64

172.16.5.181 | CHANGED | rc=0 >>
/dev/mapper/centos-root   50G   22G   29G  43% /
devtmpfs                 901M     0  901M   0% /dev
tmpfs                    912M  124K  912M   1% /dev/shm
/dev/sda1               1014M  143M  872M  15% /boot
/dev/mapper/centos-home   37G  1.6G   36G   5% /home

[root@server81 ansible]#
使用ansible的shell命令可以执行shell脚本以及命令(包含管道),下面来看看怎么执行shell脚本。
执行shell脚本
要执行shell脚本,首先需要三个步骤
- 写好shell脚本
- 批量拷贝shell脚本到各台服务器
- 批量执行shell脚本
编写一个检查磁盘使用率的脚本
[root@server81 ansible]# vim check_disk.sh

#!/bin/bash
basedir=$(cd `dirname $0`;pwd)

diskmax=10 # 磁盘的阈值

function check_max(){
   local disk_size=$1
   if [ $disk_size -ge $diskmax ]
   then
      echo "unhealth"
   else
      echo "health"
   fi
}

function check_disk_info(){
   df -h | grep -v /dev/loop0 | grep -v /dev/sr0 | awk 'NR > 1 {print $5}' | cut -d '%' -f 1 | while read disk_size
   do
        echo ""
        echo "disk_size=$disk_size%"
        check_max $disk_size
   done
}

check_disk_info
执行如下:
[root@server81 ansible]# ./check_disk.sh

disk_size=43%
unhealth

disk_size=0%
health

disk_size=0%
health

disk_size=10%
unhealth

disk_size=0%
health

disk_size=15%
unhealth

disk_size=5%
health

disk_size=0%
health
[root@server81 ansible]#
设置磁盘使用率的阈值是 10% ,这里只要判断打印出存在unhealth 非健康的磁盘即可。但是这篇主要是讲解ansible执行shell,暂时不继续深入研究这个脚本如何优化了。
拷贝脚本之前,先远程创建好准备拷贝过去的文件目录。
其中远程创建文件目录有两种方式,操作如下:
shell命令方式
[root@server81 work]# ansible servers -m shell -a "mkdir -p /work/ansible"
 [WARNING]: Consider using the file module with state=directory rather than running mkdir.  If you need to use command because file
is insufficient you can add warn=False to this command task or set command_warnings=False in ansible.cfg to get rid of this
message.

172.16.5.193 | CHANGED | rc=0 >>


172.16.5.181 | CHANGED | rc=0 >>


[root@server81 work]# ls
ansible  proxy  sh
[root@server81 work]# ls -ll
total 4
drwxr-xr-x  2 root root    6 Dec  4 11:31 ansible
drwxr-xr-x 11 root root 4096 Nov  1 14:52 proxy
drwxr-xr-x  2 root root   40 Nov 23 17:47 sh
[root@server81 work]#
从上面看到server81的该目录下已经创建了/work/ansible的文件目录了,那么另一台服务器呢,我们来看看。
那么其实,现在已经可以开始拷贝脚本了,我个人是比较喜欢这种方式。但是也可以看到执行的时候出现了警告,最好使用file命令来执行。
file命令执行创建文件夹
ansible servers -m file -a "path=/work/file state=directory mode=0644"
批量拷贝shell脚本到各台服务器
ansible 资产组 -m copy -a "src=拷贝文件路径 dest=拷贝目前文件路径 mode=0755
[root@server81 ansible]# ansible servers -m copy -a "src=/root/ansible/check_disk.sh dest=/work/file/check_disk.sh mode=0755"
172.16.5.193 | CHANGED => {
    "changed": true,
    "checksum": "e11811d20235155ab1bcebc36d91e7c660204ab8",
    "dest": "/work/file/check_disk.sh",
    "gid": 0,
    "group": "root",
    "md5sum": "597beadbc968775183a41dd14cd92460",
    "mode": "0755",
    "owner": "root",
    "size": 472,
    "src": "/root/.ansible/tmp/ansible-tmp-1543895195.8-77636350582289/source",
    "state": "file",
    "uid": 0
}
172.16.5.181 | CHANGED => {
    "changed": true,
    "checksum": "e11811d20235155ab1bcebc36d91e7c660204ab8",
    "dest": "/work/file/check_disk.sh",
    "gid": 0,
    "group": "root",
    "md5sum": "597beadbc968775183a41dd14cd92460",
    "mode": "0755",
    "owner": "root",
    "size": 472,
    "src": "/root/.ansible/tmp/ansible-tmp-1543895195.83-172748548893076/source",
    "state": "file",
    "uid": 0
}
[root@server81 ansible]#
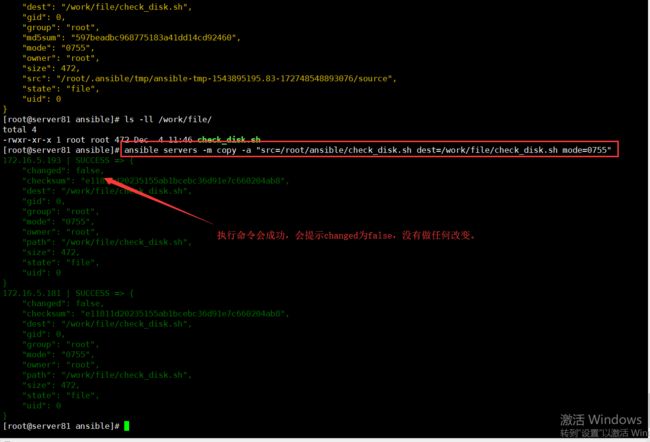
截图解析如下:
那么如果重复执行这个拷贝文件的命令,会导致怎么样的结果呢?
批量执行shell脚本
ansible servers -m shell -a "/work/file/check_disk.sh"
[root@server81 ansible]# ansible servers -m shell -a "/work/file/check_disk.sh"
172.16.5.193 | CHANGED | rc=0 >>

disk_size=32%
unhealth

disk_size=0%
health

disk_size=0%
health

disk_size=11%
unhealth

disk_size=0%
health

disk_size=18%
unhealth

disk_size=1%
health

172.16.5.181 | CHANGED | rc=0 >>

disk_size=43%
unhealth

disk_size=0%
health

disk_size=1%
health

disk_size=11%
unhealth

disk_size=0%
health

disk_size=15%
unhealth

disk_size=5%
health

disk_size=0%
health

[root@server81 ansible]#
关注微信公众号,回复【资料】,则可获得Python、PHP、JAVA、前端等视频资料。


