IDEA如何配置maven
IDEA如何配置maven:
目录
- IDEA如何配置maven:
- 前言
- 一、maven是什么?
- 二、web项目如何使用maven
-
- 下载maven依赖
- 新建maven文件夹
- 解压且在maven文件夹新建repository文件夹
- 修改settings.xml
- 新建 maven Web项目
- 新工程添加目录
- 修改xml
- 创建Tomcat部署项目工程
- 试运行
- 配置pom.xml
前言
教程笔记
以下是本篇文章正文内容,下面案例可供参考
一、maven是什么?
Maven是一个项目管理工具,它包含了一个项目对象模型 (Project Object Model),一组标准集合,一个项目生命周期(Project Lifecycle),一个依赖管理系统(Dependency Management System),和用来运行定义在生命周期阶段(phase)中插件(plugin)目标(goal)的逻辑。当你使用Maven的时候,你用一个明确定义的项目对象模型来描述你的项目,然后Maven可以应用横切的逻辑,这些逻辑来自一组共享的(或者自定义的)插件。
Maven 有一个生命周期,当你运行 mvn install 的时候被调用。这条命令告诉 Maven 执行一系列的有序的步骤,直到到达你指定的生命周期。遍历生命周期旅途中的一个影响就是,Maven 运行了许多默认的插件目标,这些目标完成了像编译和创建一个 JAR 文件这样的工作。
此外,Maven能够很方便的帮你管理项目报告,生成站点,管理JAR文件,等等。
二、web项目如何使用maven
下载maven依赖
maven网站链接
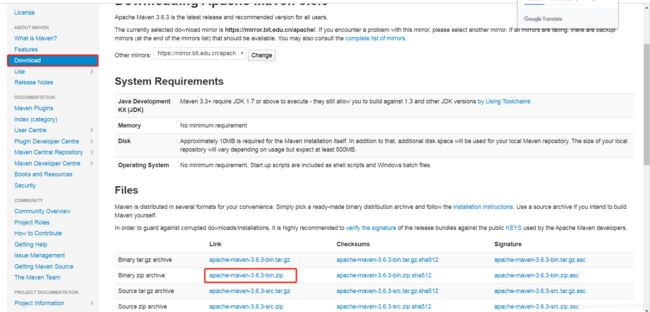
maven二进制依赖下载地址
下载二进制文件,这边用的是windows系统,上面的tar.gz是linux系统的。
新建maven文件夹
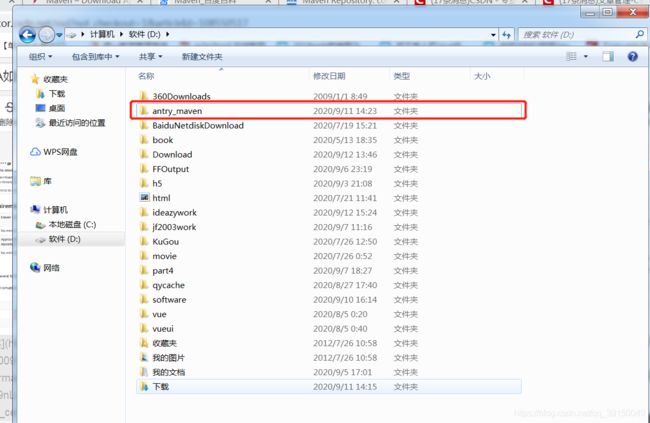
下载好解压,自己找个位置存放,那么我这边是在D盘创建一个新的文件夹
D:\antry_maven
解压且在maven文件夹新建repository文件夹
随后把解压文件放进来,且在目录下新建一个repository文件夹,如图所示:

同时简单介绍一下apache-maven-3.6.3目录结构
bin - 可执行的命令(如果要我们自己去记住maven的命令,学习成本很大,所以推荐用可视化界面,IDEA)
boot - 所有的启动项都在里面配置,就像window系统的启动项,在C盘一样。
conf - 重点:所有配置信息都在里面,等等需要修改,不然会死。
lib - 对应需要的jar文件
配置文件
修改settings.xml
随后更改一下 D:\antry_maven\apache-maven-3.6.3\conf\settings.xml文件

首先找到
  <!-- localRepository
   | The path to the local repository maven will use to store artifacts.
   |
   | Default: ${
     user.home}/.m2/repository
  <localRepository>/path/to/local/repo</localRepository>
  -->
随后将 <localRepository>/path/to/local/repolocalRepository>复制到注释外,并将 /path/to/local/repo 改成刚才我们创建的repository文件夹的位置,我这边的位置是D:\antry_maven\repository所以我改成这样
注意注意: 这边斜杆一定要注意,复制过来的位置和这里面需要的斜杆不一样,要改一下,我改完之后是这样
  <!-- localRepository
   | The path to the local repository maven will use to store artifacts.
   |
   | Default: ${
     user.home}/.m2/repository
  <localRepository>/path/to/local/repo</localRepository>
  -->
  <localRepository>D:/antry_maven/repository</localRepository>
随后找到
  <mirrors>
    <!-- mirror
     | Specifies a repository mirror site to use instead of a given repository. The repository that
     | this mirror serves has an ID that matches the mirrorOf element of this mirror. IDs are used
     | for inheritance and direct lookup purposes, and must be unique across the set of mirrors.
     |
    <mirror>
      <id>mirrorId</id>
      <mirrorOf>repositoryId</mirrorOf>
      <name>Human Readable Name for this Mirror.</name>
      <url>http://my.repository.com/repo/path</url>
    </mirror>
     -->
  </mirrors>
加入片段,这个片段为了到阿里的远程库去下载,这样速度快一点,不然会很慢。
<mirror>
	<id>alimaven</id>
	<name>aliyun maven</name>
	<url>http://maven.aliyun.com/nexus/content/groups/public/</url>
	<mirrorOf>central</mirrorOf>
</mirror>
maven默认使用jdk1.5版本,我用的是1.8版本,所以我们需要修改jdk的配置信息,也是修改settings.xml。
在profiles加上
<profile>
	<id>jdk-1.8</id>
	<activation>
		<activeByDefault>true</activeByDefault>
		<jdk>1.8</jdk>
	</activation>
	<properties>
		<maven.compiler.source>1.8</maven.compiler.source>
		<maven.compiler.target>1.8</maven.compiler.target>
		<maven.compiler.compilerVersion>1.8</maven.compiler.compilerVersion>
	</properties>
</profile>
然后可以点保存,关闭。
新建 maven Web项目
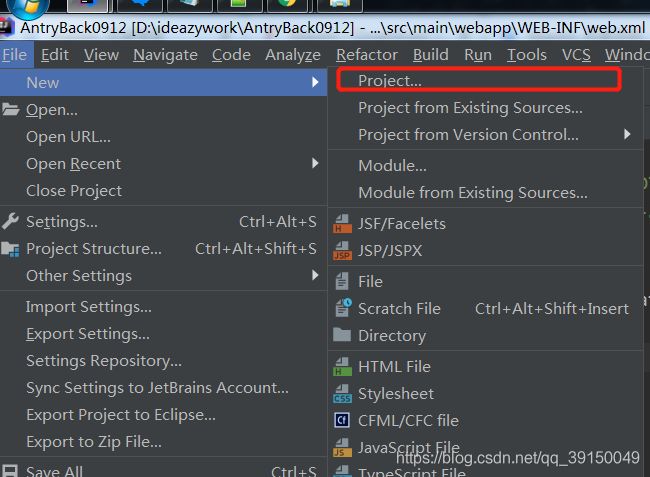
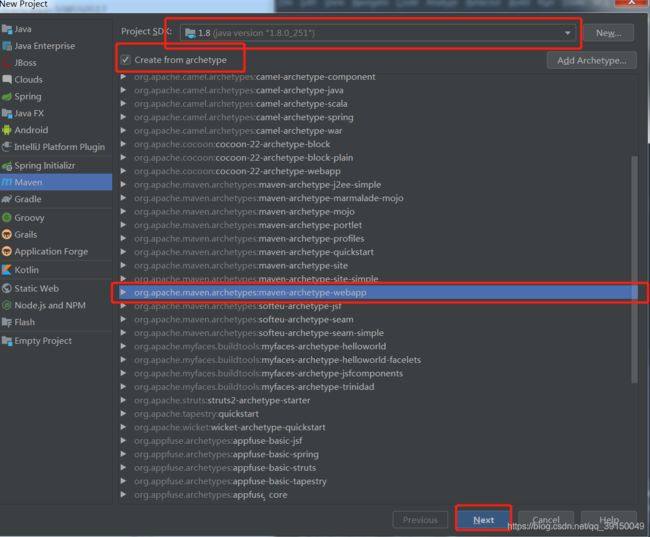
- 点击Create New Project - 选择Maven - 选择SDK(jdk位置,如果有设置过,就不要设置了)
- 勾选Create from arcetype - 选择maven-arcetype-webapp - 点击next按钮
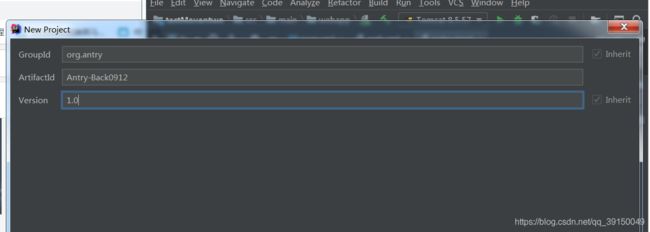
- 输入GroupId(这里的GroupId是公司的域名,我们先用:org.你们名字的首拼)
- 输入ArtifactId (项目名)
- Version写上1.0即可
- 点击Next按钮
- 点击Maven home directory后面的…按钮,选择Maven文件夹的路径,选择到apache-maven-3.6.3这个文件夹
- 点击ok
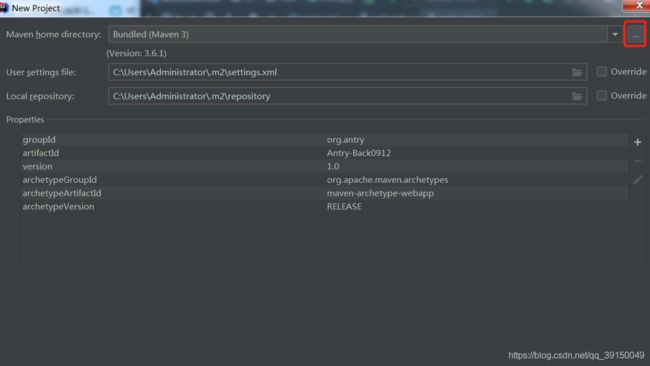
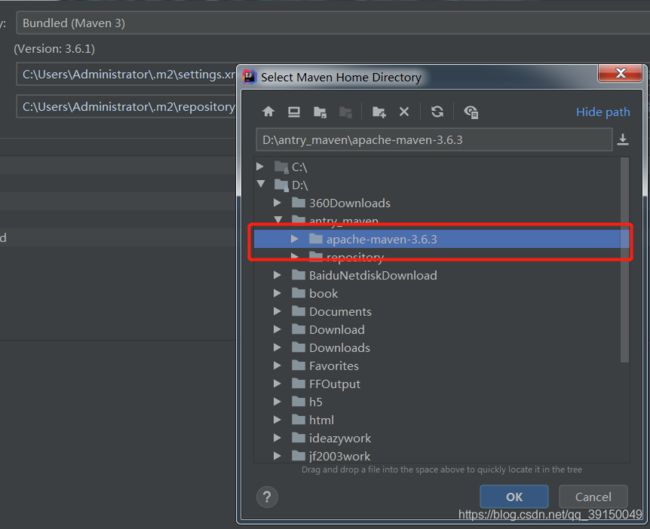
- 勾选User settings file后面的Overrider复选框
- 选择User settings file文件,找到我们之前编辑的settings.xml文件
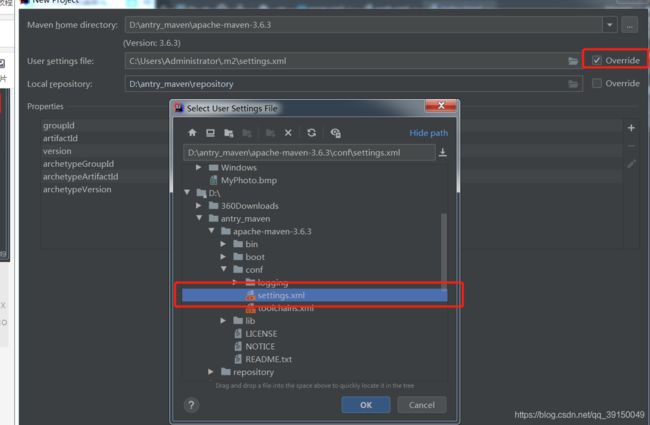
其它默认即可。
一切正常的话,这个时候会开始下载一些jar,可能需要一些时间,但不会特别久
新工程添加目录
随后
- 点击main文件夹右键 - new - directory - 输入java - 点击ok
- 点击main文件夹右键 - new - directory - 输入resources - 点击ok
- 点击java文件夹右键 - Mark Directory as - Source Root
- 点击resources文件夹右键 - Mark Directory as - Resource Root
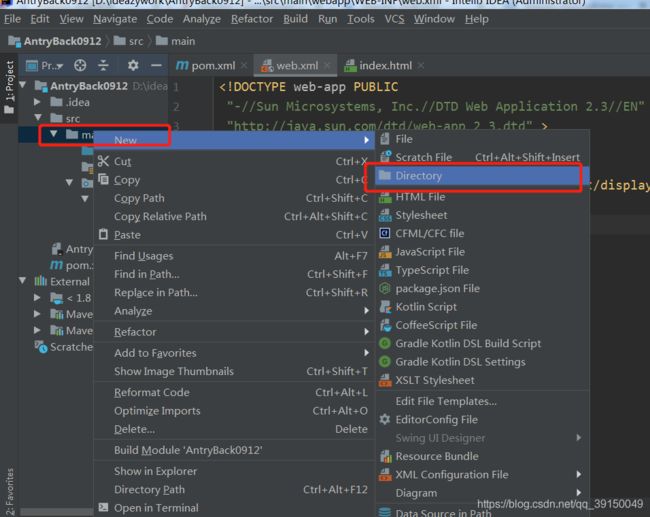
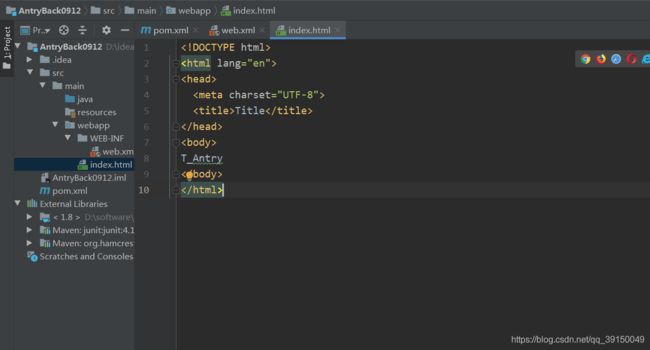
就有这样两个目录

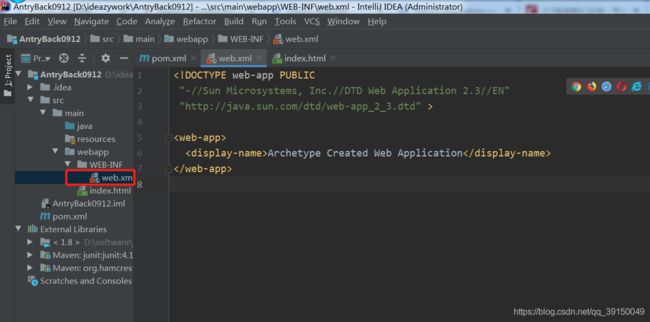
修改xml
<?xml version="1.0" encoding="UTF-8"?>
	<web-app xmlns="http://xmlns.jcp.org/xml/ns/javaee"
	 xmlns:xsi="http://www.w3.org/2001/XMLSchema-instance"
	 xsi:schemaLocation="http://xmlns.jcp.org/xml/ns/javaee http://xmlns.jcp.org/xml/ns/javaee/web-app_4_0.xsd"
	 version="4.0">

	 </web-app>
我喜欢html,所以我把index.jsp删掉,新建一个html文件,index.html
创建Tomcat部署项目工程
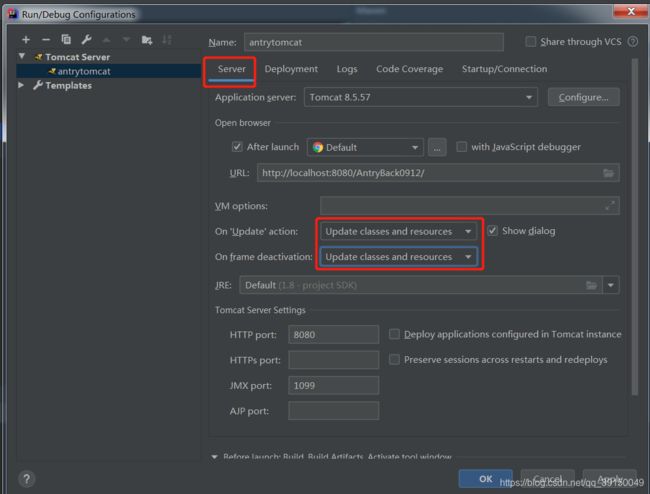
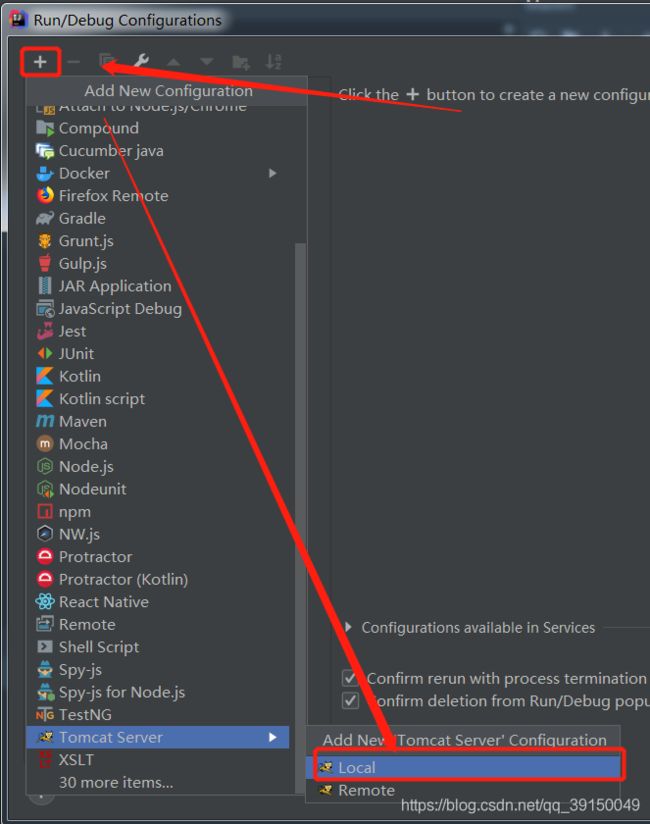
- Run - Edit Configurations… - 点击+号 - 选择Tomcat Server - Local
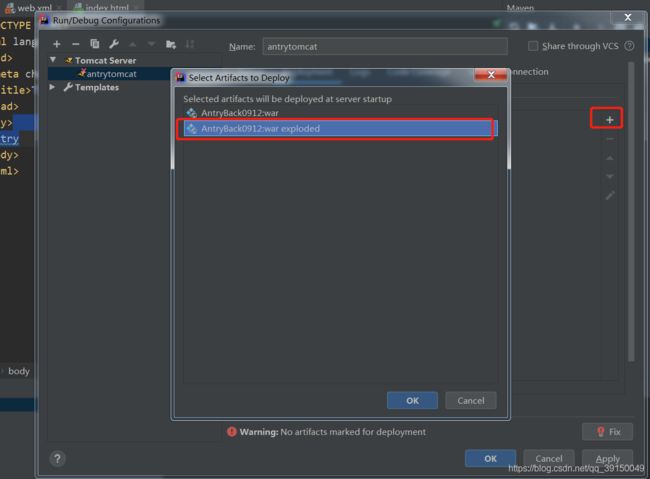
- 输入Name(这里是Tomcat的名字,随便都可以)

- 点击Deployment - 点击+号 - 选择Artifact - 选择 项目名:war exploded - 点击ok,
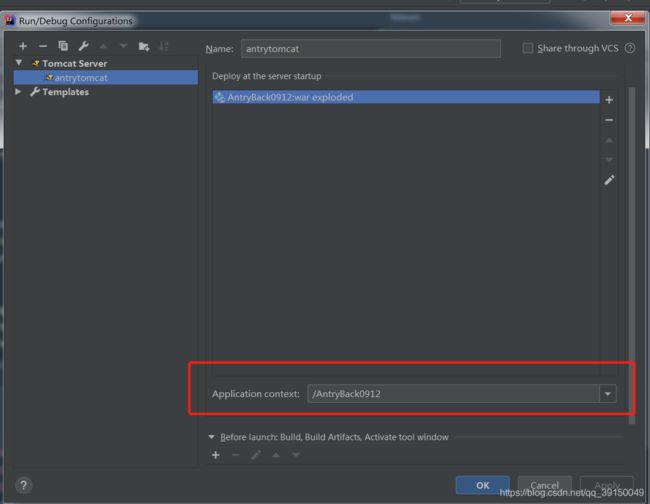
- Application context修改成 /项目名,把后缀去掉,省的URL很长
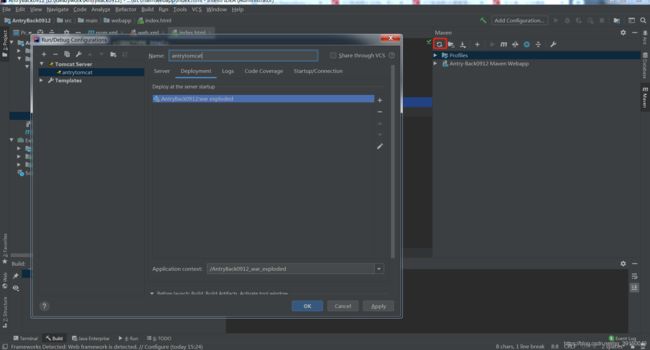
如果你没有artifact选项,那你要校验一下maven,如图所示
试运行
点击虫子图标启动项目
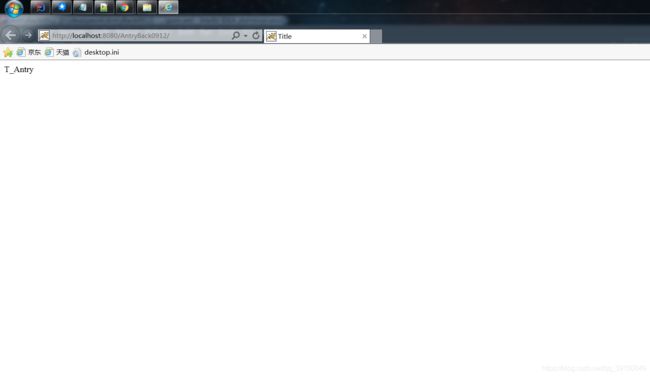
随后我们要导入我们写好的web项目,或者你要开始写项目,包要怎么加,还有一些配置
配置pom.xml
pom.xml配置:
- name和url标签可以删除
- dependency标签原有信息可以删除
dependency标签的信息如何去找呢?
https://mvnrepository.com/
到网站中搜索你所需要的的jar,选择后
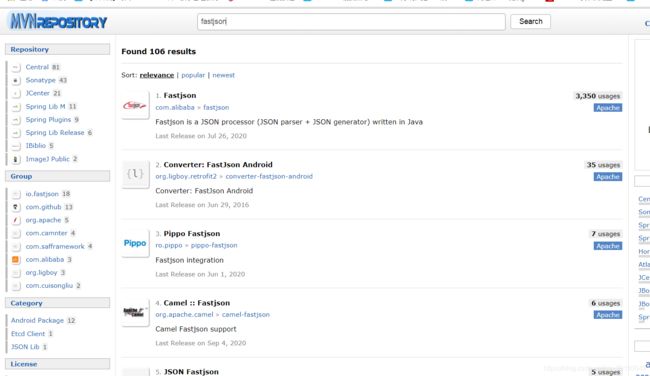
选好版本,复制这一段
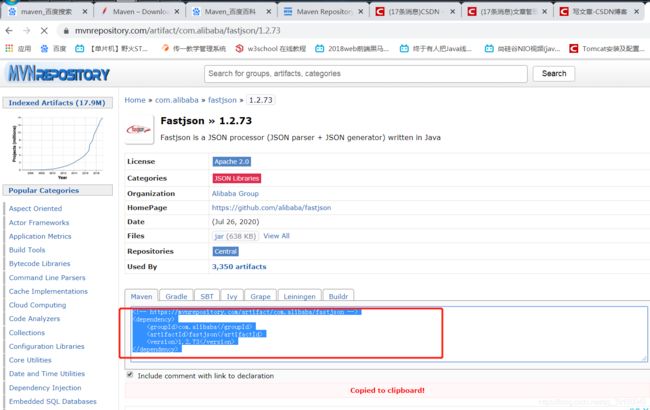
放到pom.xml 文件的dependencies标签中
例如我的dependencys标签写完是这样
<dependencies>
    <dependency>
      <groupId>junit</groupId>
      <artifactId>junit</artifactId>
      <version>4.11</version>
      <scope>test</scope>
    </dependency>

    <dependency>
      <groupId>javax.servlet</groupId>
      <artifactId>javax.servlet-api</artifactId>
      <version>4.0.1</version>
      <scope>provided</scope>
    </dependency>
    <dependency>
      <groupId>javax.servlet</groupId>
      <artifactId>jstl</artifactId>
      <version>1.2</version>
    </dependency>
    <dependency>
      <groupId>com.oracle</groupId>
      <artifactId>ojdbc6</artifactId>
      <version>11.2.0.4.0-atlassian-hosted</version>
    </dependency>
    <dependency>
      <groupId>com.alibaba</groupId>
      <artifactId>fastjson</artifactId>
      <version>1.2.73</version>
    </dependency>
    <dependency>
      <groupId>org.mybatis</groupId>
      <artifactId>mybatis</artifactId>
      <version>3.5.5</version>
    </dependency>
    <!-- https://mvnrepository.com/artifact/commons-codec/commons-codec -->
    <dependency>
      <groupId>commons-codec</groupId>
      <artifactId>commons-codec</artifactId>
      <version>1.14</version>
    </dependency>
  </dependencies>
再把工程拷贝进来,注意,web.xml要拷贝web-app标签之间的内容过来
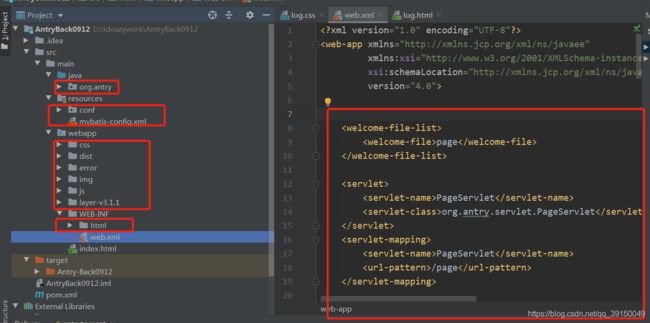
成功后就会转到你的初始页面
整个教程到这里就结束了,如果有不明白,可以私聊我。
