ubuntu上安装Apache2+ModSecurity及实现防SQL注入演示
ubuntu上安装Apache2+ModSecurity及实现防SQL注入演示
一、Apache2 的安装
1.1、安装环境:
OS:Ubuntu 16.04.1 LTS
Apache: Apache/2.4.18 (Ubuntu)更新安装源:
sudo apt-get install update
sudo apt-get install apache21、查看版本信息
apachectl -v
2、加载和去掉加载模块
sudo a2enmod security2 #启动mod-security模块
sudo a2dismod security2 #停止mod-security模块
3、加载站点和去掉加载站点
sudo a2ensite proxy.conf #加载proxy.conf站点
sudo a2dissite proxy.conf #停止proxy.conf站点
4、apache启动、停止和重启
sudo service apache2 restart
sudo service apache2 stop
sudo service apache2 start
sudo service apache2 reload #reload不用重启服务,直接重新加载配置文件
2.1、启动代理模块
sudo a2enmod proxy proxy_ajp proxy_balancer proxy_connect proxy_ftp proxy_http2.2、配置站点文件
新建配置文件proxy.conf
sudo vim /etc/apache2/mods-enabled/proxy.conf
	ServerName www.aaa.com
	ServerAdmin webmaster@localhost
	DocumentRoot /var/www/html
	ProxyPreserveHost On
	ProxyRequests Off

		Order deny,allow
		Allow from all

	ProxyPass / http://10.8.165.51/mutillidae/ retry=1 acquire=3000 timeout=600 Keepalive=On
	ProxyPassReverse / http://10.8.165.51/mutillidae/
添加监听端口:sudo vim /etc/apache2/ports.conf
Listen 80
Listen 8088
2.3、启用站点
sudo a2ensite proxy.conf
sudo service apache2 reload
2.4、配置域名解析:/etc/hosts
127.0.0.1 www.aaa.com三、modsecurity模块的安装与使用
3.1、安装libapache2-modsecurity模块及其依赖包
sudo apt-get install libxml2 libxml2-dev libxml2-utils libaprutil1 libaprutil1-dev libapache2-modsecuritydpkg -s libapache2-modsecurity | grep Version3.2、配置modsecurity,启用拦截模式
sudo service apache2 reload配置modsecurity的配置文件:
cd /etc/modsecurity/
mv modsecurity.conf-recommended modsecurity.conf
sudo vim /etc/modsecurity/modsecurity.confSecRuleEngine On3.3、使用modsecurity核心规则集
规则集放置在以下目录下:
cd /usr/share/modsecurity-crs/activated_rules/在root用户模式下,选择启用的过滤规则集:
for f in $(ls ../base_rules/); do ln -s ../base_rules/$f; done修改apache模块配置,启用规则集:
sudo vim /etc/apache2/mods-available/security2.conf修改:
# Default Debian dir for modsecurity's persistent data
SecDataDir /var/cache/modsecurity
# Include all the *.conf files in /etc/modsecurity.
# Keeping your local configuration in that directory
# will allow for an easy upgrade of THIS file and
# make your life easier
IncludeOptional /etc/modsecurity/*.conf
IncludeOptional /usr/share/modsecurity-crs/*.conf
IncludeOptional /usr/share/modsecurity-crs/activated_rules/*.conf
3.4、modsecurity模块启动
sudo a2enmod headers
sudo a2enmod security2
四、测试WEB应用防SQL注入
4.1、 Web应用 OWASP Mutillidae II
OWASP Mutillidae II是采用PHP写的一个Web漏洞应用,运行的Web服务包含多种测试漏洞:SQL Inject、XSS等。这里测试的是SQL注入。
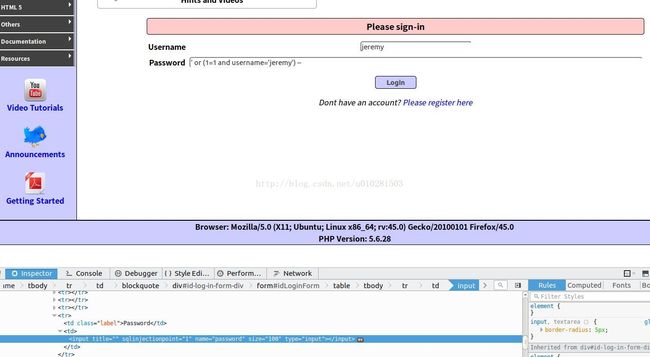
在它的登陆页面中,已知包含用户用户名:jeremy 真确密码: password 。现在我们要使用用户名:jeremy 和 注入的SQL语句实现登陆
' or (1=1 and username='jeremy') -- 4.2、不启用modsecurity的情况
登陆页面如下:
使用上述的SQL语句能实现无密码登陆,成功登陆如下:
从上图的显示可以看出用户:jeremy已成功登陆
4.3、启用modsecurity模块情况
通过如下命令启动:
sudo a2enmod security2
sudo service apache2 restart禁止登入如下:
注意事项:若 /etc/apache2/mods-enabled/proxy.conf 不采用域名而用IP直接访问,则modsecurity的激活的过滤规则中应不应包含:modsecurity_crs_21_protocol_anomalies.conf 。若想采用URL中不用域名,而用IP地址直接访问时,不应启用 modsecurity_crs_21_protocol_anomalies.conf 这个过滤规则。该规则会过滤掉所有含IP的直接访问。会在如下的log文件中提示出错:
/var/log/apache2/error.log

[Mon Sep 11 16:09:33.296883 2017] [:error] [pid 3913:tid 140006145349376] [client 10.102.24.121] ModSecurity: Access denied with code 403 (phase 2). Pattern match "^[\\\\d.:]+$" at REQUEST_HEADERS:Host. [file "/usr/share/modsecurity-crs/activated_rules/modsecurity_crs_21_protocol_anomalies.conf"] [line "98"] [id "960017"] [rev "2"] [msg "Host header is a numeric IP address"] [data "10.102.24.121:8088"] [severity "WARNING"] [ver "OWASP_CRS/2.2.9"] [maturity "9"] [accuracy "9"] [tag "OWASP_CRS/PROTOCOL_VIOLATION/IP_HOST"] [tag "WASCTC/WASC-21"] [tag "OWASP_TOP_10/A7"] [tag "PCI/6.5.10"] [tag "http://technet.microsoft.com/en-us/magazine/2005.01.hackerbasher.aspx"] [hostname "10.102.24.121"] [uri "/"] [unique_id "WbZEvX8AAQEAAA9J1UYAAABA"]
参考文章:
http://www.freebuf.com/articles/web/43559.html


