gradle 编译android项目 Eclipse
gradle下载地址
gradle环境配置
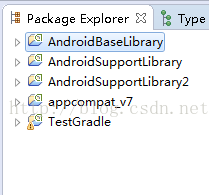
1.工程目录结构
说明:如果项目有多个library工程并且有可能重复引用了相同的jar包,如support-4等,需要将这些jar单独拎出来作为一个BaseLibray,其他library引用这个BaseLibrary,如果不这样做很有可能在编译的时候遇到下面这样的错误:
UNEXPECTED TOP-LEVEL EXCEPTION:
    java.lang.IllegalArgumentException: already added: Landroid/support/v4
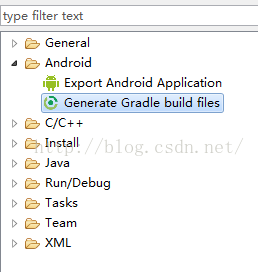
2.Eclipse下自动生成相关文件
File -> Export -> Android -> Generate Gradle build files
如果没有Generate这个选项,可以尝试升级到高版本的ADT 笔者使用的ADT-23
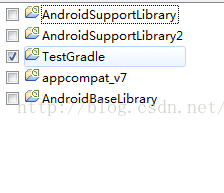
选中主工程
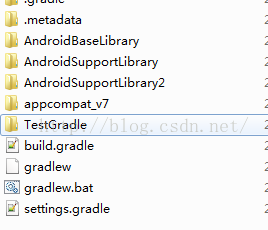
然后finish即可。完成之后会自动在工程目录中生成一些build文件
说明:在目录下添加local.properties文件,内容如:
sdk.dir=D:\\dev\\adt-bundle-windows-x86_64-20140702\\sdk
即指定Android SDK的目录,gradle在编译工程的时候会调用该目录下的打包工具,由于我已经把SDK目录配置在了环境变量中,这里可以不需要local.properties文件了。
打开build.gradle我们可以看到:
// Top-level build file where you can add configuration options common to all sub-projects/modules.
buildscript {
    repositories {
        jcenter()
    }
    dependencies {
        classpath 'com.android.tools.build:gradle:0.12.+'
    }
}
修改这个文件:
// Top-level build file where you can add configuration options common to all sub-projects/modules.
buildscript {
    repositories{
		mavenCentral()
	}
	dependencies{
		//笔者使用的gradle版本为2.4
		classpath 'com.android.tools.build:gradle:1.1.3'
	}

	/***
	tasks.withType(Compile){
		options.encoding = "UTF-8"
	}
	**/

	tasks.withType(JavaCompile) { options.encoding = "UTF-8" }
}
由于使用了ADT自动生成build files的功能,库工程和主工程下都会有build.gradle文件
主工程下build.gradle
apply plugin: 'com.android.application'

dependencies {
    compile fileTree(dir: 'libs', include: '*.jar')
    compile project(':appcompat_v7')
    compile project(':AndroidSupportLibrary')
    compile project(':AndroidSupportLibrary2')
}

android {
    compileSdkVersion 22
    buildToolsVersion "22.0.1"

    sourceSets {
        main {
            manifest.srcFile 'AndroidManifest.xml'
            java.srcDirs = ['src']
            resources.srcDirs = ['src']
            aidl.srcDirs = ['src']
            renderscript.srcDirs = ['src']
            res.srcDirs = ['res']
            assets.srcDirs = ['assets']
        }

        // Move the tests to tests/java, tests/res, etc...
        instrumentTest.setRoot('tests')

        // Move the build types to build-types/
        // For instance, build-types/debug/java, build-types/debug/AndroidManifest.xml, ...
        // This moves them out of them default location under src//... which would
        // conflict with src/ being used by the main source set.
        // Adding new build types or product flavors should be accompanied
        // by a similar customization.
        debug.setRoot('build-types/debug')
        release.setRoot('build-types/release')
    }
}
直接命令行切换到主工程目录:执行gradle clean
执行gradle build
至此这个基本流程就算完成了。
3.打多个不同包名,使用不同资源不同渠道定制包。
以umeng多渠道为例,修改android:value
 productFlavors {

        aa {
            applicationId 'com.example.testgradle.aa'
			manifestPlaceholders = [ CHANNEL_NAME:"aa"]
        }

        bb {
            applicationId 'com.example.testgradle.bb'
			manifestPlaceholders = [ CHANNEL_NAME:"bb"]
        }
    }
applicationId为包名,manifestPlaceholders会在打包时替换AndroidManifest.xml中
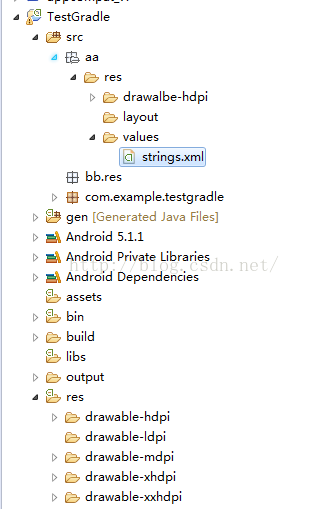
如想重新命名应用名称,只需修改对应路径下的string.xml就行了,换应用的icon或其他资源也同理,保证资源名和主工程下的一致,同时放到对应路径,gradle在打包的时候就会替换为新的资源文件。【这儿有个问题需要注意,就是如果主工程下有自定义的attr,在使用自定义属性的xml中的schemas中使用xmlns:app="http://schemas.android.com/apk/res-auto" 否则在打其他包名的时候提示找不到attribute】
贴上一份还算完整的build.gradle
apply plugin: 'com.android.application'

dependencies {
    compile fileTree(dir: 'libs', include: '*.jar')
    compile project(':appcompat_v7')
    compile project(':AndroidSupportLibrary')
    compile project(':AndroidSupportLibrary2')
}

android {
    compileSdkVersion 22
    buildToolsVersion "22.0.1"


	defaultConfig {
		applicationId 'com.example.testgradle'

		minSdkVersion 9
		targetSdkVersion 20
		versionCode 1
			versionName '1.0'
	}
	productFlavors {

		aa {
			applicationId 'com.example.testgradle.aa'
			manifestPlaceholders = [ CHANNEL_NAME:"aa"]
		}

		bb {
			applicationId 'com.example.testgradle.bb'
			manifestPlaceholders = [ CHANNEL_NAME:"bb"]
		}

	signingConfigs{
		myConfig{
			storeFile file("test.keystore")//指定keystore的路径 这儿为当前工程目录下
			storePassword "123321"
			keyAlias "alias_name"
			keyPassword "123321"
		}
	}
	buildTypes{
		release{
			//runProguard true  //打开混淆开关
			//proguardFile 'proguard.txt.txt'  //配置单个文件这样
			signingConfig signingConfigs.myConfig
		}
	}

    sourceSets {
        main {
            manifest.srcFile 'AndroidManifest.xml'
            java.srcDirs = ['src']
            resources.srcDirs = ['src']
            aidl.srcDirs = ['src']
            renderscript.srcDirs = ['src']
            res.srcDirs = ['res']
            assets.srcDirs = ['assets']
        }
    }


        // Move the tests to tests/java, tests/res, etc...
        instrumentTest.setRoot('tests')

        // Move the build types to build-types/
        // For instance, build-types/debug/java, build-types/debug/AndroidManifest.xml, ...
        // This moves them out of them default location under src//... which would
        // conflict with src/ being used by the main source set.
        // Adding new build types or product flavors should be accompanied
        // by a similar customization.
        debug.setRoot('build-types/debug')
        release.setRoot('build-types/release')
    }
}
相关技术文章
http://tech.meituan.com/mt-apk-adaptation.html
http://stackoverflow.com/questions/17571427/gradle-no-resource-identifier-found-for-attribute-when-using-flavors-and-packag
