生命周期函数、redux的使用(一)
在定义React组件的时候,render()函数返回的html必须只有一个根元素,要想这个根元素不显示并且不占据页面空间,可以从react中引进Fragment组件
JSX语法细节
在JSX里面写注释的方法:
多行注释:
{/*注释注释*/}

单行注释:
{
//注释注释
}属性:dangerouslySetInnerHTML={{_html: item}}可以让内容item不转义,直接显示
属性class写成className,属性for写成htmlFor
PropTypes与DefaultProps的应用
PropTypes接受组件传过来的参数时,对参数类型做校验
通过下面的语句引进PropTypes,通过脚手架create-react-app已经有prop-types包,所以可以直接引进
import PropTypes from 'prop-types';
class TabNav extends Component{
   //强制设置变量的类型
   static propTypes = {
      val: PropTypes.string。isRequired,
      activeIndex: PropTypes.number,
      //可以是数字也可以是字符串
      text: PropTypes.arrayOf(PropTypes.number,PropTypes.string)
   };
}
defaultProps即对组件接收的参数赋予默认值,如果父组件没有给子组件传递该参数的值,则子组件使用默认值
state、props与render()函数的关系
当state、props中的属性的值发生变化的时候,render()函数重新执行,即当数据一变,就会调用render()函数,重新渲染页面,从而改变页面,达到数据一变,页面就会变
子组件的render()调用时机:当子组件的props或者state属性发生变化时调用render()函数,或者父组件的render()调用时,子组件的render()会调用
虚拟DOM------就是一个JS对象,用来描述真实的DOM
在React中,虚拟DOM的操作不怎么耗性能,实际是操作真实的DOM比较耗性能,比较新旧虚拟DOM的差异(使用diff算法),找到差异的地方,直接更新变化的DOM
虚拟DOM的优点:
1)性能提升,真实DOM的比对变成虚拟DOM的比对
2)它使得跨端应用得以实现。React Native
虚拟 DOM中的diff:同层比较,在用列表表示的时候,key的值最好不用index,使得不变的元素的新旧key值一样,从而提升性能
setState(对象/异步func(prevState),func---当第一个异步函数操作完之后就执行该函数):异步函数是为了将多次间隔较短的虚拟DOM的变化,合并成一次虚拟DOM的变化,提高性能
JXS中的tag中的属性ref的值是一个函数,用于获取DOM,但在实际中不推荐使用该属性获取该元素,因为React中是数据驱动,不推荐直接操作DOM
React中的生命周期函数---指在某一时刻会自动执行的函数
initialization---组件初始化
setup props and statemounting----组件挂载(只执行一次)
//执行顺序
//1、在组件即将被挂载到页面的时候执行
componentWillMount(){
  console.log(1)
}

//2、将JSX模板渲染成真实的DOM
render(){}

//3、在组件挂载到页面之后调用
componentDidMount(){}
updation---组件更新(数据发生变化,props state)
//props发生变化的时候,即数据发生变化,导致组件的更新,触发下面的过程

//1、一个组件要从父组件接受参数,只要父组件的render函数重新被执行了,子组件的这个生命周期函数就会被执行----也就是说这个组件第一次存在于父组件不会执行,如果这个组件之前存在于父组件中,才会执行
componentWillReceiveProps(){}

//2、组件在更新之前,自动调用,返回boolean类型值,决定是否更新组件
shouldComponentUpdate(){
   return true
}

//3、
componentWillUpdate(){}


//4、
render(){}


//5、
componentDidUpdate(){}
//state中的属性发生变化的时候,触发下面的函数
//1、
shouldComponentUpdate(){}
//2、
componentWillUpdate(){}
//3、
render(){}
//4、
componentDidUpdate(){}unmounting---组件卸载
//组件卸载之前执行
componentWillUnmount(){}
shouldComponentUpdate 是做什么的,(react 性能优化是哪个周期函数?)
shouldComponentUpdate 的返回值是boolean类型,用来判断是否需要调用 render 方法重新描绘 dom(返回true值)。
因为 dom 的描绘非常消耗性能,如果我们能在 shouldComponentUpdate 方法中能够写出更优化的 dom diff 算法,可以极大的提高性能
生命周期函数的使用场景
在定义组件的时候,一定要书写render()函数,因为React内置了除了render()函数之外的所有生命周期函数
1)ajax请求放在componentDidMount()中,该函数只执行一次
使用charles实现本地数据mock,使用axios方法
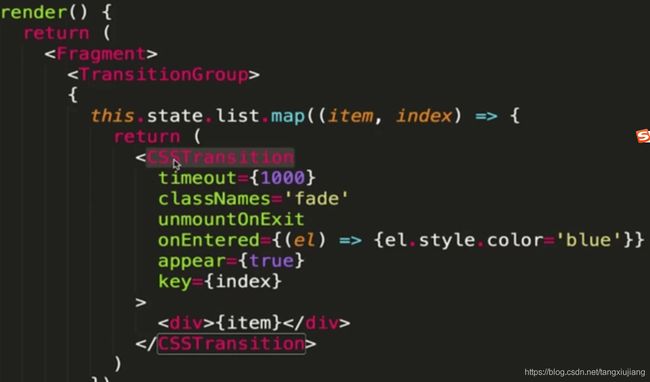
使用css的transition,animation实现简单动画,或者使用react第三方插件react-transition-group实现用js实现的动画
  false或者false->true发生一些动画*/}
     in={this.state.showValidationMessage}
      {/*动画执行的时间*/}
     timeout={300}
      {在.css文件中定义的类名的前缀,如fade-enter,fade-enter-active}
     classNames="fade"
     //当元素被隐藏的时候,DOM被移除
     unmountOnExit
     //退出时的函数
     onExited={() => {
         this.setState({
            showValidationButton: true,
         });
     }}
     //当页面刚开始的时候也使用样式
     appear={true}
  >
React是一个简单的视图层框架
Redux = Reducer + Flux:是一个数据层框架,主要方法是createStore(redux)和store.dispatch(action),store.subscribe(event)
Flux是一个辅助React的数据层框架:存在的问题是可以有很多个store,造成数据存储存在依赖的问题
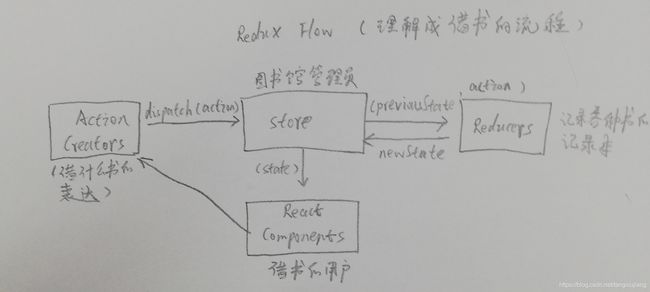
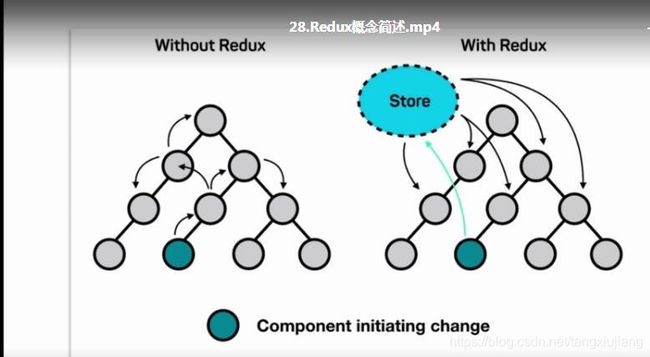
有了Redux之后,将组件的数据存储在Store里面,当组件的数据发生变化,Store里面的数据发生变化,然后接着改变其他组件的数据
Antd(用于快速构建后台界面用的,前端UI用的较少)或者、semantic-ui-react是用于构建React UI 的插件
首先在项目中安装redux,redux在chrom中的调试插件redux devtools
创建reducer
1)在src/store/reducer.js文件里面定义reducer(相当于一个记录本,里面定义state的默认值,然后必须返回一个函数)
const defaultState = {
  inputVal: '123',
  list: [1,2]
}

//state是整个store里面的数据
export default (state = defaultState, action) => {
  return state;
}2)在src/store/index.js文件里面定义store
//该方法用于创建store对象
import { createStore } from 'redux';
//导进reducer(记录本)
import reducer from './reducer';
const store = createStore(reducer);

export default store;
3)component连接store
//在component中引进store
import store from './store/index.js'
class TodoList extends Component{
  constructor(props){
    super(props);
    //利用store提供的getState()方法拿到store中的state数据
    this.state = store.getState() ;
  }
}
4)在浏览器中安装调试redux的插件redux devtools,然后在组件中需要进行如下配置
在创建store的地方进行如下配置
//该方法用于创建store对象
import { createStore } from 'redux';
//导进reducer(记录本)
import reducer from './reducer';
const store = createStore(reducer,window.__REDUX_DEVTOOLS_EXTENSION__ &&
   window.__REDUX_DEVTOOLS_EXTENSION__()
);

export default store;
5)在React Component中定义action,并且将action分发给store对象
//在TodoList组件里面定义action
//在输入框中定义事件change


handleInputChange(e){
  //创建action
  //input(React Component)框告诉store要做的action(Action Creators)
  const action={
    type:'change_input_value',
    //可以将input的value传递过去
    value:e.target.value
  }
  //组件将action传给store对象
  store.dispatch(action);
}
6)store接收到action之后,自动将接收到的action和store中之前的数据传给reducer,这时候需要在reducer里面根据action做相应的处理,将处理完之后的newState返回给store 对象
const defaultState = {
  inputVal: '123',
  list: [1,2]
}

//state是整个store里面的数据
// reducer可以接收state,但不能直接修改state
export default (state = defaultState, action) => {
  //根据action做相应的处理
  if( action.type === 'change_input_value' ){
    //对数据作一个深拷贝
    const newState = JSON.parse(JSON.stringify(state))
    //对公共数据的修改
    newState.inputVal = action.value
    // 将数据返回给store对象
    return newState
  }
  return state;
}
7)store接收到reducer处理之后返回的newState。这时候需要用newState替换掉component中的state数据
利用store.subscribe(event)订阅一个事件event,event用于更新component中的state数据
//在component中引进store
import store from './store/index.js'
class TodoList extends Component{
  constructor(props){
    super(props);
    //利用store提供的getState()方法拿到store中的state数据
    this.state = store.getState() ;

    // 在组件中订阅store对象的事件,store中数据发生变化,就自动执行该函数
    this.handleStoreChange = this.handleStoreChange.bind(this)
    store.subscribe(this.handleStoreChange);
  }

  handleStoreChange(){
    // 当组件感知store中的数据发生变化的时候,从store中
    // 拿到newState,然后替换掉当前组件的state数据,达到
    this.setState(store.getState())
  }
}
8)component中的state数据更新了,现在需要点击按钮时,将新增的数据添加到数组里面,而现在所有的数据都放到了store对象里面,即点击按钮的时候,需要改变的是store对象中的数据
在组件上面定义事件,在事件里面定义action,并通过store.dispatch(action)传递给store对象
// 在Button组件上绑定事件
// 在组件上定义action,并且通过store.dispach(action)将action分发给store对象
handleBtnClick() {
// action对象必须有type属性,
// 剩余的要对应上在reducer中定义的属性名
const action = {
type: 'add_todo_item'
}
// 将action传递给store
store.dispatch(action)
}9)store对象接收到action,就自动触发reducer根据action做相应的处理,处理完后将newState返回给store对象
const defaultState = {
  inputVal: '123',
  list: [1,2]
}

//state是整个store里面的数据
// reducer可以接收state,但不能直接修改state
export default (state = defaultState, action) => {
  //根据action做相应的处理
  if( action.type === 'change_input_value' ){
    //对数据作一个深拷贝
    const newState = JSON.parse(JSON.stringify(state))
    //对公共数据的修改
    newState.inputVal = action.value
    // 将数据返回给store对象
    return newState
  }

  //根据action做相应的处理
  if( action.type === 'add_todo_item' ){
    //对数据作一个深拷贝
    const newState = JSON.parse(JSON.stringify(state))
    //对公共数据的修改
    newState.list.push(newState.inputVal)
    // 将数据清空
    newState.inputVal = ''
    // 将数据返回给store对象
    return newState
  }

  return state;
}
10)store对象接收到newState,由于之前在component中的constructor中已经订阅事件store.subscribe(this.handleStoreChange);通过handleStoreChange修改组件的state,所以已经达到点击按钮,向数组添加数据的目的
点击具体的item的时候将其删除掉
1)在组件上面绑定事件,并且向事件传递index参数
{item} 2)在事件里面定义action,通过store.dispatch(action),将动作传递给store对象
handleItemDel(index){
  const action={
    type:'delete_todo_item',
    index
  }
  store.dispatch(action)
}
3)此时store接收到action,并将store中的state和action一起传给reducer,reducer执行相应的action,返回newState给store对象,由于之前在component的constructor中通过store.subscribe(event),在event中通过store.getState()重新对component的state赋值,达到删除功能
const defaultState = {
  inputVal: '123',
  list: [1,2]
}

//state是整个store里面的数据
// reducer可以接收state,但不能直接修改state
export default (state = defaultState, action) => {
  //根据action做相应的处理
  if( action.type === 'change_input_value' ){
    //对数据作一个深拷贝
    const newState = JSON.parse(JSON.stringify(state))
    //对公共数据的修改
    newState.inputVal = action.value
    // 将数据返回给store对象
    return newState
  }

  //根据action做相应的处理
  if( action.type === 'add_todo_item' ){
    //对数据作一个深拷贝
    const newState = JSON.parse(JSON.stringify(state))
    //对公共数据的修改
    newState.list.push(newState.inputVal)
    // 将数据清空
    newState.inputVal = ''
    // 将数据返回给store对象
    return newState
  }

    //根据action做相应的处理
    if( action.type === 'delete_todo_item' ){
      //对数据作一个深拷贝
      const newState = JSON.parse(JSON.stringify(state))
      //删除对应下标的数据
      newState.list.splice(action.index,1)
      // 将数据清空
      newState.inputVal = ''
      // 将数据返回给store对象
      return newState
    }
  return state;
}
ActionTypes的拆分
解决的问题:当action.type拼写错误,但在浏览器没有报错也没有提示任何信息,为了解决这个问题将ActionTypes在一个文件夹里面定义成常量,然后输出。当书写错误的时候,浏览器会报错
1)在src/store下新建文件actionTypes.js,内容如下
const CHANGE_INPUT_VALUE = 'change_input_value',
      ADD_TODO_ITEM = 'add_todo_item',
      DELETE_TODO_ITEM = 'delete_todo_item'
export {
  CHANGE_INPUT_VALUE,
  ADD_TODO_ITEM,
  DELETE_TODO_ITEM
}
2)在组件里面引进该对象,然后将action里面的type换成上述文件定义成的常量变量
同时在reducer中将action.type也换成定义的常量变量
使用actionCreator统一创建action,便于管理,提高代码的可读性,便于自动化测试
1)在src/store下面创建文件actionCreators.js
import {CHANGE_INPUT_VALUE} from './actionTypes'

// actionCreator,返回一个action对象
const getInputChangeAction = (value) => {
  type: CHANGE_INPUT_VALUE,
  value
}

export { getInputChangeAction }
2)在组件引入action
import {getInputChangeAction} from './store/actionCreators.js'3)在组件中使用action
//在TodoList组件里面定义action
//在输入框中定义事件change


handleInputChange(e){
  //创建action
  //input(React Component)框告诉store要做的action(Action Creators)
  const action = getInputChangeAction(e.target.value)
  //组件将action传给store对象
  store.dispatch(action);
}
redux的3个基本原则
1)store对象必须是唯一的,在src/store/index.js中定义
2)只有store能够改变自己的内容(reducer根据action进行相应操作后,将newState返回给store,store将自己的内容更新,所以不能在reducer里面直接修改state的内容)
3)reducer必须是纯函数(固定输入,固定输出,并且不会有任何副作用---例如不会修改传入参数的值)
redux的核心API
createStore(reducer)------创建store
store.dispatch(action)----组件向store传递action
store.subscribe(event)----向store订阅事件,只要store内容一变,就触发event
store.getState()----------拿到store里面的内容
UI组件(展示型组件)与容器型组件的拆分
UI组件负责页面的展示,数据通过容器型组件传过来,通过props拿到数据;在TodoListUI.js里面只有render()函数里面直接返回JSX;
容器性组件TodoList.js负责页面的逻辑
Redux中发送异步请求获取数据----
在componentDidMount()中发送ajax请求,拿到数据后给store传递action
1)在项目中安装axios插件
2)在容器型组件中引进axios
3)在componentDidMount()中定义action,并将action传递给store
componentDidMount(){
  axios.get('/list.json').then((res)=>{
    const data = res.data
    // 创建action
    const action = initListAction(data)
    store.dispatch(action)
  }).catch(e){console.log(e)}
}
接着在reducer中根据action.type进行操作
发使用redux-thunk中间件实现ajax数据请求
--------为了将异步请求和复杂的逻辑抽取出来,将代码放到一个统一的文件,便于统一管理
redux-thunk中间件可以把异步请求和复杂的逻辑放到action里面处理
在项目中安装redux-thunk,根据官网例子书写代码 https://github.com/reduxjs/redux-thunk 链接
1、在创建store对象的index.js文件做如下修改:对redux-thunk进行配置
// 该方法用于创建store对象
// 引进方法 applyMiddleware,才能使用中间件
import { createStore,applyMiddleware,compose } from 'redux';
//导进reducer(记录本)
import reducer from './reducer';
import thunk from 'redux-thunk';

const composeEnhancers =  window.__REDUX_DEVTOOLS_EXTENSION_COMPOSE__ ?
    window.__REDUX_DEVTOOLS_EXTENSION_COMPOSE__({}) : compose;

const enhancer = composeEnhancers(
  applyMiddleware(thunk),
  // other store enhancers if any
);

// 在创建stor的时候,使用reducer构建初始的数据,
// 在创建store的时候会使用中间件redux-thunk
const store = createStore(
    reducer,
    enhancer
);

export default store;
2、对redux-thunk进行配置好后,可以将异步操作放到action里面进行操作
在src/store下面创建文件actionCreators.js中使用了中间件redux-thunk,那么创建的action可以返回函数,而不仅仅是返回一个对象,在返回的函数里面进行异步操作
import {CHANGE_INPUT_VALUE} from './actionTypes'
import axios from 'axios'

// actionCreator,返回一个action对象
const getInputChangeAction = (value) => {
  type: CHANGE_INPUT_VALUE,
  value
}

// 使用Redux-thunk中间件之后,创建的action可以返回一个函数,当store接受
// 到这个action时,action的函数会自动执行
const getTodoList = () =>{
    return (dispatch) => {
        // 异步请求拿到数据
        axios.get('/list.json').then((res)=>{
            const data = res.data;
            //改变store里面的数据
            const action = initListAction(data);
            dispatch(action)
        })
    }
}

export { getInputChangeAction, getTodoList }
3、在组件的componentDIdMount()中调用上述函数,从而得到action
import { getTodoList } from 'actionCreators.js'

componentDIdMount(){
    // action是一个函数
    const action = getTodoList();
    // 执行action函数
    store.dispatch(action)
}
redux中间件---处理异步事件
redux中间件指的是Action和Store之间的中间件
中间件指的是对dispatch方法的升级,使得该函数的参数除了是对象之外还可以是函数
可以用redux-thunk对dispatch升级
Redux-saga中间件-----处理异步代码,在redux-saga里面会将一些异步代码放到单独文件里面
用了Redux-saga中间件,除了在reducer中接收action,还可以在saga文件中接收action
1)将Redux-saga插件安装到项目里面,https://github.com/redux-saga/redux-saga 链接
2)在src/store下创建sagas.js文件,用于存放异步代码
// saga必须使用generator
import { takeEvery,put } from 'redux-saga/effects'
import {GET_INIT_LIST} from './actionTypes'
import {initListAction} from './actionCreators'
import axios from 'axios'

function* getInitList(){
    // 处理请求失败的结果
    try{
        const res = yield axios.get('/list.json')
        const data = res.data
        const action = initListAction(data)
        // 将action传递给store
        yield put(action)
    }catch(e){
        console.log('list.json网络请求失败')
    }

}

function* mySaga() {
    // 获取每一个 action
    yield takeEvery(GET_INIT_LIST, getInitList);
}

export default mySaga;
3)在创建store对象的文件里面进行如下配置,src/store/index.js
// 该方法用于创建store对象
// 引进方法 applyMiddleware,才能使用中间件
import { createStore,applyMiddleware,compose } from 'redux';
//导进reducer(记录本)
import reducer from './reducer';
//存放异步代码
import mySaga from  './sagas'
// 创建中间件的方法
import createSagaMiddleware from 'redux-saga';
// create the saga middleware
const sagaMiddleware = createSagaMiddleware();

const composeEnhancers =  window.__REDUX_DEVTOOLS_EXTENSION_COMPOSE__ ?
    window.__REDUX_DEVTOOLS_EXTENSION_COMPOSE__({}) : compose;

const enhancer = composeEnhancers(applyMiddleware(sagaMiddleware));

// 在创建stor的时候,使用reducer构建初始的数据,
// 在创建store的时候会使用中间件redux-thunk
const store = createStore(
    reducer,
    enhancer
);
// then run the saga
sagaMiddleware.run( mySaga);
export default store;
4)在src/store/actionTypes.js中定义常量
export const GET_INIT_LIST = 'get_init_list'5)在创建action的文件src/store/actionCreators.js里面创建action,这个action返回的是对象
import {GET_INIT_LIST} from './actionTypes.js'
export const getInitList = ()=>({type:GET_INIT_LIST})
6)在组件生命周期里面调用
componentDidMount(){
    const action = getInitList()
    store.dispatch(action)
}
React-redux的使用
通过以下步骤创建了store,reducer,并且组件和store建立连接:
1)在项目中安装react-redux
2)在src/TodoList.js书写组件的内容,创建store,reducer对象之后,在component组件文件里面引进store对象之后,通过store.getState()拿到store的数据,从而让store和component 建立连接
import React,{Component} from 'react'
import store from './store'
class TodoList extends Component{
constructor(props){
super(props)
// 获取store对象的数据初始化state
this.state = store.getState()
}
render(){
return (
- dell
)
}
}
export default TodoList

3)在src/index.js中引进组件
import React from 'react'
import ReactDOM from 'react-dom'
import TodoList from './TodoList'
ReactDOM.render(

4)在src/store/reducer.js下创建reducer,该文件返回纯函数,以及定义初始化state的数据
const defaultState = {
inputValue:'',
list:[]
};
export default (state=defaultState,action) => {
return state
}

5)所有的数据放在store里面,在src/store/index.js下创建store对象
import { createStore } from 'redux'
import reducer from './reducer'
const store = createStore(reducer)
export default store

在React中使用Redux:
1)在src/index.js文件中使用React-redux的组件
store与子component建立连接
import React from 'react'
import ReactDOM from 'react-dom'
import TodoList from './TodoList'
// 引进React-redux中的 组件
import {Provider} from 'react-redux'
import store from './store'
const App = (
// Provider连接了store,那么Provider的所有子元素可以获取到store内容
)
ReactDOM.render(App,document.getElementById('root'))

2)在子组件中通过connect()使store和子组件建立连接,并且将store中的state映射到props,同时通过props修改store中的内容
import React,{Component} from 'react'
import store from './store'
import {connect} from 'react-redux'
class TodoList extends Component{
constructor(props){
super(props)
// 获取store对象的数据初始化state
this.state = store.getState()
}
render(){
return (
{/*这是因为将state映射成props*/}
- dell
)
}
}
// 就是将store里面的公用数据映射成props
const mapStateToProps = (state)=>{
return {
inputValue:state.inputValue
}
}
// 通过props修改store的内容
// 让store.dispatch挂载到props上
const mapDispatchToProps = (dispatch) => {
return {
changeInputValue(e){
const action = {
type:'change_input_value',
value:e.target.value
}
// 修改store的内容
dispatch(action)
},
handleClick(){
const action ={
type:'add_item'
}
}
dispatch(action)
}
}
// 让子组件TodoList和store建立连接
//通过mapStateToProps,store里面的state会映射成组件的props
export default connect(mapStateToProps,mapDispatchToProps)(TodoList)
3)通过上面配置,将action通过dispatch到store,并传给reducer,在reducer中需要根据action.type进行相应处理
const defaultState = {
inputValue:'',
list:[]
};
export default (state=defaultState,action) => {
if( action.type === 'change_input_value' ){
const newState = JSON.parse(JSON.stringify(state))
newState.inputValue = action.value
return newState
}
if( action.type === 'add_item' ){
const newState = JSON.parse(JSON.stringify(state))
newState.list.push(newState.inputValue)
newState.inputValue = ''
return newState
}
return state
}
改进后的组件:
import React,{Component} from 'react'
import store from './store'
import {connect} from 'react-redux'
// UI组件,无状态组件---提升性能,无生命周期函数,只是进行展示,从props中拿数据
const TodoList = (props)=>{
const { inputValue,changeInputValue, handleClick } = props
return (
{/*这是因为将state映射成props*/}
{
this.props.list.map((item,index)=>{
return - {item}
})
}
)
}
// 就是将store里面的公用数据映射成props
const mapStateToProps = (state)=>{
return {
inputValue: state.inputValue,
list: state.list
}
}
// 通过props修改store的内容
// 让store.dispatch挂载到props上
const mapDispatchToProps = (dispatch) => {
return {
changeInputValue(e){
const action = {
type:'change_input_value',
value:e.target.value
}
// 修改store的内容
dispatch(action)
},
handleClick(){
const action ={
type:'add_item'
}
dispatch(action)
},
handleDelete(index){
const action ={
type:'delete_item',
index
}
dispatch(action)
}
}
}
// 让子组件TodoList和store建立连接
//通过mapStateToProps,store里面的state会映射成组件的props
// connect()输出的结果是容器组件,因为将数据和逻辑与UI组件进行结合就是容器组件
export default connect(mapStateToProps,mapDispatchToProps)(TodoList)
Styled-Components的使用----让组件的样式只对组件的样式生效,不会在全局中生效,在标签上直接书写css然后输出该组件
问题:在src目录下有文件index.js index.css App.js,在文件index.js引进index.css,但没有在App.js里面引进index.css,也可以使用在index.css里面的类--------在React中引进css,将会在全局中生效,就会造成组件中的类冲突
解决方法:使用第三方插件---styled-components
styled-components的定义
styled-components 是一个常用的 css in js 类库,和所有同类型的类库一样,通过 js 解决了原生 css 所不具备的能力,比如变量、循环、函数等
styled-components比其他css预处理器的优点
- 诸如 sass&less 等预处理可以解决部分 css 的局限性,但还是要学习新的语法,而且需要对其编译,需要复杂的 webpack 配置
- 如果有过sass&less的经验,也能很快的切换到styled-components,因为大部分语法都类似,比如嵌套,& 继承等, styled-componens 很好的解决了学习成本与开发环境问题,很适合 React 技术栈 && React Native 的项目开发
styled-components解决的问题
- className 的写法会让原本写css的写法十分难以接受
- 如果通过导入css的方式 会导致变量泄露成为全局 需要配置webpack让其模块化
- 以及上面提到的解决了原生 css 所不具备的能力,能够加速项目的快速开发
转载出处:https://www.jianshu.com/p/2178abb2ee95
1、在项目中安装styled-components,不需要在文件中引进,但是将.css文件改成.style.js文件
2、全局样式injectClobal被createGlobalStyle替代,用组件的方式渲染,具体使用
3、将css reset的代码复制到createGlobalStyle里面----让默认样式在所有浏览器表现一致
使用iconfont嵌入头部图标
官网 https://www.iconfont.cn/
1、登录iconfont,在“图标管理”下选择“我的项目”,点击右边“新建项目”的图标
2、在主页的搜索框中输入要查找的图标名,然后选择要的图表,选择“添加入库”
3、所有图表选择好之后,点击右上角的“购物车”图标,点击“添加至项目”
4、然后点击“下载至本地”
5、然后将压缩包解压缩,将文件iconfont.eot iconfont.svg iconfont .ttf iconfont .woff文件复制到项目的src/static/iconfont文件夹下面
6、在项目中使用 iconfont,首先需要想修改文件iconfont.css里面的内容:将路径以iconfont开头的路径改成相对路径
@font-face {
font-family: "iconfont";
src: url('./iconfont.eot?t=1551963575525'); /* IE9 */
src: url('./iconfont.eot?t=1551963575525#iefix') format('embedded-opentype'), /* IE6-IE8 */
url('data:application/x-font-woff2;charset=utf-8;base64,d09GMgABAAAAAAPQAAsAAAAAB9gAAAOCAAEAAAAAAAAAAAAAAAAAAAAAAAAAAAAAHEIGVgCDHAqDFIJ7ATYCJAMQCwoABCAFhG0HRxvsBsgeh+kWI3+SnJzkPR6+v0/Pff9m3SxAmWAAMx7gZW3HK9aKFmtWXnaB/F9b+gfYhA51IebGpvWVYUUfO3VRUveT+E30FGkCBID6xL3Tpm2w+SzLaaxFa9P/3EVdgPHWwPbENmUFWiAJesvwapfCQR8mgLaBwqF1YXk98DhkVABxbzHpgM84cQ3kwEO8KhYmoCfQ4Mt85gGAx+D78Q+x8QCFpgIycXMsMEL2l//Xz+y0/9NgmEcB1XR+yMtABSyBBHGuDG6xUWaJhc3unESgiceAqdoSv37+/x/URzHy9C8PBBYDog6E2AVYQbYCX/5cSoCvRGWV6TMmKIAPsqAJtIEH4AVhzT0vMbiet7fQsz3P9xAmLrgTTBsNYw+eRK9ejatHWCtAWtMDsalBmy5lTVeTbr702TZRUl83bSO9eFH/8mXDwtdZDasXHtyovH6tTctLrvLqVScsta/HNmHwkDUD8abejbqLwkKAduAmvOARmq7VTg9eML3h1D6Y9iwsvI5QrF+J/x0SEZcfG5sflSgt8kd5w4b61gUs94mL81m+Y2fjlh7ZG1T1xJGK8u9HjnxnPuzILijgLJB0qqpq/EkqM//EifmujpFczPxkcirxr1bVdX3iBlxZxtiWLbOBnVkWFcHbQJNc9DQ4/ynp+F+f98qaWdXA5Ootma+55kwPvZkchTQ5ka4QydJhuFCWnfp5hJbe79OjuW/Ar4CB4Aa4nWTvsiWBsIWdygL/P9vkDPwnb3PfWkZ2Sv/HCxwAXvcmnsXh20kOhql+g6qz6n+pOpalpSGuTEPLlXYoRadGKUAbBv5SgbG3U5hnnYkEXo8EhbcBqPD8qckMR40gHnW8LLSFKVre0Y2ChbIdgIXZCEhnR8HoSAWrs4dUjvkGGj19g5fOscCk6LahIDALzlOIjhKjqB8vWgwup8w8FIfkWmIabdcpaU0gkIjiscTFmMjofL6IOIkyxRTPGFMspbIoKy6HWIiOI3a7S3QrLisx0Egzpe7UqCi56kGRBpcDsDwKQocijER644ksDFycZK86hQufr0WYjGanozSUNGUlhMLD0rkoRqToDtQio7NTya2c4jGGSSyKkolkChcHUSHyE3aacRG5q/tZEQZUJPOAlFuqKKgkdzVGLm92vOEaaCO9MhjEIg5pQLj2iR5Co2PikrCsc5qMOqvFSzM5OgAAAA==') format('woff2'),
url('./iconfont.woff?t=1551963575525') format('woff'),
url('./iconfont.ttf?t=1551963575525') format('truetype'), /* chrome, firefox, opera, Safari, Android, iOS 4.2+ */
url('./iconfont.svg?t=1551963575525#iconfont') format('svg'); /* iOS 4.1- */
}
.iconfont {
font-family: "iconfont" !important;
font-size: 16px;
font-style: normal;
-webkit-font-smoothing: antialiased;
-moz-osx-font-smoothing: grayscale;
}
7、图标字体可能是用于全局的,所以当成全局样式来处理,将iconfont.css文件改成iconfont.js,并修改为样式组件,内容如下:
import { createGlobalStyle } from 'styled-components';
export const iconFontGlobal = createGlobalStyle `
@font-face {
font-family: "iconfont";
src: url('./iconfont.eot?t=1551963575525'); /* IE9 */
src: url('./iconfont.eot?t=1551963575525#iefix') format('embedded-opentype'), /* IE6-IE8 */
url('data:application/x-font-woff2;charset=utf-8;base64,d09GMgABAAAAAAPQAAsAAAAAB9gAAAOCAAEAAAAAAAAAAAAAAAAAAAAAAAAAAAAAHEIGVgCDHAqDFIJ7ATYCJAMQCwoABCAFhG0HRxvsBsgeh+kWI3+SnJzkPR6+v0/Pff9m3SxAmWAAMx7gZW3HK9aKFmtWXnaB/F9b+gfYhA51IebGpvWVYUUfO3VRUveT+E30FGkCBID6xL3Tpm2w+SzLaaxFa9P/3EVdgPHWwPbENmUFWiAJesvwapfCQR8mgLaBwqF1YXk98DhkVABxbzHpgM84cQ3kwEO8KhYmoCfQ4Mt85gGAx+D78Q+x8QCFpgIycXMsMEL2l//Xz+y0/9NgmEcB1XR+yMtABSyBBHGuDG6xUWaJhc3unESgiceAqdoSv37+/x/URzHy9C8PBBYDog6E2AVYQbYCX/5cSoCvRGWV6TMmKIAPsqAJtIEH4AVhzT0vMbiet7fQsz3P9xAmLrgTTBsNYw+eRK9ejatHWCtAWtMDsalBmy5lTVeTbr702TZRUl83bSO9eFH/8mXDwtdZDasXHtyovH6tTctLrvLqVScsta/HNmHwkDUD8abejbqLwkKAduAmvOARmq7VTg9eML3h1D6Y9iwsvI5QrF+J/x0SEZcfG5sflSgt8kd5w4b61gUs94mL81m+Y2fjlh7ZG1T1xJGK8u9HjnxnPuzILijgLJB0qqpq/EkqM//EifmujpFczPxkcirxr1bVdX3iBlxZxtiWLbOBnVkWFcHbQJNc9DQ4/ynp+F+f98qaWdXA5Ootma+55kwPvZkchTQ5ka4QydJhuFCWnfp5hJbe79OjuW/Ar4CB4Aa4nWTvsiWBsIWdygL/P9vkDPwnb3PfWkZ2Sv/HCxwAXvcmnsXh20kOhql+g6qz6n+pOpalpSGuTEPLlXYoRadGKUAbBv5SgbG3U5hnnYkEXo8EhbcBqPD8qckMR40gHnW8LLSFKVre0Y2ChbIdgIXZCEhnR8HoSAWrs4dUjvkGGj19g5fOscCk6LahIDALzlOIjhKjqB8vWgwup8w8FIfkWmIabdcpaU0gkIjiscTFmMjofL6IOIkyxRTPGFMspbIoKy6HWIiOI3a7S3QrLisx0Egzpe7UqCi56kGRBpcDsDwKQocijER644ksDFycZK86hQufr0WYjGanozSUNGUlhMLD0rkoRqToDtQio7NTya2c4jGGSSyKkolkChcHUSHyE3aacRG5q/tZEQZUJPOAlFuqKKgkdzVGLm92vOEaaCO9MhjEIg5pQLj2iR5Co2PikrCsc5qMOqvFSzM5OgAAAA==') format('woff2'),
url('./iconfont.woff?t=1551963575525') format('woff'),
url('./iconfont.ttf?t=1551963575525') format('truetype'), /* chrome, firefox, opera, Safari, Android, iOS 4.2+ */
url('./iconfont.svg?t=1551963575525#iconfont') format('svg'); /* iOS 4.1- */
}
.iconfont {
font-family: "iconfont" !important;
font-size: 16px;
font-style: normal;
-webkit-font-smoothing: antialiased;
-moz-osx-font-smoothing: grayscale;
}
`;
8、在src/App.js里面引入该全局样式组件
import { iconfontGlobal } from './static/iconfont/iconfont.js';
9、将Header组件里面的搜索、Aa、笔用iconfont代替
{/* 使用iconfont,文字是图标的unicode,类名都是iconfont */}
搜索框动画效果实现(聚焦搜索框变宽,搜索按钮有背景色,blur则变小)
使用react-transition-group插件的CSSTransition组件,用css实现动画效果
使用react-redux进行应用数据管理------组件的数据使用react-redux管理的话,组件就变成无状态组件了,使得性能大大提升
在项目中安装redux(数据框架)
在项目中安装react-redux(方便我们在react中使用redux)
需要定义的文件有index.js(store),reducer.js,constantTypes.js,
使用combineReducers完成对数据的拆分管理
对react-redux中的数据在浏览器端调试的插件是redux-devtools-extend,要想在浏览器中使用该插件调试redux中的数据,需要在创建store的时候,进行配置


