【SpringBoot深入理解源码】之系统监听器
万物皆有裂痕
那是光照进来的地方。
文章目录
- 监听器模式
- 系统监听器
-
-
- 系统监听器
- 系统广播器
- 系统事件
-
- 监听事件触发机制
-
-
- 加载定义的监听器
- 获取符合条件的监听器
-
- 自定义监听器实战
-
-
- 实现方式
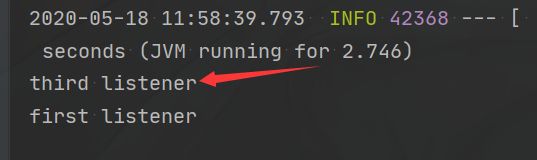
- 为什么ThirdListener设置的优先级低,却加载快
- 总结
-
监听器模式
在编程的世界中,监听无所不在,譬如你点击一个音乐播放器的播放按钮,就播放一首音乐;点击相机的拍照按钮,就拍一张照片。也就是你触发某种行为,便会执行具体的动作。
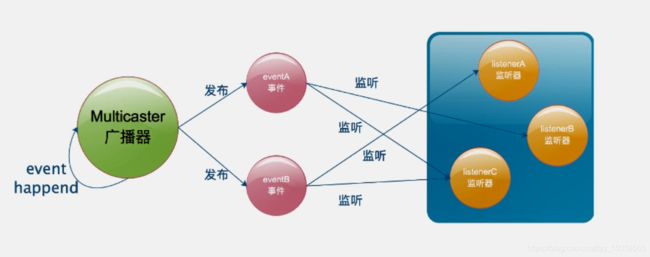
四要素
- 事件------顾名思义,事件发生的源头,比如点击的按钮,属于被监听的对象;
- 监听器------这个是监听器模式的核心,定义事件发生后的动作,通常事件对象作为监听器中定义的函数入参。
- 广播器------管理监听器并且进行广播事件
- 触发机制
系统监听器
系统监听器
系统监听器继承EventListener接口,表明可以实现事件监听,使用注解@FunctionalInterface表明系统监听器可实现函数式编程(有且仅有一个方法)。

系统广播器
系统广播器,管理监听器并且进行广播事件
核心方法有添加监听器,删除监听器,广播事件等。


系统事件
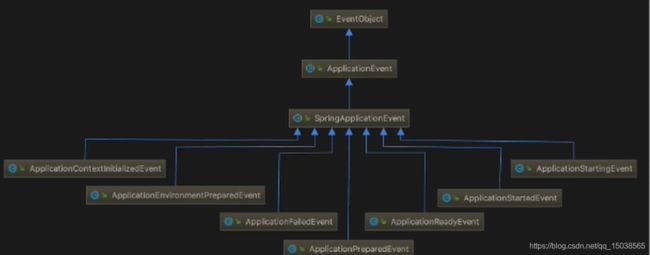
- 事件发送顺序

监听事件触发机制
加载定义的监听器
具体源码可进去run方法,和上一节【SpringBoot深入理解源码】之自定义系统初始化器
执行过程类似。

获取符合条件的监听器
run方法进去


protected Collection<ApplicationListener<?>> getApplicationListeners(ApplicationEvent event, ResolvableType eventType) {

		Object source = event.getSource();
		Class<?> sourceType = (source != null ? source.getClass() : null);
		ListenerCacheKey cacheKey = new ListenerCacheKey(eventType, sourceType);

		// Quick check for existing entry on ConcurrentHashMap...
		//先查缓存
		ListenerRetriever retriever = this.retrieverCache.get(cacheKey);
		if (retriever != null) {

			return retriever.getApplicationListeners();
		}
		//缓存找不到
		if (this.beanClassLoader == null ||
				(ClassUtils.isCacheSafe(event.getClass(), this.beanClassLoader) &&
						(sourceType == null || ClassUtils.isCacheSafe(sourceType, this.beanClassLoader)))) {

			// Fully synchronized building and caching of a ListenerRetriever
			synchronized (this.retrievalMutex) {

				retriever = this.retrieverCache.get(cacheKey);
				if (retriever != null) {

					return retriever.getApplicationListeners();
				}
				retriever = new ListenerRetriever(true);
				//从retrieveApplicationListeners中找
				Collection<ApplicationListener<?>> listeners =retrieveApplicationListeners(eventType, sourceType, retriever);
				this.retrieverCache.put(cacheKey, retriever);
				return listeners;
			}
		}
		else {

			// No ListenerRetriever caching -> no synchronization necessary
			return retrieveApplicationListeners(eventType, sourceType, null);
		}
	}

- 具体的流程图

自定义监听器实战
实现方式
- 实现方式一
//泛型参数---对哪种事件感兴趣
@Order(1)
public class FirstListener implements ApplicationListener<ApplicationStartedEvent> {

    @Override
    public void onApplicationEvent(ApplicationStartedEvent event) {

        System.out.println("first listener");
    }
}
resources下的META-INF的spring.factories文件添加,多个用逗号隔开
org.springframework.context.ApplicationListener=cn.test.listener.FirstListener

- 实现方式二
public class SecondListener implements ApplicationListener<ApplicationStartedEvent> {

    @Override
    public void onApplicationEvent(ApplicationStartedEvent event) {

        System.out.println("second listener");
    }
}
系统启动类硬编码形式添加监听器
@SpringBootApplication
public class Springboot2Application {


    public static void main(String[] args) {

        SpringApplication springApplication = new SpringApplication(Springboot2Application.class);
        springApplication.addListeners(new SecondListener());
        springApplication.run(args);
    }
}

- 实现方式三
@Order(3)
public class ThirdListener implements ApplicationListener<ApplicationStartedEvent> {

    @Override
    public void onApplicationEvent(ApplicationStartedEvent event) {

        System.out.println("third listener");
    }
}
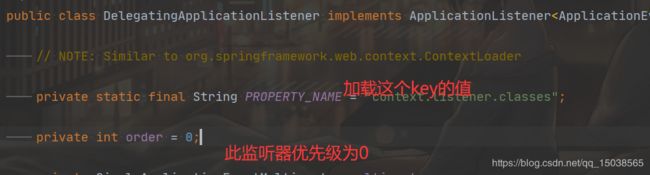
application.properties配置文件添加
context.listener.classes=cn.test.listener.ThirdListener
- 实现方式四
@Order
public class FourthListener implements SmartApplicationListener {

    @Override
    public boolean supportsEventType(Class<? extends ApplicationEvent> eventType) {

        //自定义对哪些时间感兴趣,可以多个
        return ApplicationStartedEvent.class.isAssignableFrom(eventType)
                || ApplicationPreparedEvent.class.isAssignableFrom(eventType);
    }

    @Override
    public void onApplicationEvent(ApplicationEvent event) {

        System.out.println("fourch listener");
    }
}
然后上面任意三种的一种注入进去就行


打印了两次,因为我们设置了对两个事件感兴趣因此两个触发机制都会触发监听器执行
为什么ThirdListener设置的优先级低,却加载快

这个DelegatingApplicationListener会在系统初始化的时候调用getListeners()方法加载properties配置文件的值。

总结
1. 实现ApplicationListener接口针对单一事件监听
2. 实现SmartApplicationListener接口针对多种事件监听
3. Order值越小越先执行
4. application.properties中定义的优于其他方式
文章持续更新,可以微信搜索「 绅堂Style 」第一时间阅读,回复【资料】有我准备的面试题笔记。
GitHub https://github.com/dtt11111/Nodes 有总结面试完整考点、资料以及我的系列文章。欢迎Star。