Java多线程的实现方式(继承Thread/实现Runnable/实现Callable/线程池)
方式1、继承Thread类
- 继承Thread,覆写该类中的run()方法,run()方法中即为该线程要实现的具体业务。
public class NewThread1 extends Thread{
    private String title;
    public NewThread1(String title){
        this.title = title;
    }

    @Override
    public void run() {
        for (int i = 0; i < 10; i++) {
            System.out.println(this.title+",i="+i);
        }
    }
}
如何启动线程?
- 启动线程时不能直接调用run()方法
先观察一下直接调用run()方法会出现什么情况:
public class ThreadMain {
    public static void main(String[] args) {
        NewThread1 thread1 = new NewThread1("Thread1");
        NewThread1 thread2 = new NewThread1("Thread2");
        NewThread1 thread3 = new NewThread1("Thread3");
        thread1.run();
        thread2.run();
        thread3.run();

    }
}
截取一部分结果,可以看出:直接调用run()方法仅仅是做了一个顺序打印,并没有使用多线程。

- 启动多线程正确的方式是调用Thread类的start()方法
public class ThreadMain {
    public static void main(String[] args) {
        NewThread1 thread1 = new NewThread1("Thread1");
        NewThread1 thread2 = new NewThread1("Thread2");
        NewThread1 thread3 = new NewThread1("Thread3");
        thread1.start();
        thread2.start();
        thread3.start();

    }
}
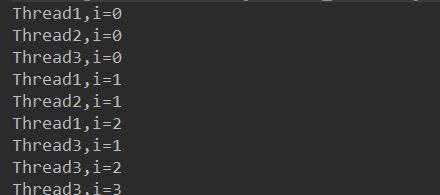
通过观察结果,可以看出,调用start()方法才能启动线程:

start()方法与run()方法的区别与关系:
-
调用start方法方可启动线程,而run方法只是thread的一个普通方法调用,还是在主线程里执行。所以,调用start方法实现多线程,而调用run方法没有实现多线程
-
Start:
用start方法来启动线程,真正实现了多线程运行,这时无需等待run方法体代码执行完毕而直接继续执行下面的代码。通过调用Thread类的start()方法来启动一个线程,这时此线程处于就绪(可运行)状态,并没有运行,一旦得到spu时间片,就开始执行run()方法,这里方法run()称为线程体,它包含了要执行的这个线程的内容,Run方法运行结束,此线程随即终止。 -
Run:
run()方法只是类的一个普通方法而已,如果直接调用Run方法,程序中依然只有主线程这一个线程,其程序执行路径还是只有一条,还是要顺序执行,还是要等待run方法体执行完毕后才可继续执行下面的代码,这样就没有达到写线程的目的。
启动多线程时start()如何调用run()方法?(简述)?
1、通过查看start()方法的源码,可以看到start()方法调用了一个start0()方法,start0()方法是一个只声明而未实现的方法,使用native关键字(指调用本机的原生系统函数)进行定义。
2、通过观察本地方法registerNative可以发现,start()方法调用start0()方法,实际上会调用JVM_StartThread方法。
3、宏JVM_ENTER定义了JVM_StartThread方法,函数内创建了真正的平台相关的本地线程,其线程函数是thread_enter。
4、thread_enter调用了一个 vmSymbolHandles::run_method_name()方法。
5、run_method_name是在 vmSymbols.hpp 用宏定义:
	class vmSymbolHandles: AllStatic {
	...
	template(run_method_name,"run") ;
	...
	}
可以看到template(run_method_name,"run")这一句调用了run方法。
方式2、实现Runnable()接口
public class NewThread2 implements Runnable{
   private String title;
   public NewThread2(String title){
       this.title = title;
   }

   @Override
   public void run() {
       for (int i = 0; i < 10; i++) {
           System.out.println(this.title+",i="+i);
       }
   }
}
如何启动线程?
启动方式1:
Thread类提供的构造方法public Thread(Runnable target)可以接受Runnable接口对象。
public class ThreadMain {
   public static void main(String[] args) {
       NewThread2 thread1 = new NewThread2("Thread1");
       NewThread2 thread2 = new NewThread2("Thread2");
       NewThread2 thread3 = new NewThread2("Thread3");
       Thread th1 = new Thread(thread1);
       Thread th2 = new Thread(thread2);
       Thread th3 = new Thread(thread3);
       th1.start();
       th2.start();
       th3.start();
       //或:
       //new Thread(thread1).start();
       //new Thread(thread2).start();
       //new Thread(thread3).start();

   }
}
启动方式2:匿名内部类启动
public class ThreadMain {
  public static void main(String[] args) {
      new Thread(new Runnable() {
          @Override
          public void run() {
              System.out.println("thread1");
          }
      }).start();
  }
}
启动方式3:Lamdba表达式进行Runnable对象创建
public class ThreadMain {
    public static void main(String[] args) {
        Runnable runnable = ()-> System.out.println("thread2");
        new Thread(runnable).start();

    }
}
方式3、实现Callable接口:
需要有返回值时利用Callable接口来实现多线程。
- 实现Callable接口,覆写call方法
- Future接口:接受Callable接口的返回值(与Callable成对出现)
-
- Future接口中的get方法会阻塞当前线程直到取得Callable的返回值
import java.util.concurrent.Callable;

public class NewThread3 implements Callable {
    private int ticket = 20;
    @Override
    public Object call() throws Exception {
        while(this.ticket>0){
            System.out.println("剩余"+ticket--+"张票!");
        }
        return "票卖完了!";
    }
}
启动多线程:
import java.util.concurrent.ExecutionException;
import java.util.concurrent.FutureTask;

public class ThreadMain {
    public static void main(String[] args) throws ExecutionException, InterruptedException {
        FutureTask task = new FutureTask(new NewThread3());
        new Thread(task).start();
        new Thread(task).start();
        //输出返回值
        System.out.println(task.get());

    }
}
方式4、线程池创建多线程:
可以点击查看详细介绍与分析:线程池的实现原理及使用
创建线程池:
根据线程池的类ThreadPoolExecutor的各项参数创建线程池:
        ThreadPoolExecutor threadPoolExecutor =
        					new ThreadPoolExecutor(3, 5,
                                     			   2000,
                                        		   TimeUnit.MILLISECONDS,
                                        		   new LinkedBlockingDeque());
向线程池提交任务:
向线程池提交任务有两种方式:execute() 和 submit() 方法
execute()方法向线程池提交任务:
execute()方法用于提交不需要返回值的任务,所以无法判断任务是否被线程池成功执行。
import java.util.concurrent.*;
class RunnableThread implements Runnable{

   @Override
   public void run() {
       for (int i = 0; i < 50; i++) {
           System.out.println(Thread.currentThread().getName()+","+i);
       }
   }
}

public class ThreadMain {
   public static void main(String[] args){
       RunnableThread runnableThread = new RunnableThread();
       ThreadPoolExecutor threadPoolExecutor =
               new ThreadPoolExecutor(3, 5,
                                       2000,
                                       TimeUnit.MILLISECONDS,
                                       new LinkedBlockingDeque());
       for (int i = 0; i < 5; i++) {
           threadPoolExecutor.execute(runnableThread);
       }
   }
}
submit()方法向线程池提交任务:
submit()方法用于提交需要返回值的任务。线程池会返回一个future类型的对象,通过这个future对象可以判断任务是否执行成功,并且可以通过future的get()方法来获取返回值,get()方法会阻塞当前线程直到任务完成,而使用get(long timeout,TimeUnit unit)方法则会阻塞当前线程一段时间后立即返回,这时候有可能任务没有执行完。
import java.util.concurrent.*;
class CallableThread implements Callable{

    @Override
    public String call() throws Exception {
        for (int i = 0; i < 50; i++) {
            System.out.println(Thread.currentThread().getName()+","+i);

        }

        return Thread.currentThread().getName()+"任务执行完毕";
    }
}
public class SubmitTest {
    public static void main(String[] args) {
        CallableThread callableThread = new CallableThread();
        ThreadPoolExecutor threadPoolExecutor =
                new ThreadPoolExecutor(3, 5,
                        2000,
                        TimeUnit.MILLISECONDS,
                        new LinkedBlockingDeque());
        for (int i = 0; i < 5; i++) {
            Future future = threadPoolExecutor.submit(callableThread);
            String str = null;
            try {
                str = future.get();
            } catch (InterruptedException e) {
                e.printStackTrace();
            } catch (ExecutionException e) {
                e.printStackTrace();
            }
            System.out.println(str);
        }
    }
}
关闭线程池:
可以通过调用线程池的shutdown 或 shutdownNow 方法来关闭线程池。
threadPoolExecutor.shundown();
或
threadPoolExecutor.shundown();