NoSql之Redis集群搭建
上一篇我们是说了集群原理,那么这次我们来讲解集群的搭建,我下面使用的是单机多实例。
1.ruby环境
redis集群管理工具redis-trib.rb依赖ruby环境,首先需要安装ruby环境:
   yum install ruby

   yum install rubygems
安装ruby和redis的接口程序
拷贝redis-3.0.0.gem至/usr/local下
执行:
gem install /usr/local/redis-3.0.0.gem2.创建集群:
a.群结点规划
这里在同一台服务器用不同的端口表示不同的redis服务器,如下:
主节点:192.168.96.131:7001 192.168.96.131:7002 192.168.96.131:7003
从节点:192.168.96.131:7004 192.168.96.131:7005 192.168.96.131:7006
在/usr/local下创建redis-cluster目录,其下创建7001、7002。。7006目录,如下:
将redis安装目录bin下的文件拷贝到每个700X目录内,同时将redis源码目录src下的redis-trib.rb拷贝到redis-cluster目录下。
修改每个700X目录下的redis.conf配置文件:
  port XXXX

  #bind 192.168.96.131

  cluster-enabled yes
b.启动每个结点redis服务
分别进入7001、7002、...7006目录,执行:
./redis-server ./redis.confc.执行创建集群命令
执行redis-trib.rb,此脚本是ruby脚本,它依赖ruby环境。
./redis-trib.rb create --replicas 1 192.168.96.131:7001192.168.96.131:7002 192.168.96.131:7003 192.168.96.131:7004 192.168.96.131:7005  192.168.96.131:7006

./redis-trib.rb create --replicas 1192.168.131.102:7001 192.168.131.102:7002 192.168.131.102:7003192.168.131.102:7004 192.168.131.102:7005 192.168.131.102:7006
说明:
redis集群至少需要3个主节点,每个主节点有一个从节点总共6个节点
replicas指定为1表示每个主节点有一个从节点
注意:
如果执行时报如下错误:
[ERR] Node XXXXXX is not empty. Either thenode already knows other nodes (check with CLUSTER NODES) or contains some keyin database 0
解决方法是删除生成的配置文件nodes.conf,如果不行则说明现在创建的结点包括了旧集群的结点信息,需要删除redis的持久化文件后再重启redis,比如:appendonly.aof、dump.rdb
创建集群输出如下:
>>> Creating cluster
Connecting to node 192.168.96.131:7001: OK
Connecting to node 192.168.96.131:7002: OK
Connecting to node 192.168.96.131:7003: OK
Connecting to node 192.168.96.131:7004: OK
Connecting to node 192.168.96.131:7005: OK
Connecting to node 192.168.96.131:7006: OK
>>> Performing hash slotsallocation on 6 nodes...
Using 3 masters:
192.168.96.131:7001
192.168.96.131:7002
192.168.96.131:7003
Adding replica 192.168.96.131:7004 to 192.168.96.131:7001
Adding replica 192.168.96.131:7005 to 192.168.96.131:7002
Adding replica 192.168.96.131:7006 to 192.168.96.131:7003
M: cad9f7413ec6842c971dbcc2c48b4ca959eb5db4192.168.96.131:7001
slots:0-5460 (5461 slots) master
M: 4e7c2b02f0c4f4cfe306d6ad13e0cfee90bf5841192.168.96.131:7002
slots:5461-10922 (5462 slots) master
M: 1a8420896c3ff60b70c716e8480de8e50749ee65192.168.96.131:7003
slots:10923-16383 (5461 slots) master
S: 69d94b4963fd94f315fba2b9f12fae1278184fe8192.168.96.131:7004
replicates cad9f7413ec6842c971dbcc2c48b4ca959eb5db4
S: d2421a820cc23e17a01b597866fd0f750b698ac5192.168.96.131:7005
replicates 4e7c2b02f0c4f4cfe306d6ad13e0cfee90bf5841
S: 444e7bedbdfa40714ee55cd3086b8f0d5511fe54192.168.96.131:7006
replicates 1a8420896c3ff60b70c716e8480de8e50749ee65
Can I set the above configuration? (type'yes' to accept): yes
>>> Nodes configuration updated
>>> Assign a different configepoch to each node
>>> Sending CLUSTER MEET messagesto join the cluster
Waiting for the cluster to join...
>>> Performing Cluster Check(using node 192.168.96.131:7001)
M: cad9f7413ec6842c971dbcc2c48b4ca959eb5db4192.168.96.131:7001
slots:0-5460 (5461 slots) master
M: 4e7c2b02f0c4f4cfe306d6ad13e0cfee90bf5841192.168.96.131:7002
slots:5461-10922 (5462 slots) master
M: 1a8420896c3ff60b70c716e8480de8e50749ee65192.168.96.131:7003
slots:10923-16383 (5461 slots) master
M: 69d94b4963fd94f315fba2b9f12fae1278184fe8192.168.96.131:7004
slots: (0 slots) master
replicates cad9f7413ec6842c971dbcc2c48b4ca959eb5db4
M: d2421a820cc23e17a01b597866fd0f750b698ac5192.168.96.131:7005
slots: (0 slots) master
replicates 4e7c2b02f0c4f4cfe306d6ad13e0cfee90bf5841
M: 444e7bedbdfa40714ee55cd3086b8f0d5511fe54192.168.96.131:7006
slots: (0 slots) master
replicates 1a8420896c3ff60b70c716e8480de8e50749ee65
[OK] All nodes agree about slotsconfiguration.
>>> Check for open slots...
>>> Check slots coverage...
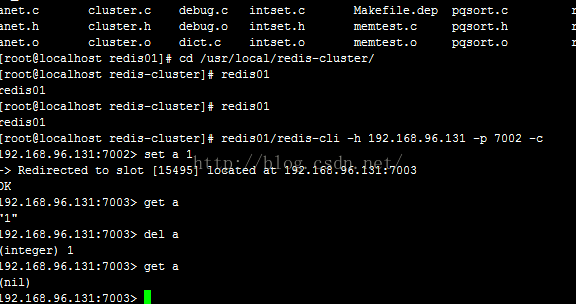
[OK] All 16384 slots covered.到这里我们的集群就创建成功了,我们就可以使用集群了,如下图: