Nginx负载均衡+后端节点健康检查安装部署文档
1.下载
nginx下载,最新版本为1.11.5
地址:http://nginx.org/en/download.html
PCRE(nginx安装需要的依赖包)下载
地址:https://sourceforge.net/projects/pcre/files/pcre/
nginx_upstream_check_module(nginx后端节点健康检查插件)下载
地址: https://github.com/yaoweibin/nginx_upstream_check_module
2.安装
下载的三个软件包:
nginx-1.11.5.tar.gz,
pcre-8.39.tar.gz,
nginx_upstream_check_module-master.zip
放置在/home/hdfs/目录下。
2.1.先安装依赖包PCRE
cd /home/hdfs/
tar -xzvf pcre-8.39.tar.gz
cd pcre-8.39
./configure
make
make install
==============================================================================
2.2. 安装nginx
unzip nginx_upstream_check_module-master.zip #解压
tar -xzvf nginx-1.11.5.tar.gz
cd ./nginx-1.11.5/src
patch -p1 < /home/hdfs/nginx_upstream_check_module-master/check_1.11.5+.patch
#找到刚刚解压的nginx_upstream_check_module目录下和nginx版本对应的补丁,
./configure --prefix=/usr/local/nginx --conf-path=/usr/local/nginx/conf/nginx.conf --with-http_realip_module --with-http_addition_module --with-http_gzip_static_module --with-http_random_index_module --with-http_stub_status_module --with-http_sub_module --with-http_dav_module --with-openssl=/usr/local/src/openssl-1.0.1g --add-module= /home/hdfs/nginx_upstream_check_module-master/
此过程若报错:
./configure: error: the HTTP gzip module requires the zlib library.
You can either disable the module by using --without-http_gzip_module
option, or install the zlib library into the system, or build the zlib library
statically from the source with nginx by using --with-zlib=
执行:yum install -y zlib-devel 按照zlib包
make install
不报错安装完成。
===============================================================================3.配置负载均衡和健康检查
进入nginx按照目录,
cd /usr/local/nginx/conf
more nginx.conf,关键配置如下:
http {
include mime.types;
default_type application/octet-stream;
keepalive_timeout 65;
#gzip on;
upstream 172.19.189.53{ #负载均衡配置,默认的策略,按时间先后,有其他按ip hash,权重
server 172.19.189.49:7070;
server 172.19.189.50:7070;
server 172.19.189.51:7070;
check interval=3000 rise=2 fall=3 timeout=3000 type=http port=7070;
# interval=3000:间隔3秒检查一次,rise=2:检查2次ok后端节点up,fall=3:三次检查失败后端节点down,timeout=3000:超时时间3秒,type=http:发http检查请求类型,port=7070检查端口,可省略,默认和server 172.19.189.49:7070中的端口一致。
check_http_send "HEAD /kylin HTTP/1.0\r\n\r\n";①
check_http_expect_alive http_2xx http_3xx;
}
server {
listen 8880;#nginx监听的端口,可修改。
server_name kylin_balance;
location / {
proxy_pass http://172.19.189.53; #反向代理,代理哪个应用服务器----②
proxy_set_header Host $host;#此下三行设置把客户端的真实ip传给后端,可省
proxy_set_header X-Real-IP $remote_addr;
proxy_set_header X-Forwarded-For $proxy_add_x_forwarded_for;
root html;#请求到达nginx服务器后,分发不出去,会去nginx安装目录root下找页面
index index.html index.htm;#默认找index.html,可自定义页面
}
location /status { #健康检查
check_status;
access_log off;
}
error_page 500 502 503 504 /50x.html;
location = /50x.html {#错误页面
root html;
}
}
}
注:①处,若请求url类型是http://ip:port/name类型的,此处的设置要在HEAD后加 /kylin,否则后端健康检查节点一直为down。
②处,此url为访问应用服务的请求域名部分,如应用服务部署在
172.19.189.49/172.19.189.50/172.19.189.51三台
不通过nginx的请求url为:http://172.19.189.49:7070/kylin,通过nginx访问的请求url为:http:// 172.19.189.53:8880/即可。
修改完配置后启动./nginx,若遇到error while loading shared libraries: libpcre.so.1: cannot open shared object file: No such file or directory
通过uname –a看系统多少位:
如果是32位系统: ln -s /usr/local/lib/libpcre.so.1 /lib
如果是64位系统: ln -s /usr/local/lib/libpcre.so.1 /lib64
4.查看负载均衡和节点健康状况:
1.负载均衡
1.1 这种方法,是在其他应用服务器上也安装nginx,把root下的index.html改为可以显示本机ip的内容,这样页面输入请求时,可以直观的看到负载是否均衡。
1.2 通过观看服务的日志,同时打开多台服务器上的应用的日志,看请求是否分发到不同的机器上去。
2.节点健康状态监控
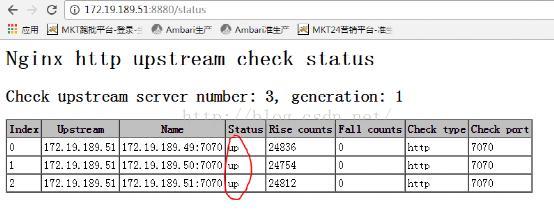
若监控的服务都正常,如下所示,状态显示up
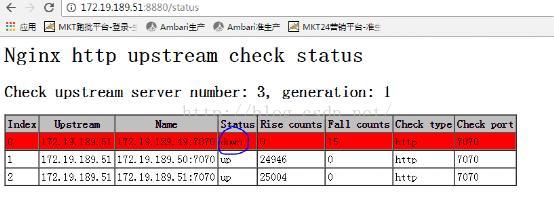
停止49上的服务,则短暂时间后,状态显示down
注: nginx的启动停止命令:
nginx -s stop/start/reload(修改配置文件nginx.conf直接reload就生效,不用先停后启)
参考文章链接:
http://www.linuxidc.com/Linux/2015-03/114988.htm
http://www.linuxidc.com/Linux/2015-03/114986.htm

