计算机视觉知识点-答题卡识别
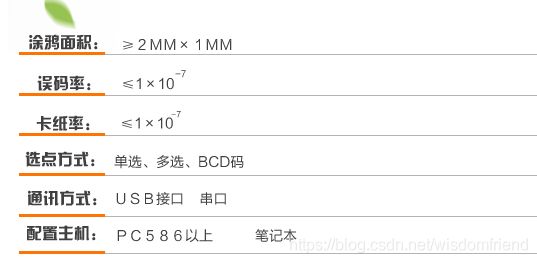
之前跟同事聊过答题卡识别的原理,自己调研了一下,高考那种答题卡是通过一个专门的答题卡阅读器进行识别的,采用红外线扫描答题卡,被涂过2B碳的区域会被定位到,再加上一些矫正逻辑就能试下判卷的功能.这种方法的准确度很高.淘宝上查了下光标机的误码率是0.9999999(7个9).见下图.
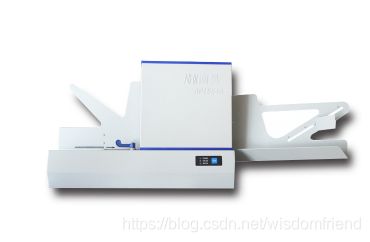
准确率高的离谱,机器长这个样子
这台机器的价格是15000, 有些小贵. 如果我想用简单的视觉方法做这个任务,不用外红设备,我应该怎么做呢.是不是用万能的yolo来做, 检测方形或者圆形的黑点行吗?这个方案当然可以,但是比较费劲,且效果不一定好.
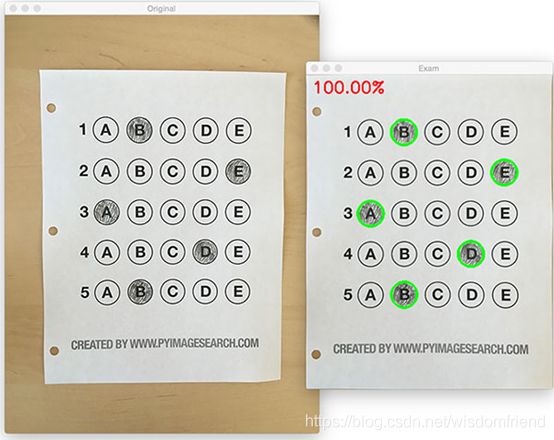
我今天要说的是采用传统的计算机视觉的方法来做,几行代码就能达到99%的准确率,虽然没有光标机的准确率高,但是我们只是玩一玩.我参考了这个这篇博客, 博主的名字叫Adrian, Adian的博客专注计算机视觉,推荐大家看看.
传统的方法大概有着几个步骤:
1 检测到答题纸的位置, 如下图
2 进行拉伸变化,把答题纸拉成矩形
3 检测黑色的区域和白色的区域
4 答案判定.
下面是一个python实现
# import the necessary packages
from imutils.perspective import four_point_transform
from imutils import contours
import numpy as np
import argparse
import imutils
import cv2
# construct the argument parse and parse the arguments
ap = argparse.ArgumentParser()
ap.add_argument("-i", "--image", default='image.jpg',
   help="path to the input image")
args = vars(ap.parse_args())
# define the answer key which maps the question number
# to the correct answer
ANSWER_KEY = {0: 1, 1: 4, 2: 0, 3: 3, 4: 1}

# load the image, convert it to grayscale, blur it
# slightly, then find edges
image = cv2.imread(args["image"])
gray = cv2.cvtColor(image, cv2.COLOR_BGR2GRAY)
blurred = cv2.GaussianBlur(gray, (5, 5), 0)
edged = cv2.Canny(blurred, 75, 200)

# find contours in the edge map, then initialize
# the contour that corresponds to the document
cnts = cv2.findContours(edged.copy(), cv2.RETR_EXTERNAL,
   cv2.CHAIN_APPROX_SIMPLE)
cnts = imutils.grab_contours(cnts)
docCnt = None
# ensure that at least one contour was found
if len(cnts) > 0:
   # sort the contours according to their size in
   # descending order
   cnts = sorted(cnts, key=cv2.contourArea, reverse=True)
   # loop over the sorted contours
   for c in cnts:
      # approximate the contour
      peri = cv2.arcLength(c, True)
      approx = cv2.approxPolyDP(c, 0.02 * peri, True)
      # if our approximated contour has four points,
      # then we can assume we have found the paper
      if len(approx) == 4:
         docCnt = approx
         break

# apply a four point perspective transform to both the
# original image and grayscale image to obtain a top-down
# birds eye view of the paper
paper = four_point_transform(image, docCnt.reshape(4, 2))
warped = four_point_transform(gray, docCnt.reshape(4, 2))

# apply Otsu's thresholding method to binarize the warped
# piece of paper
thresh = cv2.threshold(warped, 0, 255,
   cv2.THRESH_BINARY_INV | cv2.THRESH_OTSU)[1]

# find contours in the thresholded image, then initialize
# the list of contours that correspond to questions
cnts = cv2.findContours(thresh.copy(), cv2.RETR_EXTERNAL,
   cv2.CHAIN_APPROX_SIMPLE)
cnts = imutils.grab_contours(cnts)
questionCnts = []
# loop over the contours
for c in cnts:
   # compute the bounding box of the contour, then use the
   # bounding box to derive the aspect ratio
   (x, y, w, h) = cv2.boundingRect(c)
   ar = w / float(h)
   # in order to label the contour as a question, region
   # should be sufficiently wide, sufficiently tall, and
   # have an aspect ratio approximately equal to 1
   if w >= 20 and h >= 20 and ar >= 0.9 and ar <= 1.1:
      questionCnts.append(c)

# sort the question contours top-to-bottom, then initialize
# the total number of correct answers
questionCnts = contours.sort_contours(questionCnts,
   method="top-to-bottom")[0]
correct = 0
# each question has 5 possible answers, to loop over the
# question in batches of 5
for (q, i) in enumerate(np.arange(0, len(questionCnts), 5)):
   # sort the contours for the current question from
   # left to right, then initialize the index of the
   # bubbled answer
   cnts = contours.sort_contours(questionCnts[i:i + 5])[0]
   bubbled = None

   # loop over the sorted contours
   for (j, c) in enumerate(cnts):
      # construct a mask that reveals only the current
      # "bubble" for the question
      mask = np.zeros(thresh.shape, dtype="uint8")
      cv2.drawContours(mask, [c], -1, 255, -1)
      # apply the mask to the thresholded image, then
      # count the number of non-zero pixels in the
      # bubble area
      mask = cv2.bitwise_and(thresh, thresh, mask=mask)
      total = cv2.countNonZero(mask)
      # if the current total has a larger number of total
      # non-zero pixels, then we are examining the currently
      # bubbled-in answer
      if bubbled is None or total > bubbled[0]:
         bubbled = (total, j)

         # initialize the contour color and the index of the
         # *correct* answer
         color = (0, 0, 255)
         k = ANSWER_KEY[q]
         # check to see if the bubbled answer is correct
         if k == bubbled[1]:
            color = (0, 255, 0)
            correct += 1
         # draw the outline of the correct answer on the test
         cv2.drawContours(paper, [cnts[k]], -1, color, 3)

# grab the test taker
score = (correct / 5.0) * 100
print("[INFO] score: {:.2f}%".format(score))
cv2.putText(paper, "{:.2f}%".format(score), (10, 30),
   cv2.FONT_HERSHEY_SIMPLEX, 0.9, (0, 0, 255), 2)
cv2.imshow("Original", image)
cv2.imshow("Exam", paper)
cv2.waitKey(0)
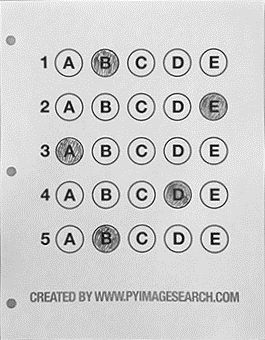
测试图片
代码运行方法:
python test.py --image images/test.jpg需要注意的事:
1 为什么不用圆检测?
圆检测代码有些复杂,而且要是涂抹的不是圆,或者不像圆该就难办了.
2 如何扩展成多选题?
修改是否被涂黑的判定逻辑就可以.
传统的计算机视觉是不是很好玩,传统的计算机视觉算法在一些限定场景下,效果还是不错的,比如室内光照恒定的情况,相机角度固定的情况.
感慨:
刚才看了下,我的上一篇博客还是在2015年,5年过去了,物是人非啊.2015年的时候我换了一个城市工作,压力很大,几年来,有顺心的事,也有烦心的事,不过总体还不错,祝福一下自己.
最后的话:
我是一个工作10年的程序员,工作中经常会遇到需要查一些关键技术,但是很多技术名词的介绍都写的很繁琐,为什么没有一个简单的/5分钟能说清楚的博客呢. 我打算有空就写写这种风格的指南文档.CSDN上搜蓝色的杯子, 没事多留言,指出我写的不对的地方,写的排版风格之类的问题,让我们一起爱智求真吧[email protected]是我的邮箱,也可以给我邮箱留言.


