Sign In with Apple
- 原文博客地址: Sign In With Apple
- 在之前的文章iOS13适配深色模式(Dark Mode)中只是简单提到了关于Sign In With Apple的问题, 下面就着重介绍一下什么是
Apple登录 - 对于很多应用都会有自己的账号登录体系, 但是一般都相对繁琐, 或者用户会忘记密码等, 为此一般都会接入微信、
QQ登录, 国外应用也会有Google、Facebook等第三方登录方式 - 在
WWDC 2019上, 苹果要求使用第三方登录的应用也必须接入苹果账号登录(2020年必须适配) - 当然了如果你的
App没有提供第三方登录,那就不用集成; 如果用到了第三方登录,那么需要提供Sign in with Apple
Sign in with Apple
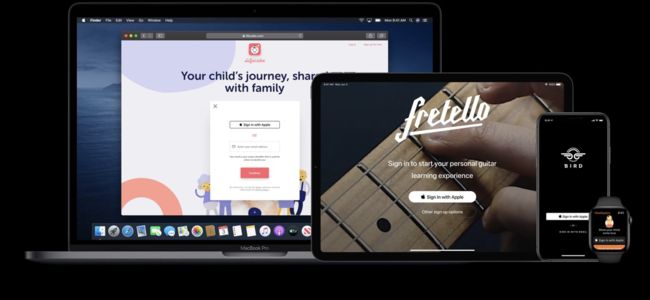
Sign in with Apple makes it easy for users to sign in to your apps and websites using their Apple ID. Instead of filling out forms, verifying email addresses, and choosing new passwords, they can use Sign in with Apple to set up an account and start using your app right away. All accounts are protected with two-factor authentication for superior security, and Apple will not track users’ activity in your app or website.
Make signing in easy
Sign In with Apple为用户提供一种快速安全的登录方式, 用户可以轻松登录开发者的应用和网站- 使用
Apple登录可以让用户在系统中设置用户帐户,开发者可以获取到用户名称(Name), 用户唯一标识符(ID)以及经过验证的电子邮件地址(email) Sign In with Apple相关特性- 尊重用户隐私: 开发人员仅仅只能获取到用户的姓名和邮箱, 苹果也不会收集用户和应用交互的任何信息
- 系统内置的安全性:
2F双重验证(Face ID或Touch ID),从此登录不再需要密码 - 简化账号的创建和登录流程,无缝跨设备使用
- 开发者可以获取到已验证过的邮箱作为登录账号或者与用户进行通信(注:用户可以选择隐藏真实邮箱,并使用苹果提供的虚拟邮箱进行授权)
- 可跨平台使用, Apple登录支持
iOS,macOS,tvOS和watchOS以及JavaScript - 更多信息可惨考
使用Apple登录
在代码集成之前还需要做一些准备工作
- 在开发者网站,在需要添加
Sign in with Apple功能
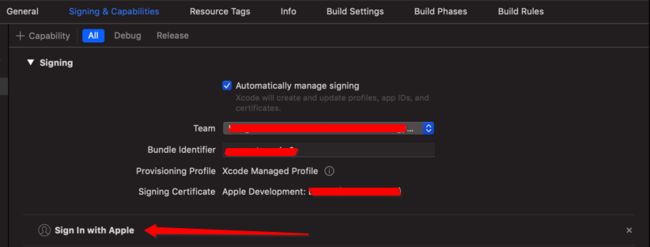
- 在
Xcode里面开启Sign in with Apple功能
登录按钮
Apple苹果登录按钮, 需要使用ASAuthorizationAppleIDButton类创建添加, 该类是iOS 13苹果提供的创建Apple登录按钮的专属类
@available(iOS 13.0, *)
open class ASAuthorizationAppleIDButton : UIControl {
    // 初始化方法
    public convenience init(type: ASAuthorizationAppleIDButton.ButtonType, style: ASAuthorizationAppleIDButton.Style)

    // 初始化方法
    public init(authorizationButtonType type: ASAuthorizationAppleIDButton.ButtonType, authorizationButtonStyle style: ASAuthorizationAppleIDButton.Style)

    // 设置按钮的圆切角
    open var cornerRadius: CGFloat
}
开始创建Apple登录按钮
// apple登录按钮
let appleButton = ASAuthorizationAppleIDButton(type: .continue, style: .black)
appleButton.frame = CGRect(x: 100, y: showLabel.frame.maxY + 40, width: 200, height: 50)
appleButton.cornerRadius = 10
appleButton.addTarget(self, action: #selector(appleAction), for: .touchUpInside)
view.addSubview(appleButton)
ASAuthorizationAppleIDButton的初始化方法中有两个参数type和styletype是设置按钮的类型ASAuthorizationAppleIDButton.ButtonTypestyle设置按钮的样式ASAuthorizationAppleIDButton.Style- 可参考官网介绍Sign In with Apple
ButtonType
public enum ButtonType : Int {
    // signIn登录类型
    case signIn
    // continue类型
    case `continue`

    public static var `default`: ASAuthorizationAppleIDButton.ButtonType { get }
}
不同ButtonType展示效果如下
Style
@available(iOS 13.0, *)
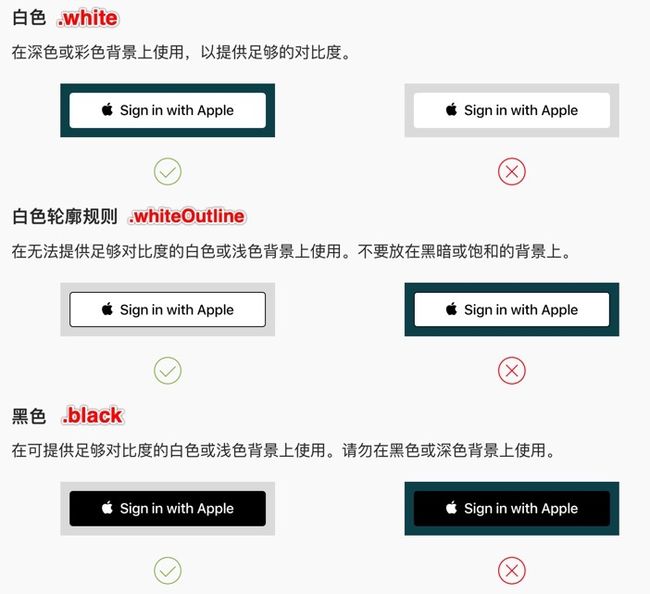
public enum Style : Int {

    case white

    case whiteOutline

    case black
}
不同Style展示效果和使用场景如下
cornerRadius
设置按钮的圆角大小
// 默认值大概5左右, 具体值不知
appleButton.cornerRadius = 10
发起授权请求
- 在创建好登录按钮后, 点击按钮的操作就是, 根据用户登录的
AppleID发起授权请求, 并获得授权码 iOS 13系统给我们提供了一个ASAuthorizationAppleIDProvider类- 该类就是一种基于用户的
AppleID生成用户的授权请求的一种机制 - 在发起授权请求之前, 需要配置要获取的数据权限范围(例如:用户名、邮箱等)
- 为获取授权结果, 还需要设置回调代理, 并发起授权请求
@objc fileprivate func appleAction() {
    // 基于用户的Apple ID授权用户,生成用户授权请求的一种机制
    let appleIDProvider = ASAuthorizationAppleIDProvider()
    // 创建新的AppleID授权请求
    let request = appleIDProvider.createRequest()
    // 所需要请求的联系信息
    request.requestedScopes = [.fullName, .email]
    // 管理授权请求的控制器
    let controller = ASAuthorizationController(authorizationRequests: [request])
    // 授权成功或者失败的代理
    controller.delegate = self
    // 显示上下文的代理, 系统可以在上下文中向用户展示授权页面
    controller.presentationContextProvider = self
    // 在控制器初始化期间启动授权流
    controller.performRequests()
}
delegate
设置授权控制器通知授权请求的成功与失败的代理
// 代理
weak open var delegate: ASAuthorizationControllerDelegate?

// 代理方法如下
@available(iOS 13.0, *)
public protocol ASAuthorizationControllerDelegate : NSObjectProtocol {
    // 授权成功的回调
    optional func authorizationController(controller: ASAuthorizationController, didCompleteWithAuthorization authorization: ASAuthorization)

    // 授权失败的回调
    optional func authorizationController(controller: ASAuthorizationController, didCompleteWithError error: Error)
}
presentationContextProvider
需要向用户展示授权页面时, 需要遵循该协议
// 显示上下文的代理, 系统可以在上下文中向用户展示授权页面
weak open var presentationContextProvider: ASAuthorizationControllerPresentationContextProviding?

// 协议方法
@available(iOS 13.0, *)
public protocol ASAuthorizationControllerPresentationContextProviding : NSObjectProtocol {

    // 该方法返回一个视图锚点, 告诉代理应该在哪个window 展示内容给用户
    func presentationAnchor(for controller: ASAuthorizationController) -> ASPresentationAnchor
}


// 方法执行示例
func presentationAnchor(for controller: ASAuthorizationController) -> ASPresentationAnchor {
    return self.view.window!
}
ASAuthorization
- 在控制器获得授权的成功回调中, 协议方法提供了一个
ASAuthorization ASAuthorization是对控制器成功授权的封装, 包括两个属性
@available(iOS 13.0, *)
open class ASAuthorization : NSObject {


    // 创建发起成功授权的发起者
    open var provider: ASAuthorizationProvider { get }

    // 成功授权后返回的相关凭证, 包含授权后的相关信息,是一个协议
    open var credential: ASAuthorizationCredential { get }
}
ASAuthorizationCredential
是一个协议, 在处理授权成功的结果中, 需要使用遵循该协议的类, 有以下三个
ASPasswordCredential: 密码凭证ASAuthorizationAppleIDCredential: Apple ID身份验证成功产生的凭证ASAuthorizationSingleSignOnCredential: 单点登录(SSO)身份验证产生的凭据
ASPasswordCredential
@available(iOS 12.0, *)
open class ASPasswordCredential : NSObject, ASAuthorizationCredential {

    // 初始化方法
    public init(user: String, password: String)

    // 用户名
    open var user: String { get }

    // 用户密码
    open var password: String { get }
}
ASAuthorizationAppleIDCredential
@available(iOS 13.0, *)
open class ASAuthorizationAppleIDCredential : NSObject, ASAuthorizationCredential {

    // 和用户AppleID关联的用户ID(标识符)
    open var user: String { get }

    // 传送给ASAuthorizationRequest的字符串
    open var state: String? { get }

    // 用户授权的可访问的联系信息的种类
    open var authorizedScopes: [ASAuthorization.Scope] { get }

    // 为APP提供的授权证明的有效token
    open var authorizationCode: Data? { get }

    // JSON Web Token (JWT), 用于以安全的方式向应用程序传递关于用户身份的信息
    open var identityToken: Data? { get }

    // 用户的email
    open var email: String? { get }

    // 用户名
    open var fullName: PersonNameComponents? { get }

    // 用户是否是真实用户的状态
    open var realUserStatus: ASUserDetectionStatus { get }
}

// 用户是否是真实用户的枚举值
public enum ASUserDetectionStatus : Int {

    case unsupported

    case unknown

    case likelyReal
}
ASAuthorizationSingleSignOnCredential
@available(iOS 13.0, *)
open class ASAuthorizationSingleSignOnCredential : NSObject, ASAuthorizationCredential {

    // AuthenticationServices返回的字符串
    open var state: String? { get }

    // 用户获取授权范围的token
    open var accessToken: Data? { get }

    // JSON Web Token (JWT), 用于以安全的方式向应用程序传递关于用户身份的信息
    open var identityToken: Data? { get }

    // 用户授权的可访问的联系信息的种类
    open var authorizedScopes: [ASAuthorization.Scope] { get }

    // 完整的身份验证响应信息
    @NSCopying open var authenticatedResponse: HTTPURLResponse? { get }
}
授权成功
上面有提到, 在ASAuthorizationControllerDelegate有两个协议方法, 分别是授权成功和失败的回调, 下面就具体看看
extension SignViewController: ASAuthorizationControllerDelegate {
    // 处理成功的授权
    func authorizationController(controller: ASAuthorizationController, didCompleteWithAuthorization authorization: ASAuthorization) {
        print("授权成功")
        // 成功的Apple ID身份验证信息
        if let appleIDCreden = authorization.credential as? ASAuthorizationAppleIDCredential {
            let userIdentifier = appleIDCreden.user
            let fullName = appleIDCreden.fullName
            let email = appleIDCreden.email

            // 这里需要我们在系统中创建一个账户, 用于存储用户的唯一标识userIdentifier
            // 可以在系统的钥匙串中存储
            let webVC = WebViewController()
            webVC.user = userIdentifier
            webVC.giveName = fullName?.givenName ?? ""
            webVC.familyName = fullName?.familyName ?? ""
            webVC.email = email ?? ""
            navigationController?.pushViewController(webVC, animated: true)
        } else if let passwordCreden = authorization.credential as? ASPasswordCredential {
            // 密码凭证用户的唯一标识
            let userIdentifiler = passwordCreden.user
            // 密码凭证的密码
            let password = passwordCreden.password

            // 显示相关信息
            let message = "APP已经收到您选择的秘钥凭证\nUsername: \(userIdentifiler)\n Password: \(password)"
            showLabel.text = message
        } else {
            showLabel.text = "授权信息均不符"
        }
    }

    // 处理授权错误
    func authorizationController(controller: ASAuthorizationController, didCompleteWithError error: Error) {
        print("授权错误: \(error)")

        var showText = ""
        if let authError = error as? ASAuthorizationError {
            let code = authError.code
            switch code {
            case .canceled:
                showText = "用户取消了授权请求"
            case .failed:
                showText = "授权请求失败"
            case .invalidResponse:
                showText = "授权请求响应无效"
            case .notHandled:
                showText = "未能处理授权请求"
            case .unknown:
                showText = "授权请求失败, 未知的错误原因"
            default:
                showText = "其他未知的错误原因"
            }
        }
        showLabel.text = showText
    }
}
做好了上面配置, 就可以看到下面的登录页面
- 如果不修改姓名, 授权成功后将获取到用户的姓名
- 如果选择共享我的电子邮件, 授权成功将获取到用户的电子邮件地址
- 如果选择隐藏邮件地址, 授权成功将获取到一个虚拟的电子邮件地址
- 点击姓名右侧的清除按钮可以修改用户名, 如下页面
- 如果登录用户修改了用户名, 那么授权成功后获取到的用户名就是修改后的
- 使用过
AppleID登录过App,进入应用的时候会提示使用TouchID登录的场景如下
- 如果使用指纹登录三次失败后, 下面会有一个使用密码继续的按钮, 可以使用手机密码继续登录
- 如果手机没有设置
Apple ID, 使用苹果登录, 将会有弹窗提示,
监听授权状态
- 在特殊情况下我们还需要监听授权状态的改变, 并进行相应的处理
- 用户终止在该
App中使用Sign in with Apple功能 - 用户在设置里注销了
Apple ID - 针对类似这种情况,
App需要获取到这些状态,然后做退出登录操作 - 我们需要在
App启动的时候,来获取当前用户的授权状态
// ASAuthorizationAppleIDProvider提供了一个获取用户授权状态和授权凭据是否有效
func getCredentialState(forUserID: String, completion: (ASAuthorizationAppleIDProvider.CredentialState, Error?) -> Void)


// ASAuthorizationAppleIDProvider.CredentialState的所有枚举值
public enum CredentialState : Int {
    case revoked
    case authorized
    case notFound
    case transferred
}
示例代码如下
func application(_ application: UIApplication, didFinishLaunchingWithOptions launchOptions: [UIApplication.LaunchOptionsKey: Any]?) -> Bool {
    if #available(iOS 13.0, *) {
        // 钥匙串中取出的
        let userIdentifier = "userIdentifier"
        if (!userIdentifier.isEmpty) {
            // 基于用户的Apple ID授权用户,生成用户授权请求的一种机制
            let appleIDProvider = ASAuthorizationAppleIDProvider()
            // 返回完成处理程序中给定用户的凭据状态
            appleIDProvider.getCredentialState(forUserID: userIdentifier) { (state, error) in
                switch state {
                case .authorized:
                    print("授权状态有效")
                case .notFound:
                    print("授权凭证缺失(可能是使用AppleID 登录过App)")
                case .revoked:
                    print("上次使用苹果账号登录的凭据已被移除,需解除绑定并重新引导用户使用苹果登录")
                default:
                    print("未知状态")
                }
            }
        }
    }

    return true
}
除此之外还可以通过通知方法来监听revoked状态, 在ASAuthorizationAppleIDProvider中增加了一个属性, 用于监听revoked状态
@available(iOS 13.0, *)
public class let credentialRevokedNotification: NSNotification.Name

// 使用方法
fileprivate func observeAppleSignInState() {
    if #available(iOS 13.0, *) {
        let center = NotificationCenter.default
        center.addObserver(self, selector: #selector(handleStateChange(noti:)), name: ASAuthorizationAppleIDProvider.credentialRevokedNotification, object: nil)
    }
}

@objc fileprivate func handleStateChange(noti: Any) {
    print("授权状态发生改变")
}
参考文档
- Sign In with Apple Entitlement
- Generate and validate tokens
- Adding the Sign In with Apple Flow to Your App
- Sign In With Apple官方Demo(Swift版)
- Sign In with Apple后台配置
欢迎您扫一扫下面的微信公众号,订阅我的博客!


