Spring的快速入门
Spring的快速入门
- 1.Spring的概述
- 2.Spring的优点
- 3.Spring的模块
- 4.Spring的IOC底层实现原理
- 5.Spring IOC的快速入门案例
-
- 5.1.下载Spring框架
- 5.2.引入Spring框架jar包
- 5.3.入门案例
-
- 传统方法
- 使用SpringIOC
- 6.Spring的IOC(控制反转)与DI(依赖注入)
-
-
- IOC
- DI
-
- DI例子
-
- 传统方法
- 使用Spring
-
1.Spring的概述
- Spring 是一个开源框架
- Spring 为简化企业级应用开发而生. 使用 Spring 可以使简单的JavaBean实现以前只有 EJB 才能实现的功能
- Spring 是JavaSE/EE的一站式框架
2.Spring的优点
- 方便解耦,简化开发 – Spring就是一个大工厂,可以将所有对象创建和依赖关系维护,交给Spring
管理 - AOP编程的支持 – Spring提供面向切面编程,可以方便的实现对程序进行权限拦截、运行监控
等功能 - 声明式事务的支持 – 只需要通过配置就可以完成对事务的管理,而无需手动编程
- 方便程序的测试 – Spring对Junit4支持,可以通过注解方便的测试Spring程序
- 方便集成各种优秀框架 – Spring不排斥各种优秀的开源框架,其内部提供了对各种优秀框架(如:Struts、
Hibernate、MyBatis等)的直接支持 - 降低JavaEE API的使用难度 – Spring 对JavaEE开发中非常难用的一些API(JDBC、JavaMail、远程调用
等),都提供了封装,使这些API应用难度大大降低
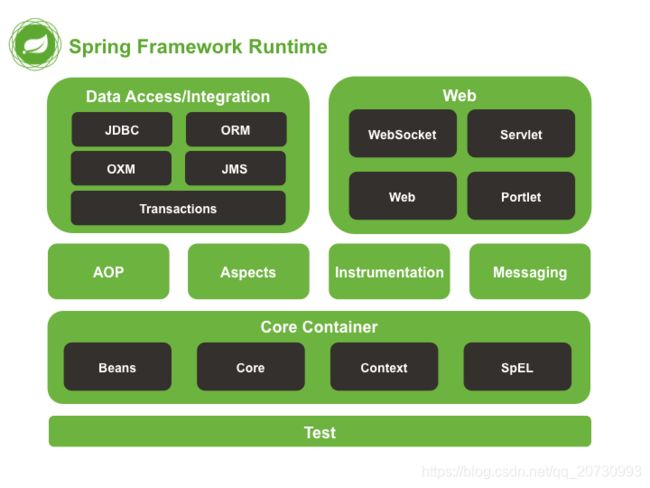
3.Spring的模块
4.Spring的IOC底层实现原理
工厂模式+反射+配置文件
5.Spring IOC的快速入门案例
5.1.下载Spring框架
官方下载
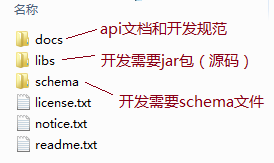
目录结构
5.2.引入Spring框架jar包
Maven工程引入spring依赖
		<dependency>
            <groupId>org.springframeworkgroupId>
            <artifactId>spring-coreartifactId>
            <version>5.2.5.RELEASEversion>
        dependency>
        <dependency>
            <groupId>org.springframeworkgroupId>
            <artifactId>spring-beansartifactId>
            <version>5.2.5.RELEASEversion>
        dependency>
        <dependency>
            <groupId>org.springframeworkgroupId>
            <artifactId>spring-contextartifactId>
            <version>5.2.5.RELEASEversion>
        dependency>
        <dependency>
            <groupId>org.springframeworkgroupId>
            <artifactId>spring-expressionartifactId>
            <version>5.2.5.RELEASEversion>
        dependency>
可以集成日志依赖
		<dependency>
            <groupId>commons-logginggroupId>
            <artifactId>commons-loggingartifactId>
            <version>1.2version>
        dependency>
        <dependency>
            <groupId>log4jgroupId>
            <artifactId>log4jartifactId>
            <version>1.2.17version>
        dependency>
5.3.入门案例
传统方法
新建一个接口UserService和一个简单的方法:
package com.springioc.demo1;

public interface UserService {

    public void sayHello();
}
新建实现类UserServiceImpl.java:
package com.springioc.demo1.impl;

import com.springioc.demo1.UserService;

public class UserServiceImpl implements UserService {

    public void sayHello() {

        System.out.println("Hello World");
    }
}
新建一个java类测试调用这个方法:
	package com.springioc.demo1;

import com.springioc.demo1.impl.UserServiceImpl;
import org.junit.Test;

public class Tester {

    @Test
    public void demo1() {

        UserService userService = new UserServiceImpl();
        userService.sayHello();
    }
}
使用SpringIOC
在resources目录下先新建一个spring的配置文件Application.xml,并且配置:
<beans xmlns="http://www.springframework.org/schema/beans"
       xmlns:xsi="http://www.w3.org/2001/XMLSchema-instance"
       xsi:schemaLocation="http://www.springframework.org/schema/beans http://www.springframework.org/schema/beans/spring-beans.xsd">

    <bean id="userService" class="com.springioc.demo1.impl.UserServiceImpl">bean>
beans>
去测试类里加载配置文件
	@Test
    public void demo2() {

        //创建Spring的工厂
        ApplicationContext applicationContext = new ClassPathXmlApplicationContext("applicationContext.xml");
        //通过工厂获得类:
        UserService userService = (UserService) applicationContext.getBean("userService");
        userService.sayHello();
    }
6.Spring的IOC(控制反转)与DI(依赖注入)
IOC
IOC Inverse of Control 反转控制的概念,就是将原本在程序中手动创建UserService对象的控制权,交由Spring框架管理
简单说,就是创建UserService对象控制权被反转到了Spring框架
DI
DI Dependency Injection 依赖注入的概念,就是在Spring创
建这个对象的过程中,将这个对象所依赖的属性注入进去。
DI例子
继续使用上题案例
修改实现类,在实现类中添加属性以及相应的GET和SET方法:
package com.springioc.demo1.impl;

import com.springioc.demo1.UserService;

public class UserServiceImpl implements UserService {

    private String name;

    public String getName() {

        return name;
    }

    public void setName(String name) {

        this.name = name;
    }

    public void sayHello() {

        System.out.println("Hello World" + ":" + name);
    }
}
传统方法
修改上题中demo1的测试代码。
因为name和他的GET与SET是加在实现类上的,用接口接受的实例化,并没有name值属性和方法。
所以用实现类来接受实例化的UserServiceImpl类
	@Test
    public void demo1(){

        // UserService userService = new UserServiceImpl();
        UserServiceImpl userService = new UserServiceImpl();
        // 设置属性:
        userService.setName("张三");
        userService.sayHello();
    }
使用Spring
在修改配置文件的指定bean标签:
	<bean id="userService" class="com.springioc.demo1.impl.UserServiceImpl">
        <property name="name" value="张三"/>
    bean>
直接运行上题中测试类中的demo2代码不用做任何修改,就能实现相同功能。
	@Test
    public void demo2() {

        //创建Spring的工厂
        ApplicationContext applicationContext = new ClassPathXmlApplicationContext("applicationContext.xml");
        //通过工厂获得类:
        UserService userService = (UserService) applicationContext.getBean("userService");
        userService.sayHello();
    }

