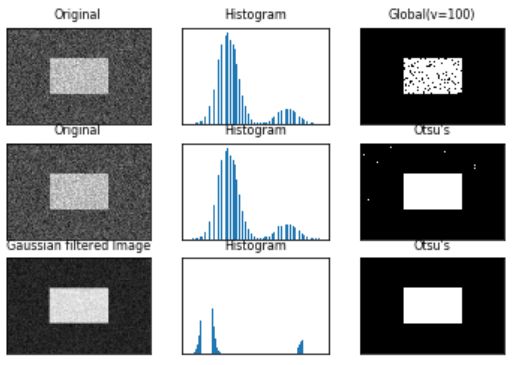
在说Otsu之前,先说几个概念
灰度直方图:将数字图像中的所有像素,按照灰度值的大小,统计其出现的频率。其实就是每个值(0~255)的像素点个数统计。
Otsu算法假设这副图片由前景色和背景色组成,通过最大类间方差选取一个阈值,将前景和背景尽可能分开。
一、代码展示
import cv2
from matplotlib import pyplot as plt
img = cv2.imread('noisy.jpg', 0)
# 固定阈值法
ret1, th1 = cv2.threshold(img, 100, 255, cv2.THRESH_BINARY)

# Otsu阈值法
ret2, th2 = cv2.threshold(img, 0, 255, cv2.THRESH_BINARY + cv2.THRESH_OTSU)

# 先进行高斯滤波,再使用Otsu阈值法
blur = cv2.GaussianBlur(img, (5, 5), 0)
ret3, th3 = cv2.threshold(blur, 0, 255, cv2.THRESH_BINARY + cv2.THRESH_OTSU)
images = [img, 0, th1, img, 0, th2, blur, 0, th3]
titles = ['Original', 'Histogram', 'Global(v=100)',
         'Original', 'Histogram', "Otsu's",
         'Gaussian filtered Image', 'Histogram', "Otsu's"]

for i in range(3):
    # 绘制原图
    plt.subplot(3, 3, i * 3 + 1)
    plt.imshow(images[i * 3], 'gray')
    plt.title(titles[i * 3], fontsize=8)
    plt.xticks([]), plt.yticks([])

    # 绘制直方图plt.hist, ravel函数将数组降成一维
    plt.subplot(3, 3, i * 3 + 2)
    plt.hist(images[i * 3].ravel(), 256)
    plt.title(titles[i * 3 + 1], fontsize=8)
    plt.xticks([]), plt.yticks([])

    # 绘制阈值图
    plt.subplot(3, 3, i * 3 + 3)
    plt.imshow(images[i * 3 + 2], 'gray')
    plt.title(titles[i * 3 + 2], fontsize=8)
    plt.xticks([]), plt.yticks([])
plt.show()
可以看出Otsu阈值明显优于固定阈值。
二、Otsu算法推导
Otsu阈值法将整幅图分为前景(目标)和背景,以下是一些符号规定:
- T: 分割阈值
- N0:前景像素点数
- N1:背景像素点数
- ω0:前景的像素点数占整幅图像的比例
- ω1:背景的像素点数占整幅图像的比例
- μ0:前景的平均像素值
- μ1:背景的平均像素值
- μ:整幅图的平均像素值
- rows * cols:图像的行数和列数
总的像素个数:
N0+N1=rows×cols
ω0和ω1是前景、背景所占的比例,也就是:
整幅图的平均像素值就是:
我们定义一个前景μ0与背景μ1的方差g:
联立前面几个公式得:
g就是前景与背景两类之间的方差,这个值越大,说明前景和背景的差别也就越大,效果越好。Otsu算法便是遍历阈值T,使得g最大。所以又称为最大类间方差法。基本上双峰图片的阈值T在两峰之间的谷底。
参考网址:https://tianchi.aliyun.com/course/courseConsole?courseId=40992&chapterIndex=1§ionIndex=12


