angular2接口查询后渲染到表格
我记的笔记,可能有不对的
1、在service里写接口请求(planser.service.ts)
get请求:
// 获取表格信息
  getinfo(supplementId, year, maxResultCount, skipCount) {
    return this.http.get(`${apiUrl}/ProjectInfo/GetProInfoManagementInfos`, {
      headers: {
      authorization: 'Bearer ' + this.token
    },
    params: {
      SupplementId: supplementId,
      Year: year,
      MaxResultCount: maxResultCount,
      SkipCount: skipCount,
    }
  }).toPromise();
  }
post请求(这个是扩展)
 makeSure(a, b, c, d, e, f, g, h, i) {
    const httpOption = {
      headers: new HttpHeaders({
        'content-type': 'application/json',
        Authorization: 'Bearer ' + this.token,
      })
    };
    return this.http.post(apiUrl + '/ProjectInfo/CreateOrUpdateProInfoManagementInfo',
     {
      id: a,
      year: b,
      basicSituation: c,
      floodControlPlan: d,
      safetyFloodControlMeasures: e,
      proDataTypeEnumId: f,
      profileId: g,
      projectId: h,
      supplementId: i,
     }, httpOption).toPromise();
  }
获取token值(这个是扩展)
import { HttpClient, HttpHeaders } from '@angular/common/http';
import { CookieService } from 'ngx-cookie-service';
import { Router } from '@angular/router';
……
constructor(private http: HttpClient, private cookieService: CookieService, private router: Router) {
    this.token = this.cookieService.get('token');
    if ( this.token === '' ) {
      this.router.navigate(['/login']);
    }
  }
2、在组件里引入服务(plan.component.ts)
 constructor(private plan: PlanserService, private titleService: Title) {
   				 this.titleService.setTitle('标签名');
  }
3、在组件里接收接口传来的数据(组件.component.ts)
 // 获得表格信息
  async getInfo(id, year, max, skip) {
  	// 这里使用的async 和 await
    const { result: res }: any = await this.plan.getinfo(id, year, max, skip);
    // tslint:disable-next-line: prefer-for-of
    for (let i = 0; i < res.items.length; i++) {
      if (res.items[i].basicSituation === null) {
        res.items.splice(i);
      }
    }
    // 拿到处理后的值并赋值给  this.listOfData
    this.listOfData = res.items;
    this.total = this.listOfData.length;
  }
4、在页面上渲染
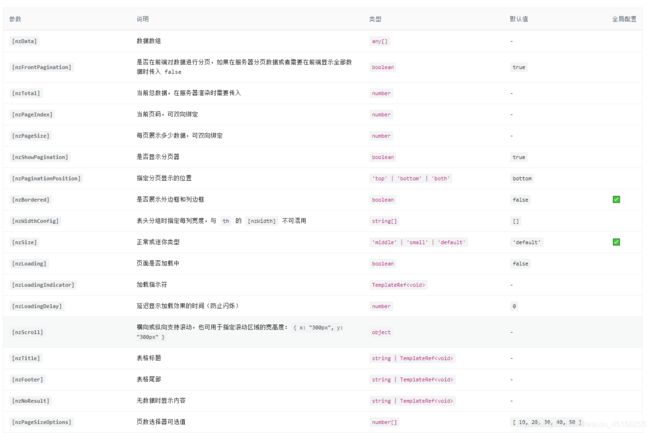
4.1、添加表格
参考:https://ng.ant.design/components/table/zh
就是使用antd的模板
4.2、加入我们自己的数据
使用到this.listOfData,ngfor等数据绑定
4.3、脚部添加分页
参考:https://ng.ant.design/components/pagination/zh
就是使用antd的模板
具体实现:
paln.component.html页面
// 表格模板加我们的数据渲染
年份
情况
计划
措施
附件
操作
{
{ data.year }}
{
{ data.basicSituation }}
{
{ data.floodControlPlan }}
{
{ data.safetyFloodControlMeasures }}
编辑
共 {
{ total }} 条
// 当前页
  public page: any = 1;
  // 每页行数
  public MaxResultCount: any = 10;
  // 跳转数量    skipCount=page*MaxResultCount 等于跳转页数*每页几条(这个是请求数据时要用的)
  public SkipCount: any = 0;

// 删除取消
  cancel(): void {
    this.nzMessageService.info('取消删除');
  }
  // 确定删除
  confirm(): void {
    // 这里写删除事件
    this.nzMessageService.info('删除成功');
  }
   // 每页条数发生改变时的回调
  nzPageSizeChange(newSise) {
    this.MaxResultCount = newSise;
    this.getInfo(this.listOfSelectedValue, this.date, this.MaxResultCount, this.SkipCount);
  }
  // 跳转到其他页时的回调
  nzPageIndexChange(size) {
    // console.log(size);
    this.page = size;
    // 这里必须减1
    this.SkipCount = (size - 1) * this.MaxResultCount;
    this.getInfo(this.listOfSelectedValue, this.date, this.MaxResultCount, this.SkipCount);
  }
