一、引言
我们都知道ASP.net mvc权限控制都是实现AuthorizeAttribute类的OnAuthorization方法。
下面是最常见的实现方式:
 public class CustomAuthorizeAttribute : AuthorizeAttribute
    {
        public override void OnAuthorization(AuthorizationContext filterContext)
        {
           if (!filterContext.RequestContext.HttpContext.Request.IsAuthenticated)
            {
                filterContext.Result = new RedirectToRouteResult(new RouteValueDictionary(new { controller = "account", action = "login", returnUrl = filterContext.HttpContext.Request.Url, returnMessage = "您无权查看." }));
                return;
            }
          base.OnAuthorization(filterContext);
        }
}
然后在需要验证的Action上打上[CustomAuthorize]标签就可以了。
这种方式是比较粗粒度的解决方案,由于是已经将定义好(约定好的)权限hard code带对应的Action上,所以无法实现用户自定义权限控制。
看一下代码:
using System;
using System.Collections.Generic;
using System.Linq;
using System.Web;
using System.Web.Mvc;

namespace Deepleo.Role.Controllers
{
    public class UserController : Controller
    {
        [UserAuthorize]
        public ActionResult Index()
        {
            return View();
        }
       [AdminAuthorize]
        public ActionResult Admin()
        {
            return View();
        }
        [UserAuthorize]
        public ActionResult Detail()
        {
            return View();
        }
    }
}
我们有一个UserController,他有3个Action:Index,Admin,Detail.其中Admin需要系统管理员权限,其他两个值需要User权限。这样就需要建立AdminAuthorizeAttribute和UserAuthorizeAttribute.这样做就无法实现用户自定义权限。
二、基于角色的权限控制系统
基于角色的权限控制系统RBAC(Role Based Access Control)是目前最流行,也是最通用的权限控制系统。
对于ASP.NET MVC来说,这套系统很容易实现:Controller下的每一个Action可以看作是一个权限,角色就相当于多个权限的组合。
然后我们新建一个RoleAuthorizeAttribute,即对角色的属性描述。
2.1 如何鉴权
这个RoleAuthorizeAttribute的关键在于如何拿到ControllerName和ActionName,查阅msdn其实很容易就实现了,不多说,直接上代码:
using System;
using System.Collections.Generic;
using System.Linq;
using System.Web;
using System.Web.Security;
using System.Web.Mvc;
using System.Web.Routing;
using Deepleo.Role.Services;

namespace Deepleo.Role.Attributes
{
    public class RoleAuthorizeAttribute : AuthorizeAttribute
    {
        public override void OnAuthorization(AuthorizationContext filterContext)
        {
            var isAuth = false;
            if (!filterContext.RequestContext.HttpContext.Request.IsAuthenticated)
            {
                isAuth = false;
            }
            else
            {
                if (filterContext.RequestContext.HttpContext.User.Identity != null)
                {
                    var roleService = new RoleService();
                    var actionDescriptor = filterContext.ActionDescriptor;
                    var controllerDescriptor = actionDescriptor.ControllerDescriptor;
                    var controller = controllerDescriptor.ControllerName;
                    var action = actionDescriptor.ActionName;
                    var ticket = (filterContext.RequestContext.HttpContext.User.Identity as FormsIdentity).Ticket;
                    var role = roleService.GetById(ticket.Version);
                    if (role != null)
                    {
                        isAuth = role.Permissions.Any(x => x.Permission.Controller.ToLower() == controller.ToLower() && x.Permission.Action.ToLower() == action.ToLower());
                    }
                }
            }
            if (!isAuth)
            {
                filterContext.Result = new RedirectToRouteResult(new RouteValueDictionary(new { controller = "account", action = "login", returnUrl = filterContext.HttpContext.Request.Url, returnMessage = "您无权查看." }));
                return;
            }
            else
            {
                base.OnAuthorization(filterContext);
            }
        }
    }
}
注意:这里用Ticket的Version存储RoleId(最好不要这样,原因看我的另一篇博文:http://www.cnblogs.com/deepleo/p/iso_cookies_formsAuthenticationTicket_version.html)。你也可以用其他方式。
主要是用到了 filterContext.ActionDescriptor和filterContext.ActionDescriptor。
2.2 如何生成权限控制列表
前面的role.Permissions的集合已经是定义好的权限列表。
Permissions类的定义如下:
using System;
using System.Collections.Generic;
using System.Linq;
using System.Text;

namespace Deepleo.Role.Entities
{
    public class PermissionDefinition
    {
        public virtual int Id
        {
            set;
            get;
        }
        public virtual int ActionNo
        {
            set;
            get;
        }

        public virtual int ControllerNo
        {
            set;
            get;
        }
        public virtual string Name
        {
            set;
            get;
        }

        public virtual string ControllerName
        {
            set;
            get;
        }
        public virtual string Controller
        {
            set;
            get;
        }
        public virtual string Action
        {
            set;
            get;
        }
        public virtual DateTime AddDate
        {
            set;
            get;
        }
    }
}
属性Controller和Action记录的是权限,ControllerName和ActionName用于显示UI,ControllerNo和ActionNo用于显示顺序控制。
这里你可以手工将所有Action录入数据库中,然后实现RolService即可。但是显然这种方法实在是太笨了,我们其实可以用反射+Attribute机制实现自动化载入权限控制表。原理很简单,我就直接上关键代码了。
以下是反射的代码:
using System;
using System.Collections.Generic;
using System.Linq;
using System.Web;
using System.Web.Mvc;
using Deepleo.Role.Services;
using Deepleo.Role.Attributes;
using Deepleo.Role.Entities;

namespace Deepleo.Role.Controllers
{
    public class InstallController : Controller
    {
        public ActionResult Index()
        {
            return View();
        }

        [HttpPost]
        public ActionResult Index()
        {
            try
            {
                var roleService = new RoleService();
                #region init permission
                createPermission(new UserController());
                #endregion

                var allDefinedPermissions = roleService.GetDefinedPermissions();
                #region 超级管理员角色初始化
                var adminPermissions = new List();
                foreach (var d in allDefinedPermissions)
                {
                    adminPermissions.Add(new RolePermissionInfo { AddDate = DateTime.Now, Permission = d, });
                }
                int adminRoleId = roleService.AddRole(new Entities.RoleInfo
                {
                    AddDate = DateTime.Now,
                    Description = "",
                    Name = "超级管理员",
                    Permissions = adminPermissions
                });
                #endregion
                return RedirectToAction("Admin", "User");
            }
            catch (Exception ex)
            {
                ModelState.AddModelError("", ex.Message);
                return View();
            }
        }
        private void createPermission(Controller customController)
        {
            var roleService = new RoleService();

            var controllerName = "";
            var controller = ""; var controllerNo = 0;
            var actionName = ""; var action = ""; var actionNo = 0;
            var controllerDesc = new KeyValuePair<string, int>();

            var controllerType = customController.GetType();
            controller = controllerType.Name.Replace("Controller", "");//remobe controller posfix
            controllerDesc = getdesc(controllerType);
            if (!string.IsNullOrEmpty(controllerDesc.Key))
            {
                controllerName = controllerDesc.Key;
                controllerNo = controllerDesc.Value;
                foreach (var m in controllerType.GetMethods())
                {
                    var mDesc = getPropertyDesc(m);
                    if (string.IsNullOrEmpty(mDesc.Key)) continue;
                    action = m.Name;
                    actionName = mDesc.Key;
                    actionNo = mDesc.Value;
                    roleService.CreatePermissions(actionNo, controllerNo, actionName, controllerName, controller, action);
                }
            }
        }
        private KeyValuePair<string, int> getdesc(Type type)
        {
            var descriptionAttribute = (DescriptionAttribute)(type.GetCustomAttributes(false).FirstOrDefault(x => x is DescriptionAttribute));
            if (descriptionAttribute == null) return new KeyValuePair<string, int>();
            return new KeyValuePair<string, int>(descriptionAttribute.Name, descriptionAttribute.No);
        }
        private KeyValuePair<string, int> getPropertyDesc(System.Reflection.MethodInfo type)
        {
            var descriptionAttribute = (DescriptionAttribute)(type.GetCustomAttributes(false).FirstOrDefault(x => x is DescriptionAttribute));
            if (descriptionAttribute == null) return new KeyValuePair<string, int>();
            return new KeyValuePair<string, int>(descriptionAttribute.Name, descriptionAttribute.No);
        }
    }
}
以下是DescriptionAttribute的代码:
using System;
using System.Collections.Generic;
using System.Linq;
using System.Web;

namespace Deepleo.Role.Attributes
{
    public class DescriptionAttribute : Attribute
    {
        public string Name
        {
            set;
            get;
        }
        public int No
        {
            set;
            get;
        }
    }
}
然后在UserController打上DescriptionAttribute标签就可以了,如下所示:
using System;
using System.Collections.Generic;
using System.Linq;
using System.Web;
using System.Web.Mvc;
using Deepleo.Role.Attributes;

namespace Deepleo.Role.Controllers
{
    [Description(No = 1, Name = "用户")]
    public class UserController : Controller
    {
        [RoleAuthorize]
        [Description(No = 1, Name = "用户首页")]
        public ActionResult Index()
        {
            return View();
        }
        [RoleAuthorize]
        [Description(No = 1, Name = "用户管理")]
        public ActionResult Admin()
        {
            return View();
        }
        [RoleAuthorize]
        [Description(No = 1, Name = "用户详情")]
        public ActionResult Detail()
        {
            return View();
        }
    }
}
这样在网站安装的时候直接执行Install就可以完全自动化创建权限。
这样就可以精确到每个Action的用户自定义权限控制了。
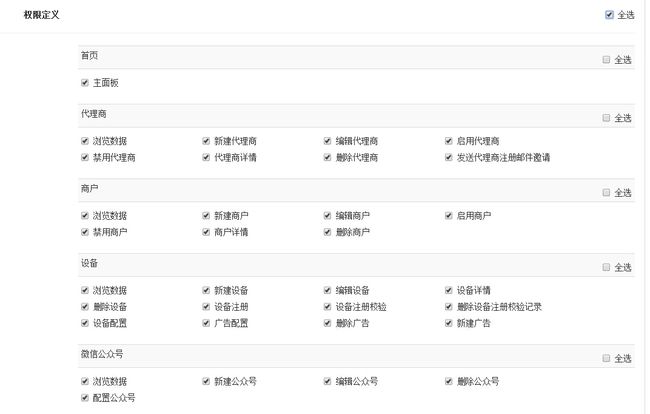
看看我的劳动成果:
写在最后:对于同名的Action的HttpGET和HttpPOST分成两个权限还没有实现。比如说:New[HttpGet],和New[HttpPOST]。主要是觉得这样没有太大的意义,当然如果你的业务需求必须这样,我觉得应该很容易就能扩展。
完整代码下载:http://files.cnblogs.com/deepleo/RoleSolution.rar
PS:代码只有关键代码,没有实现RoleService方法,请自行根据自己的实际情况实现。


