Redis集群
文章目录
- redis集群
-
- 一、Redis集群介绍
-
-
- 1、Redis集群的优势
- 2、Redis集群的数据分片
- 3、支持添加或者删除节点
- 4、Redis集群的主从复制模型
-
- 二、案列概述
-
-
- 1、单节点redis服务器带来的问题
-
- 三、redis集群搭建
-
-
- 软件包
- 1、集群规划
- 2、节点基础环境(6台操作一致)
- 3、安装redis(6台同时安装)
- 4、创建集群
-
- 四、测试集群
redis集群
一、Redis集群介绍
Redis集群是一个提供在多个Redis间节点共享数据的程序集
Redis集群并不支持多处理多个Keys的命令,应为这需要在不同节点间移动数据,从而达不到想Redis那样的性能,在高负载的情况下可能会导致不可预料的错误
Redis集群通过分区来提供一定程度的可用性,在实际环境中档某个节点宕机或则不可达的情况下继续处理命令
1、Redis集群的优势
自动分割数据到不同的节点上
整个集群的部分节点失败或者不可达的情况下能够继续处理命令
2、Redis集群的数据分片
Redis集群没有使用一致性hash,而是引入了哈希槽的概念
Redis集群有16384个哈希槽,每个Key通过CRC16校验后对16384取模来决定放置哪个槽
集群的每个节点负责一部分hash槽
以3个节点组成的集群为列
节点A包含0到5500号哈希槽
节点B包含5501到11000号哈希槽
节点A包含11001到16384号哈希槽
3、支持添加或者删除节点
添加删除节点无需停止服务
比如如果想添加节点D,需要移动节点A、B、C中的部分槽到D上;
如果想移除节点A,需要将A中的槽移到B和C节点上,然后将没有任何槽的A节点从集群中移除
4、Redis集群的主从复制模型
集群中具有A、B、C三个节点,如果节点B失败了,整个集群就会因缺少5501-11000这个范围的槽而不可以用
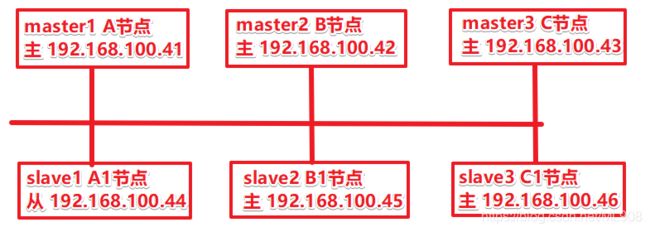
为每个节点添加一个从节点A1、B1、C1整个集群便有三个master节点和三个slave节点组成,在节点B失败后,集群
选举B1位新的主节点继续服务
当B和B1都失败后,集群将不可用
二、案列概述
1、单节点redis服务器带来的问题
①单点故障点,服务不可以用
②无法处理大量的并发数据请求
③数据丢失——大灾难
解决方法:搭建Redis集群
三、redis集群搭建
软件包
百度网盘链接:https://pan.baidu.com/s/1nAlvkBR7NS0speietzeDvA
提取码:rqul
1、集群规划
本实验使用6台Centos 7主机做集群,其中3台为master 其中3台为slave

2、节点基础环境(6台操作一致)
#关闭防火墙,关闭核心防护
[root@localhost yum.repos.d]# systemctl stop firewalld
[root@localhost yum.repos.d]# setenforce 0
[root@localhost yum.repos.d]# vim /etc/selinux/config
SELINUX=disabled
#挂载光盘
[root@localhost ~]# vim /etc/fstab
/dev/cdrom	/mnt	iso9660	defaults	0 0

[root@localhost ~]# mount -a
[root@localhost ~]# df -hT
文件系统       类型      容量  已用  可用 已用% 挂载点
/dev/sda2      xfs        20G  3.3G   17G   17% /
devtmpfs       devtmpfs  898M     0  898M    0% /dev
tmpfs          tmpfs     912M     0  912M    0% /dev/shm
tmpfs          tmpfs     912M   17M  895M    2% /run
tmpfs          tmpfs     912M     0  912M    0% /sys/fs/cgroup
/dev/sda5      xfs        10G   37M   10G    1% /home
/dev/sda1      xfs       6.0G  174M  5.9G    3% /boot
tmpfs          tmpfs     183M   28K  183M    1% /run/user/0
tmpfs          tmpfs     183M  4.0K  183M    1% /run/user/42
/dev/sr0       iso9660   4.3G  4.3G     0  100% /mnt
#搭建yum仓库
[root@localhost ~]# cd /etc/yum.repos.d
[root@localhost yum.repos.d]# mkdir backup
[root@localhost yum.repos.d]# mv C* backup
[root@localhost yum.repos.d]# cp -p backup/CentOS-Base.repo local.repo
root@localhost yum.repos.d]# vim local.repo
[centos]
name=CentOS
baseurl=file:///mnt
gpgcheck=0
enabled=1

[root@localhost yum.repos.d]# yum clean all
[root@localhost yum.repos.d]# yum makecache
3、安装redis(6台同时安装)
#安装编辑器
[root@localhost ~]# yum install -y gcc gcc-c++ make pcre pcre-devel expat-devel bash-completion
#挂载软件包
[root@localhost ~]# mkdir /a
[root@localhost ~]# mount.cifs //192.168.100.1/bao /a
[root@localhost ~]# cd /a/Y2C7
#解压并编译安装redis
[root@localhost Y2C7]# tar xzvf redis-5.0.4.tar.gz -C /opt
[root@localhost Y2C7]# cd /opt/redis-5.0.4/
[root@localhost redis-5.0.4]# make
[root@localhost redis-5.0.4]# make PREFIX=/usr/local/redis install		//安装过程中,更改安装路径可以用make PRRFIX=安装路径 install
#设置Redis相关配置文件
[root@localhost redis-5.0.4]# ln -s /usr/local/redis/bin/* /usr/local/bin/

[root@localhost redis-5.0.4]# cd /opt/redis-5.0.4/utils/

[root@localhost utils]# ./install_server.sh
Welcome to the redis service installer
This script will help you easily set up a running redis server
Please select the redis port for this instance: [6379] 			//回车
Selecting default: 6379
Please select the redis config file name [/etc/redis/6379.conf] 	//回车
Selected default - /etc/redis/6379.conf
Please select the redis log file name [/var/log/redis_6379.log] 	//回车
Selected default - /var/log/redis_6379.log
Please select the data directory for this instance [/var/lib/redis/6379] 		//回车
Selected default - /var/lib/redis/6379
Please select the redis executable path [/usr/local/bin/redis-server] /usr/local/redis/bin/redis-server 		//手动输入

Selected config:
Port           : 6379
Config file    : /etc/redis/6379.conf       #配置文件路径
Log file       : /var/log/redis_6379.log    #日志文件路径
Data dir       : /var/lib/redis/6379                   #数据文件路径
Executable     : /usr/local/redis/bin/redis-server       #可执行文件路径
Cli Executable : /usr/local/bin/redis-cli               #客户端命令行工具
Is this ok? Then press ENTER to go on or Ctrl-C to abort.		//回车
Copied /tmp/6379.conf => /etc/init.d/redis_6379
Installing service...
Successfully added to chkconfig!
Successfully added to runlevels 345!
/var/run/redis_6379.pid exists, process is already running or crashed
Installation successful!
[root@localhost utils]# netstat -lnupt | grep redis			//查看redis状态
tcp        0      0 127.0.0.1:6379          0.0.0.0:*               LISTEN      9318/redis-server 1
#修改各个redis主机的6379.conf配置文件
[root@localhost utils]# vim /etc/redis/6379.conf
bind 192.168.100.41                //删除原来的127.0.0.1 然后添加各主机对应的IP地址
logfile /var/log/redis_6379.log          #不需要改
daemonize yes                                     #不需要改
port 6379                                              #不需要改
cluster-enabled yes                              //前面的#号去掉
cluster-config-file nodes-6379.conf     //前面的#号去掉
cluster-node-timeout 15000                 //前面的#号去掉
cluster-require-full-coverage no           //前面的#号去掉 yes改成no
#6台redis服务器启动redis服务
[root@localhost utils]# /etc/init.d/redis_6379 restart
[root@localhost utils]# netstat -antp |grep  6379      监听地址都是当前本机地址
4、创建集群
#在192.168.100.41服务器上
[root@localhost utils]# yum -y install ruby rubygems     //安装编排工具

[root@localhost utils]# cp -p /a/Y2C7/redis-3.2.0.gem /opt

[root@localhost utils]# cd /opt
[root@localhost opt]# gem install redis --version 3.2.0

Successfully installed redis-3.2.0
Parsing documentation for redis-3.2.0
Installing ri documentation for redis-3.2.0
1 gem installed
#创建集群
[root@localhost opt]# cd /opt/redis-5.0.4/src/
[root@localhost src]# redis-cli --cluster create --cluster-replicas 1 192.168.100.41:6379 192.168.100.42:6379 192.168.100.43:6379 192.168.100.44:6379 192.168.100.45:6379 192.168.100.46:6379

Can I set the above configuration? (type 'yes' to accept): yes  	//这个地方要输入yes

[root@localhost src]# redis-cli --cluster check 192.168.100.41:6379		//查看群集状态

……省略……
[OK] All nodes agree about slots configuration.
Check for open slots...
Check slots coverage...
[OK] All 16384 slots covered.
四、测试集群
#在192.168.100.41服务器上,远程连接192.168.100.42数据库
[root@localhost ~]# redis-cli -h 192.168.100.42 -p 6379 -c     //远程连接Redis数据库
20.0.0.41:6379> set centos 7.6 		创建数据
20.0.0.41:6379> quit
#在192.168.100.42服务器上,远程连接192.168.100.43数据库
[root@localhost ~]# redis-cli -h 192.168.100.43 -p 6379 -c     //远程连接Redis数据库
192.168.100.43:6379> get centos		//获取数据
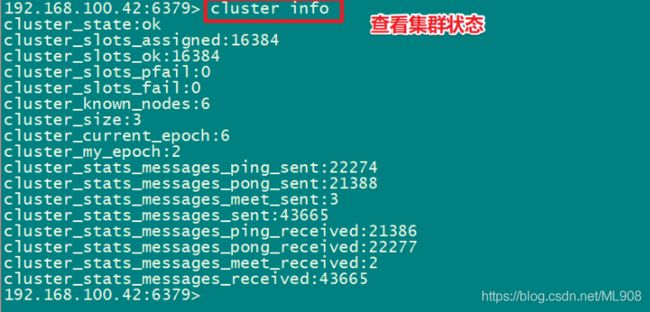
#查看集群状态
192.168.100.42:6379> cluster info
192.168.100.42:6379> cluster info


