第一篇: 服务的注册与发现Eureka(Finchley版本)
Finchley版本的官方文档如下:
http://cloud.spring.io/spring-cloud-static/Finchley.RELEASE/single/spring-cloud.html
一、spring cloud简介
spring cloud 为开发人员提供了快速构建分布式系统的一些工具,包括配置管理、服务发现、断路器、路由、微代理、事件总线、全局锁、决策竞选、分布式会话等等。它运行环境简单,可以在开发人员的电脑上跑。另外说明spring cloud是基于springboot的,所以需要开发中对springboot有一定的了解,如果不了解的话可以看这篇文章:2小时学会springboot。另外对于“微服务架构” 不了解的话,可以通过搜索引擎搜索“微服务架构”了解下。
二、创建服务注册中心
我还是采用Eureka作为服务注册与发现的组件,至于Consul 之后会出文章详细介绍。
2.1 创建maven主工程
首先创建一个主Maven工程,在其pom文件引入依赖,spring Boot版本为2.0.3.RELEASE,Spring Cloud版本为Finchley.RELEASE。这个pom文件作为父pom文件,起到依赖版本控制的作用,其他module工程继承该pom。
    4.0.0

    com.chyer
    chyer-parent
    1.0-SNAPSHOT
    pom

    chyer-parent
    Demo project of parent


        org.springframework.boot
        spring-boot-starter-parent
        2.0.3.RELEASE


        UTF-8
        UTF-8
        1.8
        Finchley.RELEASE


            org.springframework.boot
            spring-boot-starter-test
            test


                org.springframework.cloud
                spring-cloud-dependencies
                ${spring-cloud.version}
                pom
                import


                org.springframework.boot
                spring-boot-maven-plugin
附IDEA创建图:
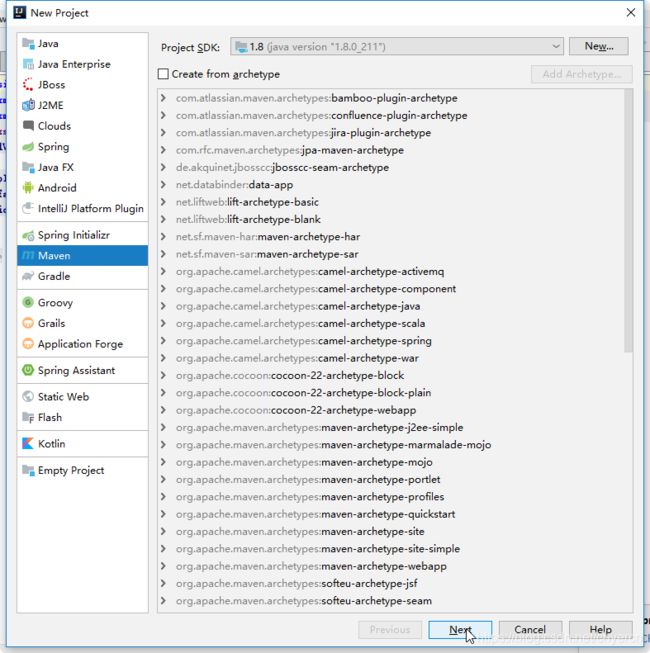
2.2 然后创建2个model工程
一个model工程作为服务注册中心,即Eureka Server
另一个作为Eureka Client
创建server
右键工程->创建model-> 选择spring initialir 如下图:
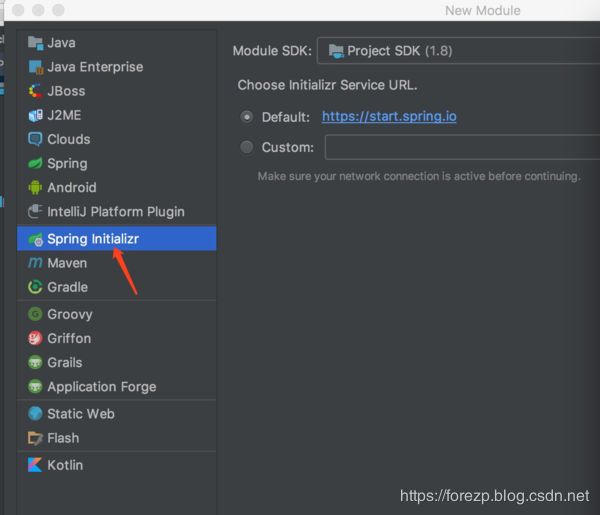
下一步->选择cloud discovery->eureka server ,然后一直下一步就行了。

创建完后的工程,其pom.xml继承了父pom文件,并引入spring-cloud-starter-netflix-eureka-server的依赖,代码如下:
    4.0.0

        com.chyer
        chyer-parent
        1.0-SNAPSHOT


    com.chyer
    eureka-server
    0.0.1-SNAPSHOT
    jar

    eureka-server
    Demo project of eureka server


            org.springframework.cloud
            spring-cloud-starter-netflix-eureka-server
2.3 启动服务注册中心
在springboot工程的启动application类上加注解@EnableEurekaServer
package com.chyer.eurekaserver;

import org.springframework.boot.SpringApplication;
import org.springframework.boot.autoconfigure.SpringBootApplication;
import org.springframework.cloud.netflix.eureka.server.EnableEurekaServer;

@SpringBootApplication
@EnableEurekaServer
public class EurekaServerApplication {

    public static void main(String[] args) {
        SpringApplication.run(EurekaServerApplication.class, args);
    }

}
2.4 配置eureka
eureka是一个高可用的组件,它没有后端缓存,每一个实例注册之后需要向注册中心发送心跳(因此可以在内存中完成),在默认情况下erureka server也是一个eureka client ,必须要指定一个 server。eureka server的配置文件application.properties:
spring.application.name=eurka-server

#访问URL
# http://localhost:8761/
server.port=8761
eureka.instance.hostname=localhost
eureka.client.serviceUrl.defaultZone=http://${eureka.instance.hostname}:${server.port}/eureka/

#表明自己是一个eureka server
eureka.client.registerWithEureka=false
eureka.client.fetchRegistry=false
通过eureka.client.registerWithEureka:false和fetchRegistry:false来表明自己是一个eureka server.
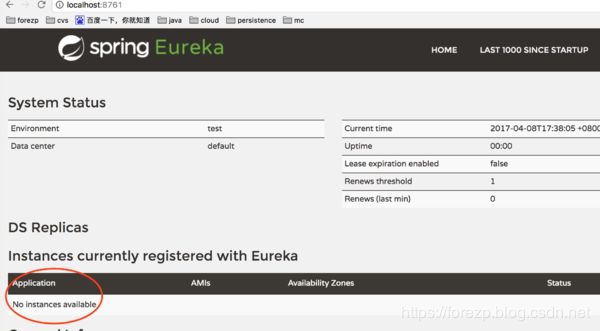
2.5 eureka server 是有界面的,启动工程,打开浏览器访问:
http://localhost:8761 ,界面如下:
三、创建一个服务提供者 (eureka client)
当client向server注册时,它会提供一些元数据,例如主机和端口,URL,主页等。Eureka server 从每个client实例接收心跳消息。 如果心跳超时,则通常将该实例从注册server中删除。
创建过程同server类似,创建完pom.xml如下:
    4.0.0

        com.chyer
        chyer-parent
        1.0-SNAPSHOT


    com.chyer
    eureka-client
    0.0.1-SNAPSHOT
    jar

    eureka-client
    Demo project of eureka client


            org.springframework.cloud
            spring-cloud-starter-netflix-eureka-client


            org.springframework.boot
            spring-boot-starter-web


                org.springframework.boot
                spring-boot-maven-plugin
通过注解@EnableEurekaClient 表明自己是一个eurekaclient.
package com.chyer.eurekaclient;

import org.springframework.beans.factory.annotation.Value;
import org.springframework.boot.SpringApplication;
import org.springframework.boot.autoconfigure.SpringBootApplication;
import org.springframework.cloud.netflix.eureka.EnableEurekaClient;
import org.springframework.web.bind.annotation.RequestMapping;
import org.springframework.web.bind.annotation.RequestParam;
import org.springframework.web.bind.annotation.RestController;

@SpringBootApplication
@EnableEurekaClient
@RestController
public class EurekaClientApplication {

    public static void main(String[] args) {
        SpringApplication.run(EurekaClientApplication.class, args);
    }

    @Value("${server.port}")
    String port;

    @RequestMapping("/hi")
    public String home(@RequestParam(value = "name", defaultValue = "chyer") String name) {
        return "hi " + name + " ,i am from port:" + port;
    }
}
仅仅@EnableEurekaClient是不够的,还需要在配置文件中注明自己的服务注册中心的地址,application.yml配置文件如下:
spring.application.name=eurka-client

#访问URL
# http://localhost:8762/
server.port=8762
eureka.client.serviceUrl.defaultZone=http://localhost:8761/eureka/
需要指明spring.application.name,这个很重要,这在以后的服务与服务之间相互调用一般都是根据这个name 。
启动工程,打开http://localhost:8761 ,即eureka server 的网址:
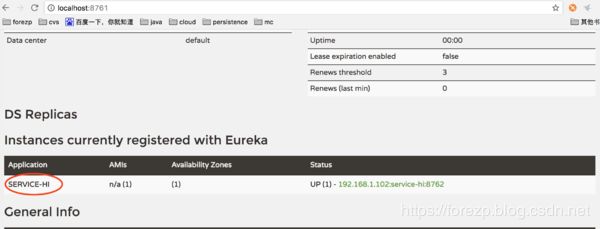
你会发现一个服务已经注册在服务中了,服务名为SERVICE-HI ,端口为7862
这时打开 http://localhost:8762/hi?name=chyer666 ,你会在浏览器上看到 :
hi chyer666 ,i am from port:8762
源码下载:https://download.csdn.net/download/chyercn/11432213