超级简单的guava配置
由于实际业务开发,现有需求如下:
    public class LightupCityRelation implements Serializable {

        private static final long serialVersionUID = -3086558476279595830L;
        private Long id;//唯一标识
        private Long searchId;//stake_img_search表id
        private String searchWord;//搜索词,python返回的酒店名称/美食名称/风景名称
        private int lightupNum;//生成点亮数
        private Date createdTime;
        private Date updatedTime;
}
现在要对这个数据进行插入操作,但是由于searchId和searchWord是关联唯一监制,数据库中只允许出现唯一一个searchId+searchWord,所以在插入前,需要对数据库进行查询操作,判断该数据是否存在,但是由于爬虫数据量太大,请求过于频繁,造成数据很大的访问!
故而采用本地缓存的方式减少对数据库的访问
步骤如下:
一、引入jar包
		<dependency>
			<groupId>org.springframework.boot</groupId>
			<artifactId>spring-boot-starter-cache</artifactId>
		</dependency>

		<dependency>
			<groupId>com.google.guava</groupId>
			<artifactId>guava</artifactId>
			<version>19.0</version>
		</dependency>
二、配置缓存配置类
package com.zg.scrapy.cache;

import com.google.common.cache.CacheBuilder;
import org.springframework.cache.CacheManager;
import org.springframework.cache.annotation.EnableCaching;
import org.springframework.cache.guava.GuavaCacheManager;
import org.springframework.context.annotation.Bean;
import org.springframework.context.annotation.Configuration;

import java.util.concurrent.TimeUnit;

@Configuration
@EnableCaching
public class GuavaCacheConfig {

    @Bean
    public CacheManager cacheManager() {
        GuavaCacheManager cacheManager = new GuavaCacheManager();
        cacheManager.setCacheBuilder(
                CacheBuilder.newBuilder().
                        expireAfterWrite(60 * 60, TimeUnit.SECONDS).
                        concurrencyLevel(10).// 设置并发级别为10
                        recordStats(). // 开启缓存统计
                        maximumSize(1000));
        return cacheManager;
    }
}
三、启动类上开启本地缓存
@EnableDiscoveryClient
@SpringBootApplication(exclude = {DataSourceAutoConfiguration.class})
@EnableCaching
public class ScrapyServiceApplication {

	public static void main(String[] args) {
		SpringApplication.run(ScrapyServiceApplication.class, args);
	}

}
四、在需要开启本地缓存的方法上面加上缓存信息
@RestController
public class LightupCityRelationServiceImpl implements LightupCityRelationService {

    @Autowired
    private LightupCityRelationMapper lightupCityRelationMapper;

    @Override
    @Cacheable(value = "lightupCityRelations",key = "#p0.searchWord.concat(#p0.searchId.toString())")
    public LightupCityRelation save(@RequestBody LightupCityRelation lightupCityRelation) {

        LightupCityRelation dblightupRelation = lightupCityRelationMapper.queryBySeatchIdAndWord(lightupCityRelation.getSearchId(), lightupCityRelation.getSearchWord());
        if (dblightupRelation != null) {
            System.out.println("该搜索词已经存在");
        }

        lightupCityRelationMapper.insert(lightupCityRelation);
        return lightupCityRelation;
    }
}
关于key的配置信息以及方法,大家可以查阅相关搜索
基本内容如下
key属性是用来指定Spring缓存方法的返回结果时对应的key的。该属性支持SpringEL表达式。当我们没有指定该属性时,Spring将使用默认策略生成key。我们这里先来看看自定义策略,至于默认策略会在后文单独介绍。
`自定义策略是指我们可以通过Spring的EL表达式来指定我们的key。这里的EL表达式可以使用方法参数及它们对应的属性。使用方法参数时我们可以直接使用“#参数名”或者“#p参数index”。下面是几个使用参数作为key的示例。
   @Cacheable(value="users", key="#id")

   public User find(Integer id) {

      returnnull;

   }


   @Cacheable(value="users", key="#p0")

   public User find(Integer id) {

      returnnull;

   }


   @Cacheable(value="users", key="#user.id")

   public User find(User user) {

      returnnull;

   }


   @Cacheable(value="users", key="#p0.id")

   public User find(User user) {

      returnnull;

   }
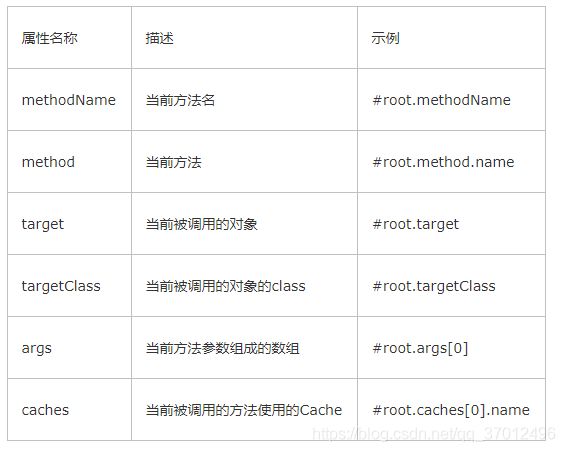
当我们要使用root对象的属性作为key时我们也可以将“#root”省略,因为Spring默认使用的就是root对象的属性。如:
   @Cacheable(value={"users", "xxx"}, key="caches[1].name")

   public User find(User user) {

      returnnull;

   }
