在Ubuntu16.04 上搭建EOS 环境
本文主要介绍如何在 Ubuntu 16.04 上搭建 EOS 环境
(喷血吐槽: MMP,从来没有一行代码没写,搭个环境搭了一个礼拜...)
参考文章:
https://www.jianshu.com/p/47ea4d11d997
https://www.jianshu.com/p/c47091d69dde
搭建环境前注意事项:
虚拟机要求分配至少 8GB 内存,貌似是 至少 20GB 可用磁盘空间(记不太清了,最好多分配点), 至于对已有的虚拟机 如何扩大内存或磁盘空间,请自行百度
环境搭建
- 下载 EOS 代码
git clone https://github.com/EOSIO/eos.git -b DAWN-2018-02-14 --recursive
下载的版本应该是DAWN-2018-02-14版
加入--recursive参数,否则EOS关联的子项目没法下载
- 自动编译
cd eos
./build.sh ubuntu full
编译的时间巨长... 我的虚拟机装在SSD上都平均至少编译2+小时....
./build.sh ubuntu 后面可以跟一个参数,默认值为 full , 也可以是 build。
full用于第一次编译或完全重新编译,它会重新尝试编译安装依赖项.
build是仅编译EOS代码,在变更代码后可以使用以下命令重新编译。
./build.sh ubuntu build
-
编译遇到的错误
google之后,找到 解决方案
解决过程如下:
- 打开
eos/plugins/db_plugin/CMakeLists.txt(在 master 分支上对应的地址为eos/plugins/mongo_db_plugin/CMakeLists.txt) - 在文件中找到 下面对应的 减号 ‘-‘ 行: 表示将该行从文件中删除 或者注释掉 ,加号'+' 行表示在文件中对应位置 添加相应的行
@@ -20,14 +20,22 @@ if (libmongoc-1.0_FOUND)

     find_package(libbsoncxx REQUIRED)
     message(STATUS "Found bsoncxx headers: ${LIBBSONCXX_INCLUDE_DIRS}")
-    find_library(EOS_LIBBSONCXX ${LIBBSONCXX_LIBRARIES}
-                 PATHS ${LIBBSONCXX_LIBRARY_DIRS} NO_DEFAULT_PATH)
+    if((LIBBSONCXX_VERSION_MAJOR LESS 3) OR ((LIBBSONCXX_VERSION_MAJOR EQUAL 3) AND (LIBBSONCXX_VERSION_MINOR LESS 2)))
+        find_library(EOS_LIBBSONCXX ${LIBBSONCXX_LIBRARIES}
+          PATHS ${LIBBSONCXX_LIBRARY_DIRS} NO_DEFAULT_PATH)
+      else()
+        set(EOS_LIBBSONCXX ${LIBBSONCXX_LIBRARIES})
+    endif()
     message(STATUS "Found bsoncxx library: ${EOS_LIBBSONCXX}")

     find_package(libmongocxx REQUIRED)
     message(STATUS "Found mongocxx headers: ${LIBMONGOCXX_INCLUDE_DIRS}")
-    find_library(EOS_LIBMONGOCXX ${LIBMONGOCXX_LIBRARIES}
-                 PATHS ${LIBMONGOCXX_LIBRARY_DIRS} NO_DEFAULT_PATH)
+    if((LIBMONGOCXX_VERSION_MAJOR LESS 3) OR ((LIBMONGOCXX_VERSION_MAJOR EQUAL 3) AND (LIBMONGOCXX_VERSION_MINOR LESS 2)))
+        find_library(EOS_LIBMONGOCXX ${LIBMONGOCXX_LIBRARIES}
+          PATHS ${LIBMONGOCXX_LIBRARY_DIRS} NO_DEFAULT_PATH)
+      else()
+        set(EOS_LIBMONGOCXX ${LIBMONGOCXX_LIBRARIES})
+    endif()
     message(STATUS "Found mongocxx library: ${EOS_LIBMONGOCXX}")
- 修改完重新进行编译,进入 eos 目录运行一下命令
./build.sh ubuntu build
等待编译成功即可
- 最后一步
cd build
make install
该命令会将编译好的可执行文件、头文件、库文件和模板文件安装到build下的install目录下,在该目录的bin下有所有编译好的命令,包括eosd、eosc、eoscpp等等。
创建并启动测试网络单节点
教程
执行命令:
cd build/programs/eosd
./eosd
直接使用命令执行./eosd 会得到一个错误(注意这一步是要做的,因为eosd会在当前目录( eos/build/programs/eosd)产生一个data-dir的目录。 如果没有报错,始终没有停止,使用ctrl+c 停掉 eosd )
进入 data-dir目录修改 config.ini
cd data-dir
sudo gedit config.ini
通过查找以下 属性名,找到对应的位置进行设置, 注意去掉注释(前面有# 号的去掉# 号)
-
genesis-json设置为eos目录下的genesis.json文件所在路径,在我的系统中路径为/home/ethan/develop/blockchain/eos
genesis-json = /home/ethan/develop/blockchain/eos
-
enable-stale-production设置为true
enable-stale-production = true
- 添加以下到文件中
producer-name = inita
producer-name = initb
producer-name = initc
producer-name = initd
producer-name = inite
producer-name = initf
producer-name = initg
producer-name = inith
producer-name = initi
producer-name = initj
producer-name = initk
producer-name = initl
producer-name = initm
producer-name = initn
producer-name = inito
producer-name = initp
producer-name = initq
producer-name = initr
producer-name = inits
producer-name = initt
producer-name = initu
# Load the block producer plugin, so you can produce blocks
plugin = eosio::producer_plugin
# Wallet plugin
plugin = eosio::wallet_api_plugin
# As well as API and HTTP plugins
plugin = eosio::chain_api_plugin
plugin = eosio::http_plugin
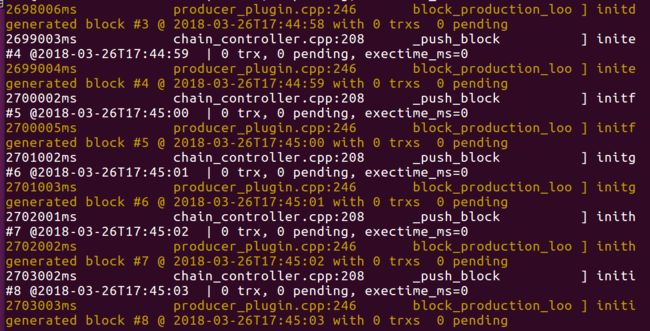
配置好之后,保存,进入eos/build/programs/eosd 目录下,重新执行 ./eosd, 如果报错 can not run eosd after building:unable to find genesis file, 表示genesis.json文件未配置成功,检查注释是否去掉或者 路径是否正确.
执行成功后,如图所示:
参考文件:
# Load the testnet genesis state, which creates some initial block producers with the default key
genesis-json = /path/to/eos/source/genesis.json
 # Enable production on a stale chain, since a single-node test chain is pretty much always stale
enable-stale-production = true
# Enable block production with the testnet producers
producer-name = inita
producer-name = initb
producer-name = initc
producer-name = initd
producer-name = inite
producer-name = initf
producer-name = initg
producer-name = inith
producer-name = initi
producer-name = initj
producer-name = initk
producer-name = initl
producer-name = initm
producer-name = initn
producer-name = inito
producer-name = initp
producer-name = initq
producer-name = initr
producer-name = inits
producer-name = initt
producer-name = initu
# Load the block producer plugin, so you can produce blocks
plugin = eosio::producer_plugin
# Wallet plugin
plugin = eosio::wallet_api_plugin
# As well as API and HTTP plugins
plugin = eosio::chain_api_plugin
plugin = eosio::http_plugin

