RabbitMq学习——Springboot整合rabbitmq之topic模糊匹配配置(四)
一、前言
rabbitmq中的交换机类中,topic作为一种很常用的转发模式。
在之前的博文中,除了fanout模式外,其他的有关转发器和消息队列的我们都有指定routingkey的写法,在进行配置消息转发器和消息队列时,都是按照具体的routingkey实现关联。
但上述操作限制太死板,如何能够进行动态匹配呢?接下来我们引入topic模式。
二、配置项
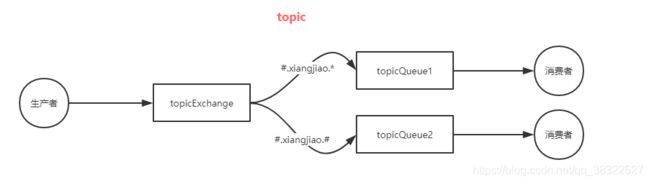
2.1、代码配置项编写前的准备
上图中就是我们本篇博客需要配置的内容,其中流程为:
1、消息生产者发送消息至指定的转发器上。
2、消息转发器按照配置好的关联规则,推送消息至对应的消息队列上。
我们在配置文件中,需要做如下几件事:
1、bean配置exchange,取名topicExchange。
2、消息队列两个,分别是topicQueue1、topicQueue2。
3、消息转发器和队列一的绑定为: #.xiangjiao.*
4、消息转发器和队列二的绑定为: #.xiangjiao.#
2.2、代码配置项的编写
2.2.1、注入队列和转发器,并进行绑定
import org.springframework.amqp.core.Binding;
import org.springframework.amqp.core.BindingBuilder;
import org.springframework.amqp.core.Queue;
import org.springframework.amqp.core.TopicExchange;
import org.springframework.beans.factory.annotation.Qualifier;
import org.springframework.context.annotation.Bean;
import org.springframework.context.annotation.Configuration;

@Configuration
public class TopicExchangeQueueConfig {


	/**
	 * 创建topic交换机
	 * @return
	 */
	@Bean(name="getTopicExchange")
	public TopicExchange getTopicExchange(){

		return new TopicExchange("topicExchange", true, false);
	}

	@Bean(name="getTopicQueue1")
	public Queue getTopicQueue1(){

		return new Queue("topicQueue1", true, false, false);
	}

	@Bean(name="getTopicQueue2")
	public Queue getTopicQueue2(){

		return new Queue("topicQueue2", true, false, false);
	}

	@Bean
	public Binding bindTopicExchangeAndQueue1(
			@Qualifier(value="getTopicExchange") TopicExchange getTopicExchange,
			@Qualifier(value="getTopicQueue1") Queue getTopicQueue1){

		//匹配 xiangjiao前的所有单词,但香蕉后智能匹配一个单词
		return BindingBuilder.bind(getTopicQueue1).to(getTopicExchange).with("#.xiangjiao.*");
	}

	@Bean
	public Binding bindTopicExchangeAndQueue2(
			@Qualifier(value="getTopicExchange") TopicExchange getTopicExchange,
			@Qualifier(value="getTopicQueue2") Queue getTopicQueue2){

		//匹配 xiangjiao前的所有单词 和后的所有单词
		return BindingBuilder.bind(getTopicQueue2).to(getTopicExchange).with("#.xiangjiao.#");
	}
}
2.2.2、编写消息的发送处理服务
public interface IMessageServcie {

	public void sendMessage(String exchange,String routingKey,String msg);
}
import org.slf4j.Logger;
import org.slf4j.LoggerFactory;
import org.springframework.amqp.core.Message;
import org.springframework.amqp.rabbit.connection.CorrelationData;
import org.springframework.amqp.rabbit.core.RabbitTemplate;
import org.springframework.amqp.rabbit.core.RabbitTemplate.ConfirmCallback;
import org.springframework.amqp.rabbit.core.RabbitTemplate.ReturnCallback;
import org.springframework.beans.factory.annotation.Autowired;
import org.springframework.stereotype.Component;

import cn.linkpower.service.IMessageServcie;

@Component
public class MessageServiceImpl implements IMessageServcie,ConfirmCallback,ReturnCallback {


	private static Logger log = LoggerFactory.getLogger(MessageServiceImpl.class);

	@Autowired
	private RabbitTemplate rabbitTemplate;

	@Override
	public void sendMessage(String exchange,String routingKey,String msg) {

		//消息发送失败返回到队列中, yml需要配置 publisher-returns: true
		rabbitTemplate.setMandatory(true);
		//消息消费者确认收到消息后,手动ack回执
		rabbitTemplate.setConfirmCallback(this);
		rabbitTemplate.setReturnCallback(this);

		//发送消息
		rabbitTemplate.convertAndSend(exchange,routingKey,msg);
	}

	@Override
	public void returnedMessage(Message message, int replyCode, String replyText, String exchange, String routingKey) {

		log.info("---- returnedMessage ----replyCode="+replyCode+" replyText="+replyText+" ");
	}

	@Override
	public void confirm(CorrelationData correlationData, boolean ack, String cause) {

		log.info("---- confirm ----");
		if(ack){

			log.info("---- confirm ----ack==true  cause="+cause);
		}else{

			log.info("---- confirm ----ack==false  cause="+cause);
		}
	}
}
2.2.3、编写消息的发送控制类
	@Autowired
	private IMessageServcie messageServiceImpl;

	@RequestMapping("/sendTopicMsg1")
	@ResponseBody
	public String sendTopicMsg1(HttpServletRequest request){

		String msg = request.getParameter("msg");
		messageServiceImpl.sendMessage("topicExchange", "bunana.xiangjiao.xj", msg);
		return "sendTopicMsg";
	}

	@RequestMapping("/sendTopicMsg2")
	@ResponseBody
	public String sendTopicMsg2(HttpServletRequest request){

		String msg = request.getParameter("msg");
		messageServiceImpl.sendMessage("topicExchange", "bunana.xiangjiao.xj.bn", msg);
		return "sendTopicMsg";
	}
2.2.4、编写消息的消费监听类
import java.io.IOException;

import org.springframework.amqp.core.Message;
import org.springframework.amqp.rabbit.annotation.RabbitHandler;
import org.springframework.amqp.rabbit.annotation.RabbitListener;
import org.springframework.stereotype.Component;

import com.rabbitmq.client.Channel;

@Component
@RabbitListener(queues="topicQueue1")
public class TopicMsgConsumerQueue1 {


	@RabbitHandler
	public void process(String msg,Channel channel, Message message) throws IOException {

		//拿到消息延迟消费
		try {

			Thread.sleep(1000*2);
		} catch (InterruptedException e) {

			e.printStackTrace();
		}
		try {

			//正确执行  手动ack
			//假设收到消息失败呢?  假定收到消息是 message 表示失败
			if("message".equalsIgnoreCase(msg)){

				/*channel.basicNack(message.getMessageProperties().getDeliveryTag(),
						false, false);*/
				channel.basicReject(message.getMessageProperties().getDeliveryTag(),
						true);
				System.err.println("get topic msg1 failed msg = "+msg);
			}else{

				channel.basicAck(message.getMessageProperties().getDeliveryTag(), true);
				System.out.println("get topic msg1 success msg = "+msg);
			}

		} catch (Exception e) {

			//消费者处理出了问题,需要告诉队列信息消费失败
			channel.basicNack(message.getMessageProperties().getDeliveryTag(),
					false, false);
			System.err.println("get topic msg1 failed msg = "+msg);
		}


	}
}
import java.io.IOException;

import org.springframework.amqp.core.Message;
import org.springframework.amqp.rabbit.annotation.RabbitHandler;
import org.springframework.amqp.rabbit.annotation.RabbitListener;
import org.springframework.stereotype.Component;

import com.rabbitmq.client.Channel;

@Component
@RabbitListener(queues="topicQueue2")
public class TopicMsgConsumerQueue2 {


	@RabbitHandler
	public void process(String msg,Channel channel, Message message) throws IOException {

		//拿到消息延迟消费
		try {

			Thread.sleep(1000*5);
		} catch (InterruptedException e) {

			e.printStackTrace();
		}
		try {

			//正确执行  手动ack
			//假设收到消息失败呢?  假定收到消息是 message 表示失败
			if("message".equalsIgnoreCase(msg)){

				/*channel.basicNack(message.getMessageProperties().getDeliveryTag(),
						false, false);*/
				channel.basicReject(message.getMessageProperties().getDeliveryTag(),
						true);
				System.err.println("get topic msg2 failed msg = "+msg);
			}else{

				channel.basicAck(message.getMessageProperties().getDeliveryTag(), true);
				System.out.println("get topic msg2 success msg = "+msg);
			}

		} catch (Exception e) {

			//消费者处理出了问题,需要告诉队列信息消费失败
			channel.basicNack(message.getMessageProperties().getDeliveryTag(),
					false, false);
			System.err.println("get topic msg2 failed msg = "+msg);
		}


	}
}
2.3、测试
测试一:请求接口
![]()
2019-12-24 17:22:52.925 ---- [AMQP Connection 127.0.0.1:5672] ---- INFO  cn.linkpower.service.impl.MessageServiceImpl - ---- confirm ----
2019-12-24 17:22:52.926 ---- [AMQP Connection 127.0.0.1:5672] ---- INFO  cn.linkpower.service.impl.MessageServiceImpl - ---- confirm ----ack==true  cause=null
get topic msg1 success msg = 11111223344
get topic msg2 success msg = 11111223344
测试二:请求接口
![]()
2019-12-24 17:23:44.243 ---- [AMQP Connection 127.0.0.1:5672] ---- INFO  cn.linkpower.service.impl.MessageServiceImpl - ---- confirm ----
2019-12-24 17:23:44.243 ---- [AMQP Connection 127.0.0.1:5672] ---- INFO  cn.linkpower.service.impl.MessageServiceImpl - ---- confirm ----ack==true  cause=null
get topic msg2 success msg = 11111223344