使用maxscale实现mysql读写分离
1.准备三台服务器(centos7.6)
| maxscale | ip:192.168.1.58 | 读写分离中间件 |
| mariadb(master) | ip:192.168.1.60 | 写入操作 |
| mariadb(slave) | ip:192.168.1.63 | 读取操作 |
2.mariadb主从配置
备注:yum安装mariadb、mariadb-server不在赘述
2.1:修改两台服务器中mariadb配置文件,让它支持mysqlbinlog主从复制
cp my-huge.cnf /etc/my.cnf
2.2:修改my.cnf中的server-id = 数值,将两台服务器中的server-id修改为不同数值
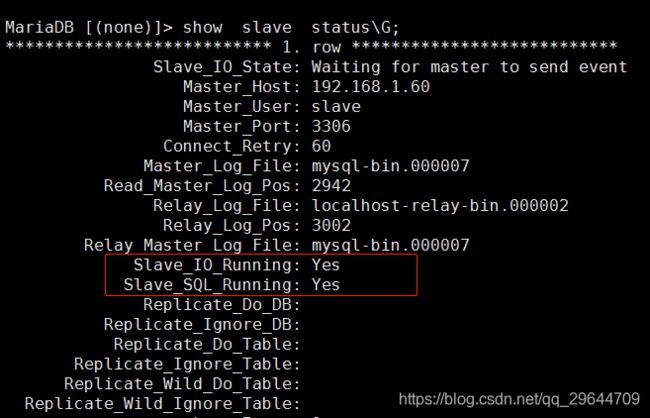
2.3:启动主mariadb(192.168.1.60),登录进行授权,查询master状态,记录mysql-bin.000007文件名和binlog起始位2942,这两个数据在从服务器接收授权会用到
grant replication slave on *.* to slave@'%' identified by '123456';show master status;2.4启动从mariadb(192.168.1.63),登陆接收授权,启动slave、查看状态
change master to
master_user='slave',
master_password='123456',
master_host='192.168.1.60',
master_log_file='mysql-bin.000007',
master_log_pos=2942;
start slave;#\G的作用是以key:value的形式一行一行显示
show slave status\G;3.配置maxscale读写分离
3.1 在maxscale(192.168.1.58)下载并安装maxscale和它的一些依赖
yum install libaio.x86_64 libaio-devel.x86_64 novacom-server.x86_64 libedit -ywget https://downloads.mariadb.com/MaxScale/1.4.5/centos/7/x86_64/maxscale-1.4.5-1.centos.7.x86_64.rpmrpm -ivh maxscale-1.4.5-1.centos.7.x86_64.rpm3.2 登录主mariadb(192.168.1.60)创建监控用户(maxmon)和路由用户(maxrou)
grant replication slave ,replication client on *.* to maxmon@'%' identified by '123456';grant all on *.* to maxrou@'%' identified by '123456';3.3 修改maxscale配置文件(192.168.1.58)
vim /etc/maxscale.cnf[maxscale]
threads=1
# Server definitions
# Set the address of the server to the network
# address of a MySQL server.
#定义数据库服务器
[server1]
type=server
#主数据库地址master
address=192.168.1.60
port=3306
protocol=MySQLBackend
#定义数据库服务器
[server2]
type=server
#从数据库地址slave
address=192.168.1.63
port=3306
protocol=MySQLBackend
#定义要监视的服务器总共两台,监控的用户
[MySQL Monitor]
type=monitor
module=mysqlmon
servers=server1,server2
user=maxmon
passwd=123456
monitor_interval=10000
# Service definitions
# Service Definition for a read-only service and
# a read/write splitting service.
# 读负载均衡模块
# 读写分离模块可以实现读负载均衡,因此注释掉该模块
#[Read-Only Service]
#type=service
#router=readconnroute
#servers=server2
#user=maxrou
#passwd=123456
#router_options=slave
# 定义读写分离服务及路由用户
[Read-Write Service]
type=service
router=readwritesplit
# 主从数据库
servers=server1,server2
# 设置路由用户名和密码
user=maxrou
passwd=123456
max_slave_connections=100%
# 定义管理服务
[MaxAdmin Service]
type=service
router=cli
# 注释监听
#[Read-Only Listener]
#type=listener
#service=Read-Only Service
#protocol=MySQLClient
#port=4008
# 定义读写分离服务的端口4006
[Read-Write Listener]
type=listener
service=Read-Write Service
protocol=MySQLClient
port=4006
# 定义管理服务监听端口6603
[MaxAdmin Listener]
type=listener
service=MaxAdmin Service
protocol=maxscaled
port=6603
3.4 启动,并查看状态(192.168.1.58)
systemctl start maxscalesystemctl status maxscalenetstat -antp4. 测试验证
4.1 登录 MaxScale(192.168.1.58) 管理器,查看数据库连接状态,默认的用户名和密码是 admin/mariadb
maxadmin -uadmin -pmariadb -P6603list servers4.2 创建测试用户,登陆主mariadb(192.168.1.60)创建测试用户test
grant all on *.* to test@'%' identified by '123456';4.3 在主数据库mariadb(192.168.1.60)创建test数据库,并创建表wen,然后插入值
create  database test;

use test;

create table wen(id int);

insert into wen values(1),(2);
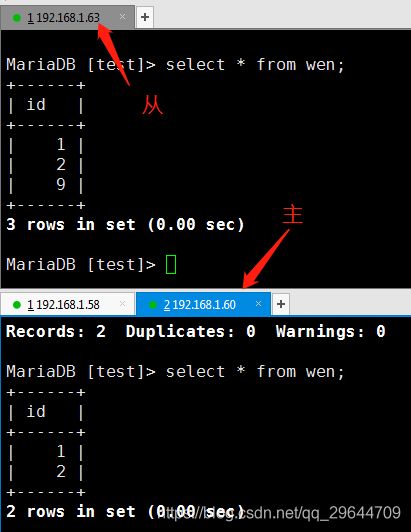
在从数据库mariadb(192.168.1.63)中找到test,并在表wen中插入值
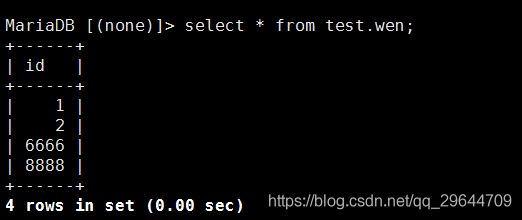
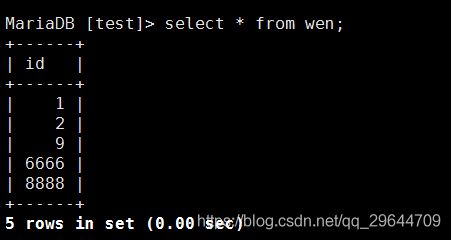
insert into wen values (9);备注:开始已经实现了主从复制,主数据库(192.168.1.60)中的数据会自动同步到从数据库(192.168.1.63),而从数据库新增的数据不会同步到主数据库
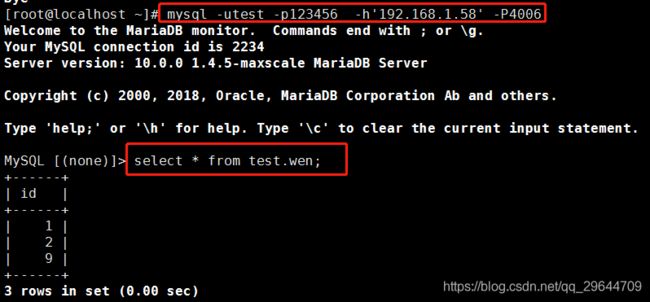
4.4 在maxscale服务器(192.168.1.58),使用 Mysql 客户端连接 MaxScale
mysql -utest -p123456 -h'192.168.1.58' -P4006查询test.wen表所有数据,数据与从数据库test.wen表相同,比主数据库test.wen多一条记录
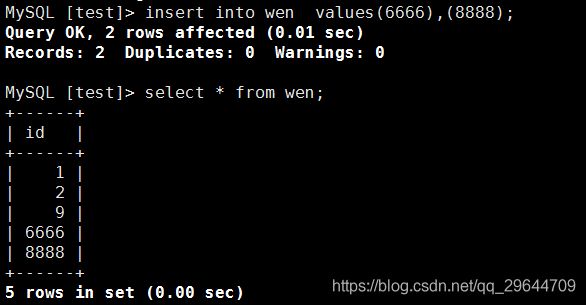
通过代理服务器maxscale(192.168.1.58)的mysql客户端插入两条数据,并查看结果
通过主服务器(192.168.1.60)mysql客户端查看结果
通过从服务器(192.168.1.63)mysql客户端查看结果
得到结论:写入用的是主服务器(192.168.1.60),因为向从服务器写入数据 不会同步到主服务器;而读取是由从服务器(192.168.1.63)读取的。
由此实现了主从复制,并且实现了mysql读写分离。

