磁盘管理1--磁盘分区
1.名词解释
分区方式: mbr(bootloader引导程序446字节,mpt主分区表64字节,55a硬盘标识2字节)、gpt
主分区
扩展分区
逻辑分区
2.磁盘查看命令
fdisk -l ##系统中的所有磁盘设备
df -Th ##系统正在挂载的磁盘设备
blkid ##系统可以挂载的磁盘设备id

3.分区划分
fdisk /dev/vdb ##建立磁盘分区[root@localhost ~]# fdisk /dev/vdb
Welcome to fdisk (util-linux 2.23.2).
Changes will remain in memory only, until you decide to write them.
Be careful before using the write command.
Command (m for help): m ##获得帮助
Command action
a toggle a bootable flag
b edit bsd disklabel
c toggle the dos compatibility flag
d delete a partition ##删除分区
g create a new empty GPT partition table
G create an IRIX (SGI) partition table
l list known partition types ##列出系统可用分区类型
m print this menu
n add a new partition ##新建分区
o create a new empty DOS partition table
p print the partition table ##显示分区
q quit without saving changes ##退出
s create a new empty Sun disklabel
t change a partition’s system id ##修改分区功能id
u change display/entry units
v verify the partition table
w write table to disk and exit ##保存更改到分区表中
x extra functionality (experts only)
Command (m for help): n ##新建分区
Partition type:
p primary (1 primary, 0 extended, 3 free) ##分区类型为主分区
e extended ##分区类型为扩展分区
Select (default p): p
Partition number (1-4, default 1): 1 ##主分区id
First sector (2048-20971519, default 2048): ##此分区的起始位置
Using default value 2048
Last sector, +sectors or +size{K,M,G} (2048-20971519, default 20971519): +100M ##分区大小
Partition 1 of type Linux and of size 100 MiB is set
Command (m for help): wq ##保存并退出,只输入q则表示放弃更改退出
The partition table has been altered!
Calling ioctl() to re-read partition table.
Syncing disks.
[root@localhost ~]#
partprobe   ##同步分区表
cat /proc/partitions  ##查看系统识别的分区信息
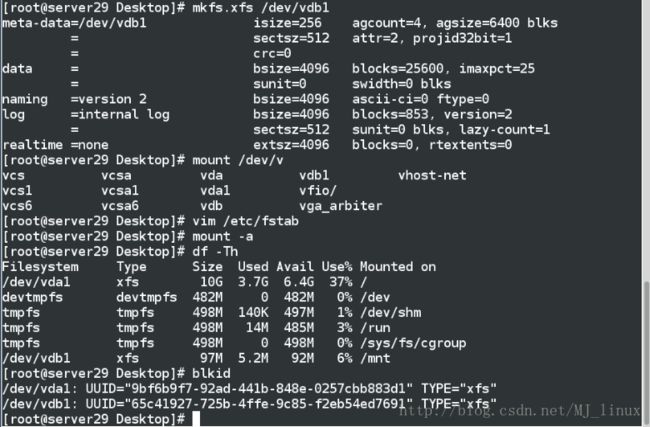
mkfs.xfs /dev/vdb1  ##格式化(安装文件系统)
mount /dev/vdb1  /mnt   ##临时挂载
vim /etc/fstab ##永久挂载
编写格式:
device mountpoint ftype defaults(mountpoint) 0 0
/dev/vdb1 /mnt xfs defaults 0 0
mount -a ##使/etc/fastab中记录的挂载生效利用df -Th 和blkid命令查看系统正在挂载的磁盘设备和系统可以挂载的磁盘设备id
4.删除分区
1>先使用umount命令解除挂载
注:当挂载点被使用时,无法解除挂载,需要用fuser -kvm结束使用的进程,然后进行解除挂载
解除挂载之后,使用fdisk /dev/vdb命令删除分区
2>fdisk /dev/vdb ##删除分区
3>partprobe ##同步分区表

4>cat /proc/partitions ##查看系统识别的分区信息
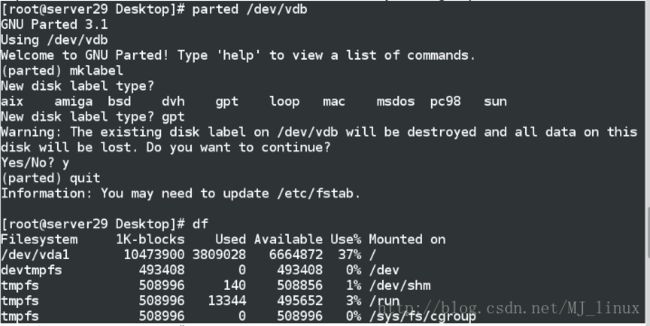
5.设定分区方式,将mkdocs 改为 gpt
*更改之前需要把正在使用的分区关闭,才可以进行更改
1>partoff /dev/vdbn ##关闭分区2>parted /dev/vdb ##更改分区表记录方式进入之后mklabel选择分区方式
3>fdisk /dev/vdb ##新建分区
4>partprobe ##同步分区表
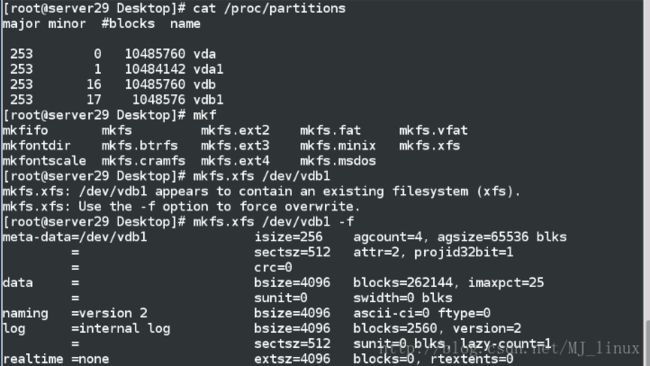
5>cat /proc/partitions##查看分区信息
6>mkfs.xfs /dev/vdb1 -f ##格式化分区
7>mount /dev/vdb1 /mnt ##挂载
8>df -Th ##查看系统正在挂载的磁盘设备
9>blkid ##查看系统可以挂载的磁盘设备id


6.添加swap分区
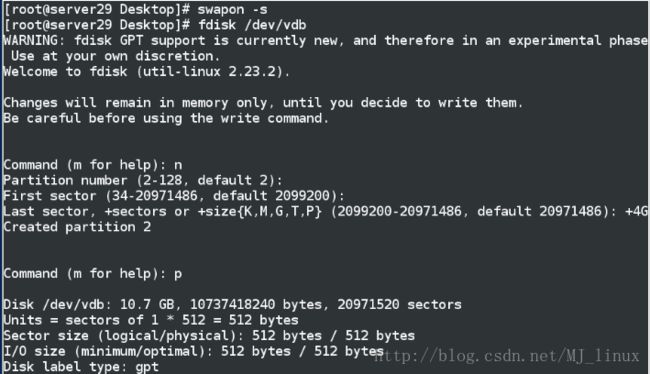
fdisk /dev/vdb ##添加一个分区[root@localhost ~]# fdisk /dev/vdb
WARNING: fdisk GPT support is currently new, and therefore in an experimental phase. Use at your own discretion.
Welcome to fdisk (util-linux 2.23.2).
Changes will remain in memory only, until you decide to write them.
Be careful before using the write command.
Command (m for help): n
Partition number (2-128, default 2):
First sector (34-20971486, default 2099200):
Last sector, +sectors or +size{K,M,G,T,P} (2099200-20971486, default 20971486): +4G
Created partition 2
Command (m for help): p
Disk /dev/vdb: 10.7 GB, 10737418240 bytes, 20971520 sectors
Units = sectors of 1 * 512 = 512 bytes
Sector size (logical/physical): 512 bytes / 512 bytes
I/O size (minimum/optimal): 512 bytes / 512 bytes
Disk label type: gpt
tart End Size Type Name
1 2048 2099199 1G Linux filesyste
2 2099200 10487807 4G Linux filesyste
Command (m for help): t
Partition number (1,2, default 2): 2
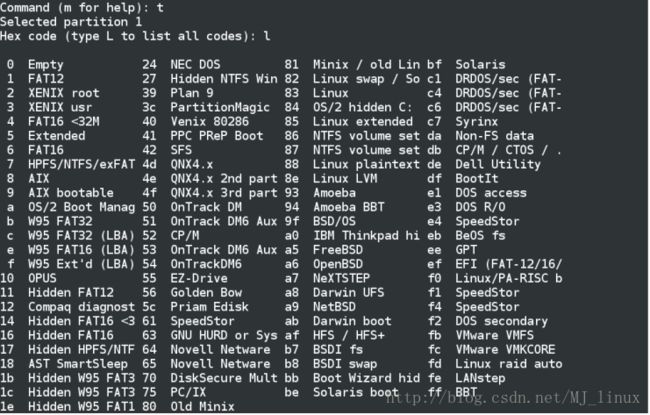
Partition type (type L to list all types): l
1 EFI System C12A7328-F81F-11D2-BA4B-00A0C93EC93B
2 MBR partition scheme 024DEE41-33E7-11D3-9D69-0008C781F39F
3 BIOS boot partition 21686148-6449-6E6F-744E-656564454649
4 Microsoft reserved E3C9E316-0B5C-4DB8-817D-F92DF00215AE
5 Microsoft basic data EBD0A0A2-B9E5-4433-87C0-68B6B72699C7
6 Microsoft LDM metadata 5808C8AA-7E8F-42E0-85D2-E1E90434CFB3
7 Microsoft LDM data AF9B60A0-1431-4F62-BC68-3311714A69AD
8 Windows recovery evironmnet DE94BBA4-06D1-4D40-A16A-BFD50179D6AC
9 IBM General Parallel Fs 37AFFC90-EF7D-4E96-91C3-2D7AE055B174
10 HP-UX data partition 75894C1E-3AEB-11D3-B7C1-7B03A0000000
11 HP-UX service partition E2A1E728-32E3-11D6-A682-7B03A0000000
12 Linux filesystem 0FC63DAF-8483-4772-8E79-3D69D8477DE4
13 Linux RAID A19D880F-05FC-4D3B-A006-743F0F84911E
14 Linux swap 0657FD6D-A4AB-43C4-84E5-0933C84B4F4F
15 Linux LVM E6D6D379-F507-44C2-A23C-238F2A3DF928
16 Linux reserved 8DA63339-0007-60C0-C436-083AC8230908
17 FreeBSD data 516E7CB4-6ECF-11D6-8FF8-00022D09712B
18 FreeBSD boot 83BD6B9D-7F41-11DC-BE0B-001560B84F0F
19 FreeBSD swap 516E7CB5-6ECF-11D6-8FF8-00022D09712B
20 FreeBSD UFS 516E7CB6-6ECF-11D6-8FF8-00022D09712B
21 FreeBSD ZFS 516E7CBA-6ECF-11D6-8FF8-00022D09712B
22 FreeBSD Vinum 516E7CB8-6ECF-11D6-8FF8-00022D09712B
23 Apple HFS/HFS+ 48465300-0000-11AA-AA11-00306543ECAC
24 Apple UFS 55465300-0000-11AA-AA11-00306543ECAC
25 Apple RAID 52414944-0000-11AA-AA11-00306543ECAC
26 Apple RAID offline 52414944-5F4F-11AA-AA11-00306543ECAC
27 Apple boot 426F6F74-0000-11AA-AA11-00306543ECAC
28 Apple label 4C616265-6C00-11AA-AA11-00306543ECAC
29 Apple TV recovery 5265636F-7665-11AA-AA11-00306543ECAC
30 Apple Core storage 53746F72-6167-11AA-AA11-00306543ECAC
31 Solaris boot 6A82CB45-1DD2-11B2-99A6-080020736631
32 Solaris root 6A85CF4D-1DD2-11B2-99A6-080020736631
33 Solaris /usr & Apple ZFS 6A898CC3-1DD2-11B2-99A6-080020736631
34 Solaris swap 6A87C46F-1DD2-11B2-99A6-080020736631
35 Solaris backup 6A8B642B-1DD2-11B2-99A6-080020736631
36 Solaris /var 6A8EF2E9-1DD2-11B2-99A6-080020736631
37 Solaris /home 6A90BA39-1DD2-11B2-99A6-080020736631
38 Solaris alternate sector 6A9283A5-1DD2-11B2-99A6-080020736631
39 Solaris reserved 1 6A945A3B-1DD2-11B2-99A6-080020736631
40 Solaris reserved 2 6A9630D1-1DD2-11B2-99A6-080020736631
41 Solaris reserved 3 6A980767-1DD2-11B2-99A6-080020736631
42 Solaris reserved 4 6A96237F-1DD2-11B2-99A6-080020736631
43 Solaris reserved 5 6A8D2AC7-1DD2-11B2-99A6-080020736631
44 NetBSD swap 49F48D32-B10E-11DC-B99B-0019D1879648
45 NetBSD FFS 49F48D5A-B10E-11DC-B99B-0019D1879648
46 NetBSD LFS 49F48D82-B10E-11DC-B99B-0019D1879648
47 NetBSD concatenated 2DB519C4-B10E-11DC-B99B-0019D1879648
48 NetBSD encrypted 2DB519EC-B10E-11DC-B99B-0019D1879648
49 NetBSD RAID 49F48DAA-B10E-11DC-B99B-0019D1879648
50 ChromeOS kernel FE3A2A5D-4F32-41A7-B725-ACCC3285A309
51 ChromeOS root fs 3CB8E202-3B7E-47DD-8A3C-7FF2A13CFCEC
52 ChromeOS reserved 2E0A753D-9E48-43B0-8337-B15192CB1B5E
53 MidnightBSD data 85D5E45A-237C-11E1-B4B3-E89A8F7FC3A7
54 MidnightBSD boot 85D5E45E-237C-11E1-B4B3-E89A8F7FC3A7
55 MidnightBSD swap 85D5E45B-237C-11E1-B4B3-E89A8F7FC3A7
56 MidnightBSD UFS 0394Ef8B-237C-11E1-B4B3-E89A8F7FC3A7
57 MidnightBSD ZFS 85D5E45D-237C-11E1-B4B3-E89A8F7FC3A7
58 MidnightBSD Vinum 85D5E45C-237C-11E1-B4B3-E89A8F7FC3A7
Partition type (type L to list all types): 14
Changed type of partition ‘Linux filesystem’ to ‘Linux swap’
Command (m for help): p
Disk /dev/vdb: 10.7 GB, 10737418240 bytes, 20971520 sectors
Units = sectors of 1 * 512 = 512 bytes
Sector size (logical/physical): 512 bytes / 512 bytes
I/O size (minimum/optimal): 512 bytes / 512 bytes
Disk label type: gpt
Start End Size Type Name
1 2048 2099199 1G Linux filesyste
2 2099200 10487807 4G Linux swap
Command (m for help): wq
The partition table has been altered!
Calling ioctl() to re-read partition table.
WARNING: Re-reading the partition table failed with error 16: Device or resource busy.
The kernel still uses the old table. The new table will be used at
the next reboot or after you run partprobe(8) or kpartx(8)
Syncing disks.
[root@localhost ~]#
[root@localhost ~]# partprobe ##同步分区表
[root@localhost ~]# mkswap /dev/vdb2 ##格式化成swap类型
Setting up swapspace version 1, size = 4194300 KiB
no label, UUID=b933737a-1409-48b5-8f92-d663d388134b
[root@localhost ~]# swapon -a /dev/vdb2 ##激活swap
[root@localhost ~]# swapon -s
Filename Type Size Used Priority
/dev/vdb2 partition 4194300 0 -1
[root@localhost ~]#


7.更改gpt下的swap 为mkdos下的swap
1>取消挂载然后进行更改
2>fdisk -l ##显示系统设备信息
vdb的分区方式为gpt
3>df ##显示系统正在挂载的磁盘设备
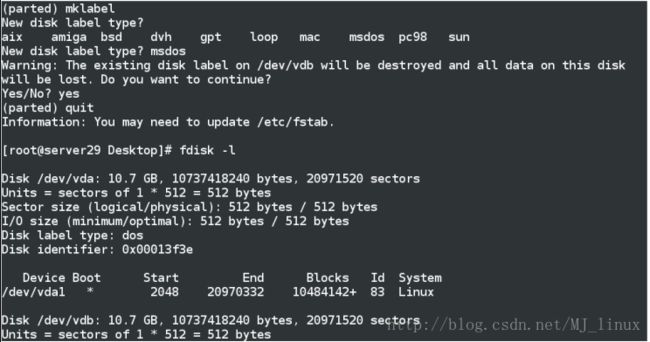
4>parted /dev/vdb ##更改分区方式
mklabel—msdos—yes—quit
5>fdisk -l ##显示系统设备信息
vdb的分区方式为dos
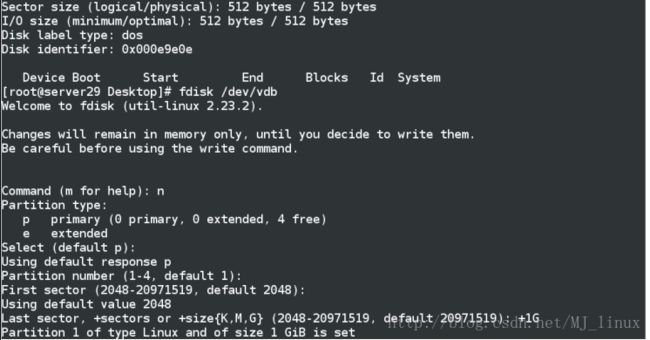
6>fdisk /dev/vdb##新建分区
t修改分区为swap分区 p查看vdb1的类型为dos
7>partprobe ##同步分区表
8>mkswap /dev/vdb1 ##格式化为swap类型
9>swapon -a /dev/vdb1
10>swapon -s




8.用文件方式swapfile临时做swap
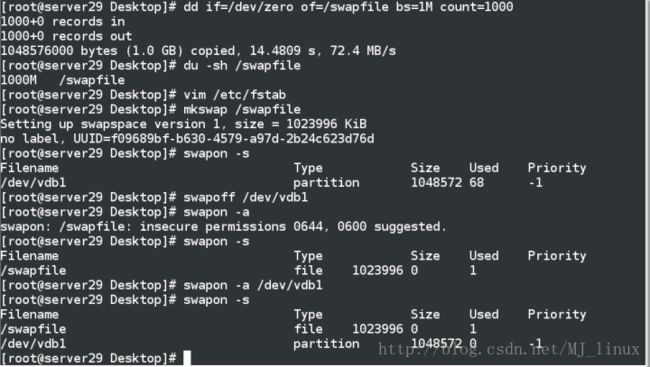
1>dd if=/dev/zero of=/swapfile bs=1M count=1000 ##创建一个1G大小的文件
2>vim /etc/fstab ##挂载swap
3>mkswap /swapfile ##格式化为swap类型
4>swapon -s ##显示正在使用的swap,有的话就要swapoff
5>swapon -a /swapfile ##激活临时添加到swap里
6>swapon -s
swapon -a -p + 数字 ##更改优先级
vim /etc/fstab ##永久添加swap分区
格式:/swapfile swap swap defaults,pri=1 0 0 #pri优先级

9.删除swap
1>vim /etc/fstab ##删除此文件中添加的swap行
2>swapoff /swapfile ##断开swap文件链接
3>swapoff /dev/vdb1 ##断开swap磁盘链接
4>rm -rf /swapfile ##删除文件
5>fdisk /dev/vdb ##删除磁盘分区
6>partprobe ##同步分区表
7>swapon -s ##显示正在使用的swap
![]()

![]()


