Let's Encrypt证书使用
certbot软件从Github直接下载,在CentOS6、7下执行都没有问题。
设置yum代码库
certbot-auto运行是会自动连接下载依赖包,启用163(http://mirrors.163.com/.help/centos.html)和epel(https://fedoraproject.org/wiki/EPEL#How_can_I_use_these_extra_packages.3F)库,提前准备好环境,更多查看https://certbot.eff.org/#centosrhel6-other
wget http://mirrors.163.com/.help/CentOS6-Base-163.repo
mv CentOS6-Base-163.repo /etc/yum.repos.d/
wget https://dl.fedoraproject.org/pub/epel/epel-release-latest-6.noarch.rpm
rpm -ivh epel-release-latest-6.noarch.rpm修改CentOS6-Base-163.repo文件,将$releasever替换为6
修改epel.repo文件,将$releasever替换为6,将http://download.fedoraproject.org/pub/epel修改为https://mirrors.tuna.tsinghua.edu.cn/epel
运行以下命令生成缓存
yum clean all
yum makecache
安装git软件,也可直接从https://github.com/certbot/certbot下载
yum install git防火墙修改
修改/etc/sysconfig/iptables
vim /etc/sysconfig/iptables查看是否有80、443端口允许访问记录
-A INPUT -i eth0 -p tcp -m tcp --dport 80 -j ACCEPT
-A INPUT -i eth0 -p tcp -m tcp --dport 443 -j ACCEPT
获取Let’s Encrypt证书
certbot-auto运行是会自动连接下载依赖包,执行过程出现问题具体分析原因
git clone https://github.com/certbot/certbot
cd certbot
certbot-auto命令在root用户下执行,certbot-auto会执行更新certbot版本和安装依赖包,执行需要联网,有时较慢
./certbot-auto certonly --standalone --email 你的邮箱 -d 你的域名生成的证书放在/etc/letsencrypt/live/[网站域名]下,证书有效期3个月
| 文件名 | 内容 |
|---|---|
| cert.pem | 服务端证书 |
| chain.pem | 浏览器需要的所有证书但不包括服务端证书,比如根证书和中间证书 |
| fullchain.pem | 包括了cert.pem和chain.pem的内容 |
| privkey.pem | 证书的私钥 |
更新证书
./certbot-auto renew更新证书之后,需要执行tomcat、weblogic对应配置内容。
Apache 设置
Apache测试版本
Server version: Apache/2.4.6 (CentOS)
Server built: Nov 14 2016 18:04:44修改/etc/httpd/conf.d/ssl.conf
Listen 443 https
HSTS(HTTP Strict Transport Security)的作用是强制客户端(如浏览器)使用HTTPS与服务器创建连接。
Tomcat设置
cp /etc/letsencrypt/live/域名/*.pem apache-tomcat-8.5.5/conf/
cd apache-tomcat-8.5.5/conf/
chown 用户:组 *.pem
修改conf/server.xml文件:
    <Connector port="8443" protocol="org.apache.coyote.http11.Http11NioProtocol"
               maxThreads="150" SSLEnabled="true" >
        <UpgradeProtocol className="org.apache.coyote.http2.Http2Protocol" />
        <SSLHostConfig>
            <Certificate certificateKeyFile="conf/privkey.pem"
                         certificateFile="conf/cert.pem"
                         certificateChainFile="conf/fullchain.pem"
                         type="RSA" />
        SSLHostConfig>
    Connector>
Nginx设置
修改nginx的配置文件/usr/local/nginx/conf/nginx.conf,实现https转到内网tomcat的http服务,注:以下配置未实现tomcat识别来自https的请求,详细见问题3
    server {

        listen 8443;

        server_name localhost;
        ssl on;
        ssl_certificate /etc/letsencrypt/live/域名/fullchain.pem;
        ssl_certificate_key /etc/letsencrypt/live/域名/privkey.pem;
        server_name_in_redirect off;
        proxy_set_header Host $host:$server_port;
        proxy_connect_timeout 60s;
        proxy_read_timeout 5400s;
        proxy_send_timeout 5400s;
        proxy_set_header X-Real-IP $remote_addr;
        proxy_set_header REMOTE-HOST $remote_addr;
        proxy_set_header X-Forwarded-For $proxy_add_x_forwarded_for;
        index index.html index.htm index.jsp index.do;

        location ^~ /ZhsqApp/{
            proxy_pass  http://192.168.100.10:8080;
            client_max_body_size    100m;
        }
    }
Weblogic 配置
weblogic必须是10.3.6及以上版本,才能使用Let's Encrypt的证书,Let's Encrypt采用SHA256withRSA,低版本的不支持SHA256withRSA
生成密钥库
执行openssl命令生成fullchain_and_key.p12,执行keytool命令生成密钥库文件weblogic.jks
openssl pkcs12 -export -in fullchain.pem -inkey privkey.pem -out fullchain_and_key.p12 -name weblogic -passout pass:123456
keytool -importkeystore -deststorepass 123456 -destkeystore weblogic.jks -srckeystore fullchain_and_key.p12 -srcstoretype PKCS12 -srcstorepass 123456 -alias weblogicprivkey.pem、fullchain.pem为Let’s Encrypt生成文件,密码可自行修改。注-name与-alias别名保存一致,-passout参数的pass:需保留。-passout与-srcstorepass密码保持一致, -deststorepass需记住在weblogic配置使用。
生成信任库
执行keytool命令生成信任库文件trust.jks
keytool -importcert -alias rootCA -trustcacerts -file cert.pem -keystore trust.jks -storepass 123456cert.pem为Let’s Encrypt生成文件,密码可自行修改。 -storepass需记住在weblogic配置使用。
weblogic配置
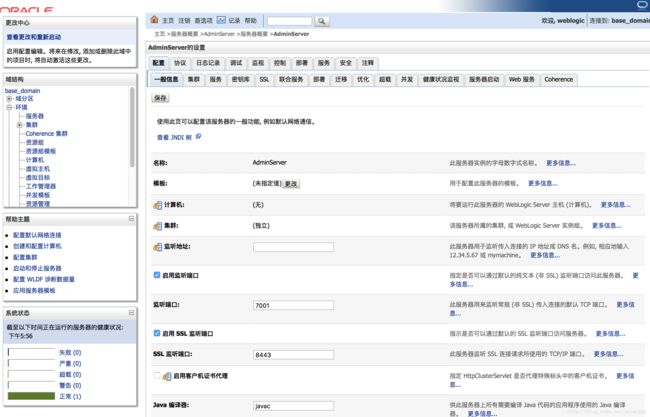
启用SSL监听端口
登录weblogic控制台 -> 服务器 -> 选择服务器管理 -> 配置标签 -> 一般信息子标签页 -> 启用 SSL 监听端口 -> 修改端口7002 -> 保存
在Linux下设置端口小于1024的,需要使用管理员用户启动weblogic。
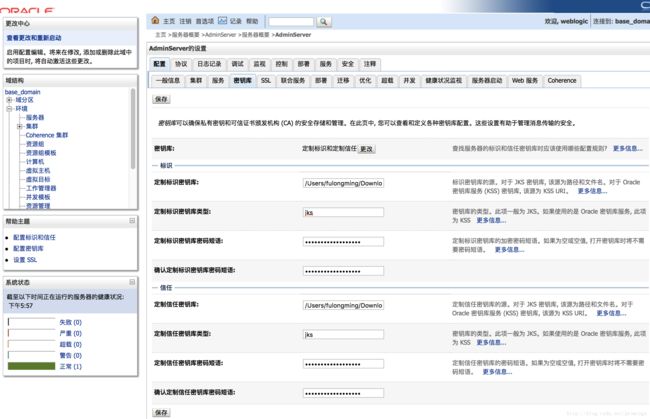
密钥库配置
进入配置标签 -> 密钥库标签页
1. 密钥库点更改,选择定制标识和定制信任,点击保存。
1. 定制标识密钥库,填写weblogic.jks全路径
1. 定制标识密钥库类型,填写jks
1. 定制标识密钥库密码短语,填写生成密钥库时 -deststorepass写的密码
1. 确认定制标识密钥库密码短语,填写生成密钥库时 -deststorepass写的密码
1. 定制信任密钥库,填写trust.jks全路径
1. 定制信任密钥库类型,填写jks
1. 定制信任密钥库密码短语,填写生成信任库时 -storepass写的密码
1. 确认定制信任密钥库密码短语,填写生成信任库时 -storepass写的密码
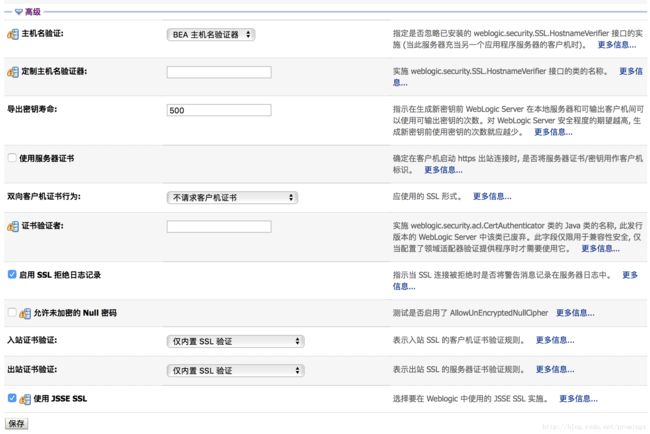
SSL配置
进入配置标签 -> SSL标签页
1. 私有密钥别名,填写生成密钥库时的别名
1. 私有密钥密码短语,填写生成密钥库时 -deststorepass写的密码
1. 确认私有密钥密码短语,填写生成密钥库时 -deststorepass写的密码
点击保存

weblogic 10.3. 6 版本还需要做额外配置,SSL标签页中,点击高级,选中使用 JSSE SSL,点击保存
重启weblogic服务,测试https访问。
问题
问题1、Let’s Encrypt安装好之后在PC端可以正常访问,但在手机端提示不受信任的
主要原因是缺少中级证书。生成的LE证书后使用的需要使用fullchain.pem,打开后会发现有两段证书,第一段是LE的证书,第二段才是你网站的证书。而你只有网站的证书,而没有LE的证书。
问题2、如何关闭SSL3协议
查看http://disablessl3.com如何关闭apache、nginx的ssl3协议
tomcat修改,修改server.xml,
<Connector port="8443" protocol="org.apache.coyote.http11.Http11NioProtocol"
               maxThreads="150" SSLEnabled="true"
               sslProtocol="TLS" sslEnabledProtocols="TLSv1,TLSv1.1,TLSv1.2"  >
问题3、nginx采用Let’s Encrypt证书,如何实现https转http,后端识别来自https的请求
修改nginx的配置文件
修改nginx的配置文件/usr/local/nginx/conf/nginx.conf,实现https转到内网tomcat的http服务,注:以下配置未实现tomcat识别来自https的请求,详细见问题2server { listen 8443; server_name localhost; ssl on; ssl_certificate /etc/letsencrypt/live/域名/fullchain.pem; ssl_certificate_key /etc/letsencrypt/live/域名/privkey.pem; server_name_in_redirect off; proxy_set_header Host $host:$server_port; proxy_connect_timeout 60s; proxy_read_timeout 5400s; proxy_send_timeout 5400s; proxy_set_header X-Real-IP $remote_addr; proxy_set_header REMOTE-HOST $remote_addr; proxy_set_header X-Forwarded-For $proxy_add_x_forwarded_for; proxy_set_header X-Forwarded-Proto $scheme; proxy_set_header WL-Proxy-SSL true; add_header Strict-Transport-Security "max-age=63072000; includeSubdomains; "; index index.html index.htm index.jsp index.do; location ^~ /ZhsqApp/{ proxy_pass http://192.168.100.10:8080; client_max_body_size 100m; } }主要增加3处配置:
proxy_set_header X-Forwarded-Proto $scheme;tomcat可识别参数proxy_set_header WL-Proxy-SSL true;weblogic可识别参数add_header Strict-Transport-Security "max-age=63072000; includeSubdomains; ";启用HSTS功能,浏览器在63072000秒时间内默认以https请求服务
- tomcat启用识别X-Forwarded-Proto设置
修改配置文件server.xml,在Engine下添加下面内容
  protocolHeader="X-Forwarded-Proto"
 protocolHeaderHttpsValue="https" httpsServerPort="8443"/>
做好上述配置,重启tomcat。request.getScheme()的值显示https。非443端口时,必须增加httpsServerPort配置,不然request.getServerPort()方法返回 443
另外,可参考Nginx SSL+tomcat集群,request.getScheme() 取到https正确的协议内容 - weblogic启用识别WL-Proxy-SSL 设置
进入console界面,域名->配置->Web应用程序,勾选启用 WebLogic 插件,保存

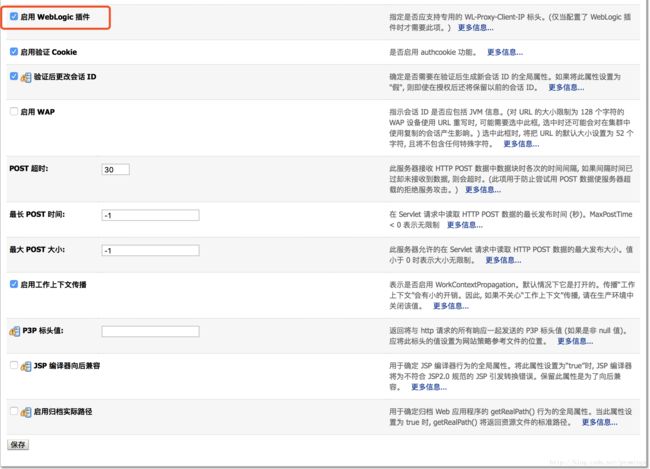
做好上述配置,重启weblogic。request.getScheme()的值显示https
另外,可参考HTTPS/SSL/Spring Security doesn’t work in both a load balancer and non-load balancer environment #424内容