iOS 推送通知:本地通知(UILocalNotification)和远程通知(APNs)详解
——本地推送通知
推送通知的作用?
在App退到后台或者完全退出时,可以使用通知来告诉用户某件事情,比如推送新的聊天消息、新闻等
通知对应的效果:
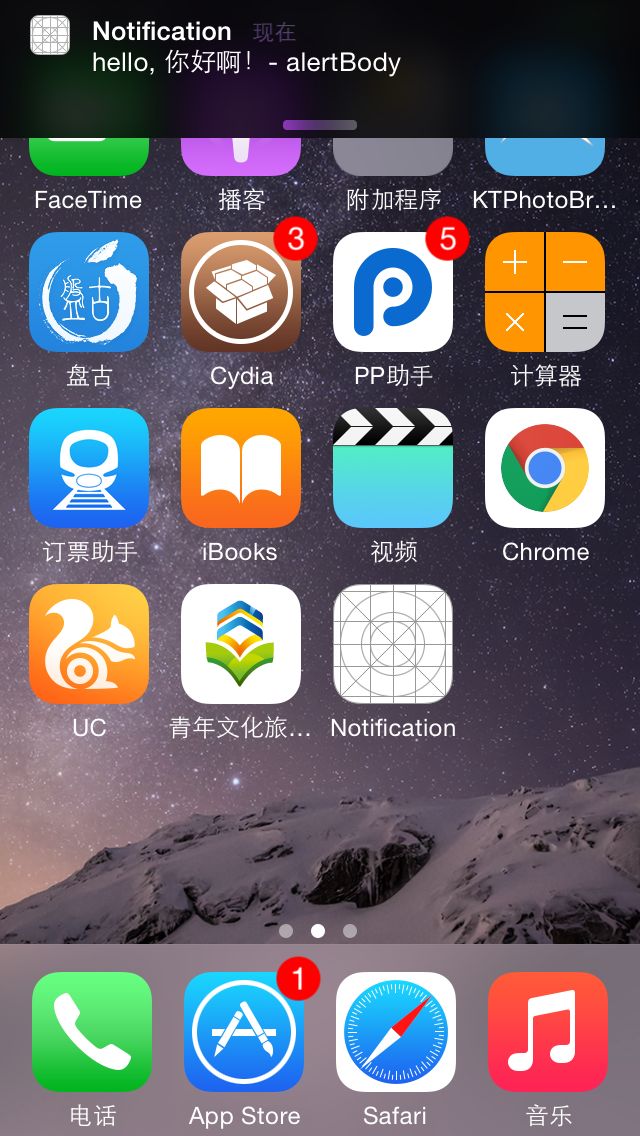
- 在主屏幕的顶端会出现通知消息
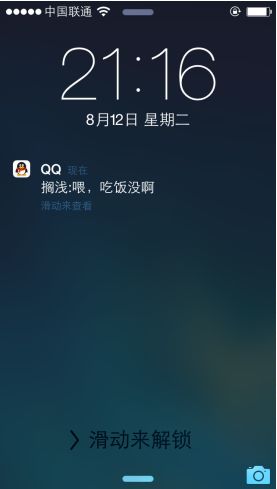
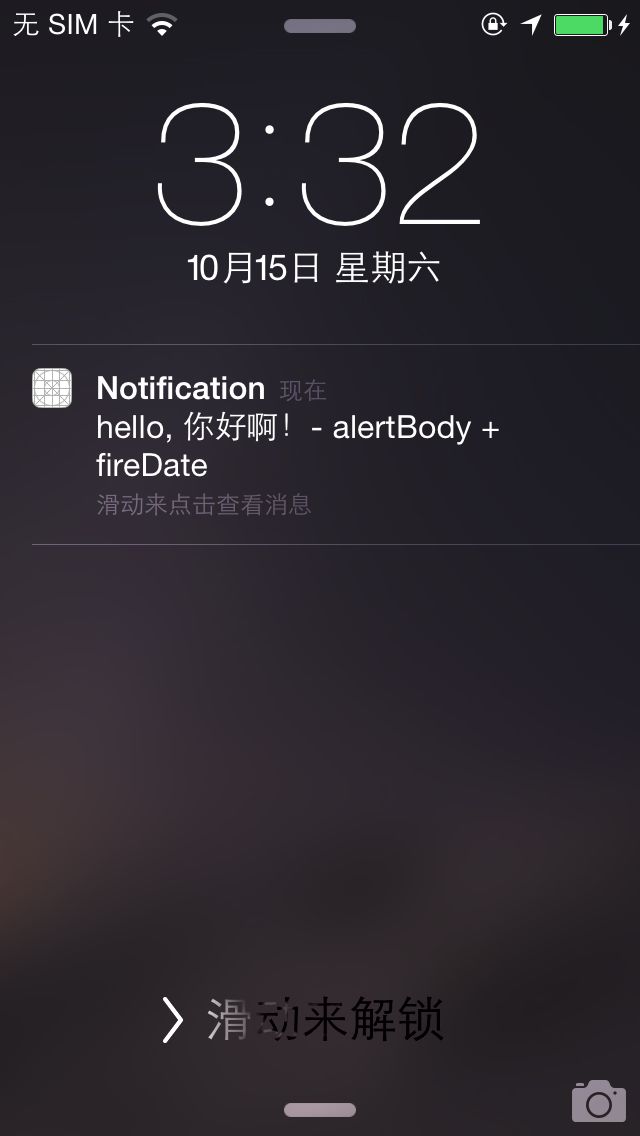
- 当手机锁屏时出现在锁屏界面,可以通过滑动打开该App,
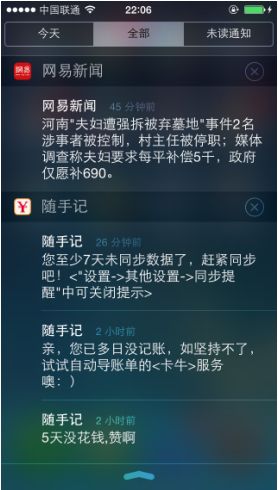
- 在通知中心中出现推送的消息
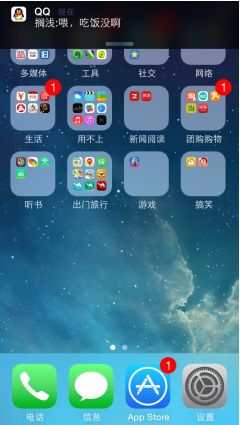
- App图标会有微标值① badgeValue
- 推送通知提示音
注意:
发送通知时,如果程序正在前台允许,那么推送通知UI就不会显示出来;点击通知系统默认会打开该App。
 -
- 
 -
- 
通知的种类:
- 通知设计模式(NSNotification)
- 本地通知(UILocalNotification)
- 远程通知(APNs)
通知设计模式:
——是一种设计模式,是一种设计思想,是抽象的,推送通知(本地和远程)是肉眼可以看到的,是有界面的。
本地推送通知:
——本地通知不需要连接网络,一般是开发人员在合适的情况下在App内发送通知,应用场景:当能够确定在某个时间时需要提醒用户。
远程通知:
——远程通知必须需要连接网络,远程推送服务又称为APNs(Apple Push Notification Services),一般是服务器端发送通知。
对于用户,通知一般是指的推送通知,即本地推送通知和远程推送通知
推送通知的代理类是: AppDelegate
推送通知的使用场景:
- 一些任务管理App,会在任务时间即将到达时,通知你该做任务了。如:提醒事项App、 电影App:电影即将开始提示用户按时到达影院。
- 聊天App:程序退出到后台或者完全退出时收到消息
- 电商App:推荐新品时
- 新闻App:推送新闻
知识准备
- (BOOL)application:(UIApplication )application didFinishLaunchingWithOptions:(NSDictionary )launchOptions :启动选项参数:当程序是通过点击应用程序图标时该参数是nil,当应用程序完全退出时,点击推送通知时该参数不为空,key为UIApplicationLaunchOptionsLocalNotificationKey
通常当用户点击通知时会做一些业务处理,如QQ在前台状态下会将提醒数字+1, 当应用程序在后台状态或完全退出状态下会打开对应的聊天窗口
本地通知的基本使用
#import "ViewController.h"

@interface ViewController ()

@end

@implementation ViewController

- (void)viewDidLoad {
    [super viewDidLoad];
}

// 简单实例:点击通知进入App
- (IBAction)postLocalNotification:(id)sender {
    UILocalNotification *localNotification = [[UILocalNotification alloc] init];
    localNotification.alertBody = @"hello, 你好啊!- alertBody + fireDate";
    localNotification.fireDate = [NSDate dateWithTimeIntervalSinceNow:3]; // 3秒钟后

    //--------------------可选属性------------------------------
    if ([[[UIDevice currentDevice] systemVersion] floatValue] >= 8.2) {
        localNotification.alertTitle = @"推送通知提示标题:alertTitle"; // iOS8.2
    }

    // 锁屏时在推送消息的最下方显示设置的提示字符串
    localNotification.alertAction = @"点击查看消息";

    // 当点击推送通知消息时,首先显示启动图片,然后再打开App, 默认是直接打开App的
    localNotification.alertLaunchImage = @"LaunchImage.png";

    // 默认是没有任何声音的 UILocalNotificationDefaultSoundName:声音类似于震动的声音
    localNotification.soundName = UILocalNotificationDefaultSoundName;

    // 传递参数
    localNotification.userInfo = @{@"type": @"1"};

    //重复间隔:类似于定时器,每隔一段时间就发送通知
//  localNotification.repeatInterval = kCFCalendarUnitSecond;

    localNotification.category = @"choose"; // 附加操作

    // 定时发送
    [[UIApplication sharedApplication] scheduleLocalNotification:localNotification];
    NSInteger applicationIconBadgeNumber =  [[UIApplication sharedApplication] applicationIconBadgeNumber] + 1;
    [[UIApplication sharedApplication] setApplicationIconBadgeNumber:applicationIconBadgeNumber];

    // 立即发送
//    [[UIApplication sharedApplication] presentLocalNotificationNow:localNotification];
}

// 示例1:简单示例:点击通知进入App
//- (IBAction)postLocalNotification:(id)sender {
//    UILocalNotification *localNotification = [[UILocalNotification alloc] init];
//    localNotification.alertBody = @"hello, 你好啊!- alertBody + fireDate";
//    localNotification.fireDate = [NSDate dateWithTimeIntervalSinceNow:5]; // 5秒钟后
//
//    [[UIApplication sharedApplication] scheduleLocalNotification:localNotification];
//}
@end
#import "AppDelegate.h"
#import "AppDelegate+PrivateMethod.h"
@interface AppDelegate ()
@end
@implementation AppDelegate
- (BOOL)application:(UIApplication *)application didFinishLaunchingWithOptions:(NSDictionary *)launchOptions {
// Override point for customization after application launch.
if (launchOptions != nil) {
UILocalNotification *localNotification = launchOptions[UIApplicationLaunchOptionsLocalNotificationKey];
if (localNotification != nil) {
// 程序完全退出状态下,点击推送通知后的业务处理
// 如QQ会打开想对应的聊天窗口
NSInteger applicationIconBadgeNumber = application.applicationIconBadgeNumber - 1;
application.applicationIconBadgeNumber = applicationIconBadgeNumber >= 0 ? applicationIconBadgeNumber : 0;
}
}
[self registerUserNotificationSettingsForIOS80];
return YES;
}
// 当App在前台状态下,如果有通知会调用该方法
// 当应用程序在后台状态下,点击推送通知,程序从后台进入前台后,会调用该方法(从锁屏界面点击推送通知从后台进入前台也会执行)
// 当应用程序完全退出时不调用该方法
- (void)application:(UIApplication *)application didReceiveLocalNotification:(nonnull UILocalNotification *)notification {
NSLog(@"%@", notification);
// 处理点击通知后对应的业务
UIApplicationState applicationState = [[UIApplication sharedApplication] applicationState];
if (applicationState == UIApplicationStateActive) { // 前台
// 例如QQ会增加tabBar上的badgeValue未读数量
} else if (applicationState == UIApplicationStateInactive) {// 从前台进入后台
// 例如QQ会打开对应的聊天窗口
NSInteger applicationIconBadgeNumber = application.applicationIconBadgeNumber - 1;
application.applicationIconBadgeNumber = applicationIconBadgeNumber >= 0 ? applicationIconBadgeNumber : 0;
}
[application cancelLocalNotification:notification];
}
// 监听附加操作按钮
- (void)application:(UIApplication *)application handleActionWithIdentifier:(nullable NSString *)identifier forLocalNotification:(nonnull UILocalNotification *)notification completionHandler:(nonnull void (^)())completionHandler {
NSLog(@"identifier:%@", identifier);
completionHandler();
}
// 该方法在iOS9.0后调用,iOS9.0之前调用上面那个方法
- (void)application:(UIApplication *)app handleActionWithIdentifier:(nullable NSString *)identifier forLocalNotification:(nonnull UILocalNotification *)notification withResponseInfo:(nonnull NSDictionary *)responseInfo completionHandler:(nonnull void (^)())completionHandler {
// ====identifier:no, content:{UIUserNotificationActionResponseTypedTextKey = "not agree";}
NSLog(@"====identifier:%@, content:%@", identifier, responseInfo);
completionHandler();
}
@end#import "AppDelegate.h"
@interface AppDelegate (PrivateMethod)
- (void)registerUserNotificationSettingsForIOS80;
@end
#import "AppDelegate+PrivateMethod.h"
@implementation AppDelegate (PrivateMethod)
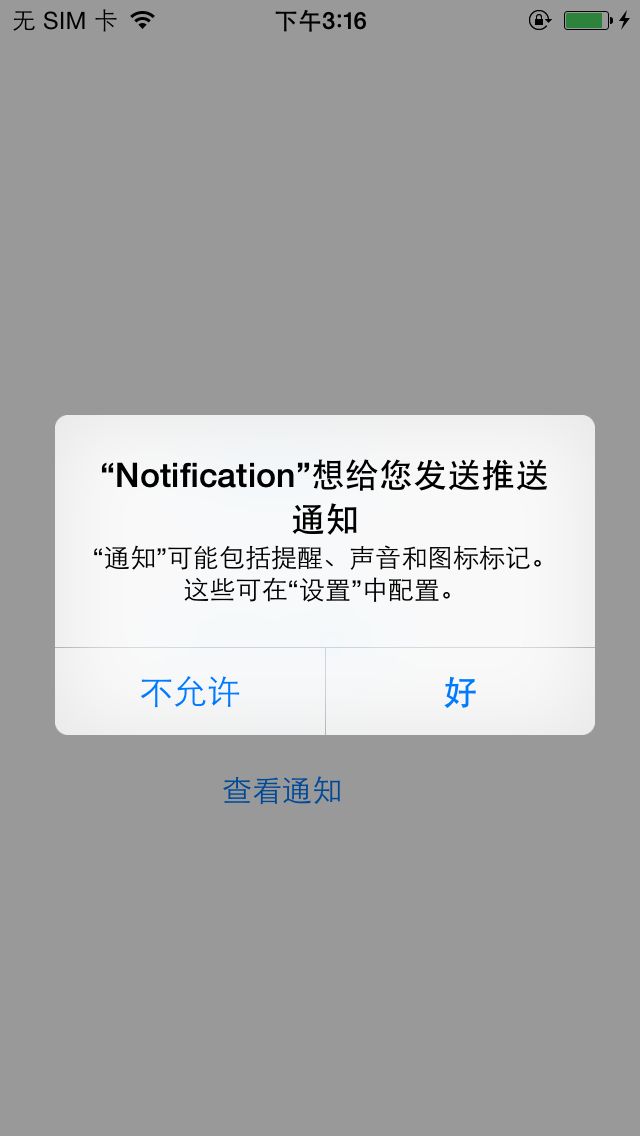
- (void)registerUserNotificationSettingsForIOS80 {
// iOS8.0 适配
if ([[UIApplication sharedApplication] respondsToSelector:@selector(registerUserNotificationSettings:)]) {
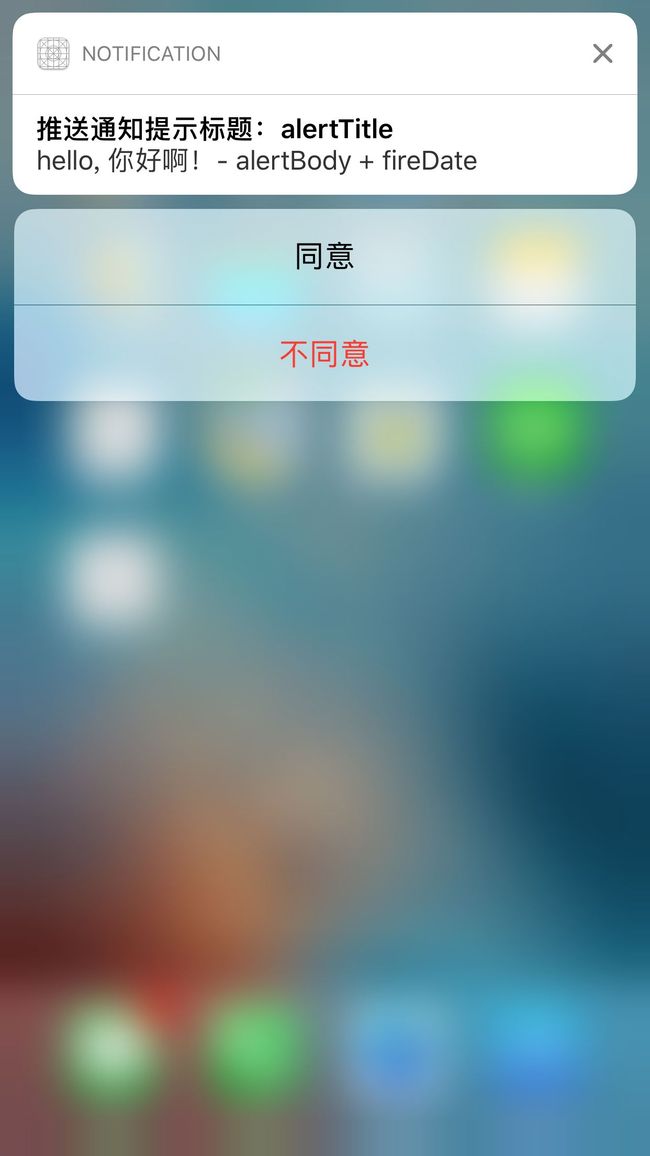
// categories: 推送消息的附加操作,可以为nil,此时值显示消息,如果不为空,可以在推送消息的后面增加几个按钮(如同意、不同意)
UIMutableUserNotificationCategory *category = [[UIMutableUserNotificationCategory alloc] init];
category.identifier = @"choose";
// 同意
UIMutableUserNotificationAction *action1 = [[UIMutableUserNotificationAction alloc] init];
action1.identifier = @"yes";
action1.title = @"同意";
action1.activationMode = UIUserNotificationActivationModeForeground; // 点击按钮是否进入前台
action1.authenticationRequired = true;
action1.destructive = false;
// 不同意
UIMutableUserNotificationAction *action2 = [[UIMutableUserNotificationAction alloc] init];
action2.identifier = @"no";
action2.title = @"不同意";
action2.activationMode = UIUserNotificationActivationModeBackground; // 后台模式,点击了按钮就完了
action2.authenticationRequired = true;
action2.destructive = true;
if ([[[UIDevice currentDevice] systemVersion] floatValue] >= 9.0) {
action2.behavior = UIUserNotificationActionBehaviorTextInput;
action2.parameters = @{UIUserNotificationTextInputActionButtonTitleKey: @"拒绝原因"};
}
[category setActions:@[action1, action2] forContext:UIUserNotificationActionContextDefault];
NSSet *categories = [NSSet setWithObjects:category, nil];
UIUserNotificationType types = UIUserNotificationTypeBadge | UIUserNotificationTypeSound | UIUserNotificationTypeAlert;
UIUserNotificationSettings *notificationSettings = [UIUserNotificationSettings settingsForTypes:types categories:categories];
[[UIApplication sharedApplication] registerUserNotificationSettings:notificationSettings];
}
}
@end
运行效果:


—————远程推送通知—————
什么是远程推送通知
- 从远程服务器推送给客户端的通知,需要连接网络
- 远程推送服务,又称为APNs 苹果推送通知服务(Apple Push Notification services)
传统推送通知
传统推送通知是相对于APNs而言的,传统推送通知的原理是:当APP打开时和App的服务器建立一个长连接(需要网络),当需要通知的时候,App服务器通过长连接向对应的客户端发送数据,当客户端接收到数据时使用UILocalNotfication本地通知的方式来展示,这样就实现了传统推送通知。
传统推送通知必须要联网,如果关闭了App或者打开了App但是无法连接服务器了,这些情况都收不到通知了。
APNs远程推送通知:只要手机联网了,不管App是打开或者关闭都能接收到苹果服务器推送的通知
APNs
- 所有苹果设备在联网状态下都会与苹果服务器建立长连接,连接是双向的,苹果设备可以向苹果服务器发送请求,苹果服务器也可以向苹果设备发送请求。
苹果服务器常用的通知功能:
- 时间校准
- 系统升级
- 查找我的iPhone
长连接的好处:更加及时
远程通知的过程:
例如微信App:首先每个联网并打开微信的App都与微信服务器有一个长连接,当微信A用户向微信B用户发送一个消息时,微信A用户将消息发送到微信服务器,然后微信服务器判断微信B用户是否和微信服务器建立了长连接,如果有直接通过微信B用户和微信服务器建立的连接管道直接发送即可,这样微信B用户就能收到消息;如果微信B用户此时没有打开微信App,那么微信服务器就将消息发送给苹果服务器,苹果服务器再讲消息发送到某台苹果设备上。苹果是怎么知道该发送给那台设备呢?用户A发送消息时需要将用户B的UDID和微信App的Bundle ID 附带在消息上一块发送给B用户,这些消息微信服务器又发送给苹果服务器,苹果服务器通过UDID就知道发送给那台设备了,然后通过Bundle ID就知道是哪个App发送的了。苹果根据UDID + Bundle ID 生成一个deviceToken, 这样每条微信消息中都加上deviceToken苹果服务器就能识别设备和App了。
例如 微信A用户发送消息:{“to”:”1234567”, “msg”:”hello”} ——-》微信服务器{“deviceToken”:”RSFWERWR23L342JOI2NLMO2H4”, “to”:”1234567”, “msg”:”hello”} —–》APNs服务器 ——》微信B用户
deviceToken 在客户端发送之前就请求???
实现步骤:
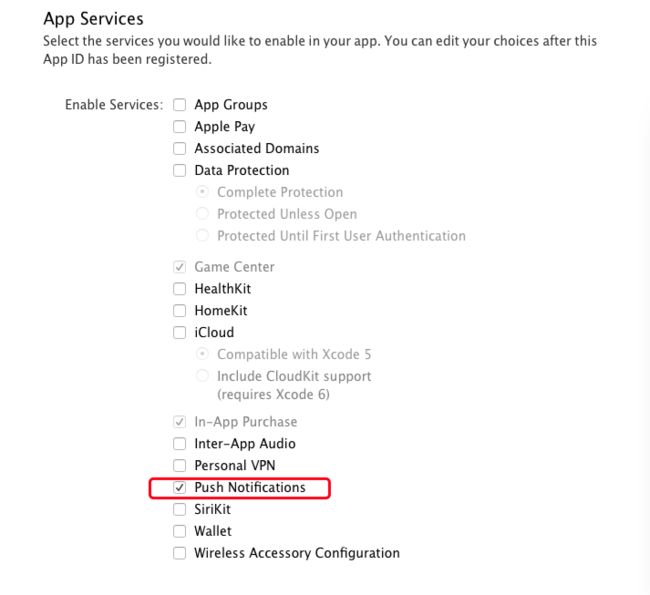
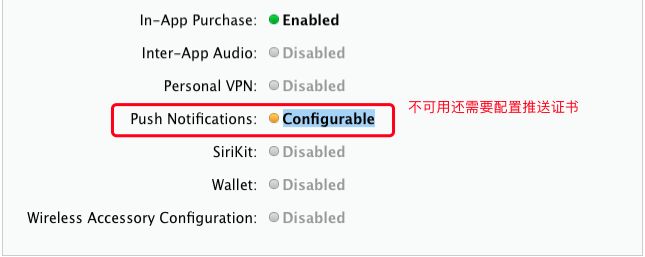
- 创建真机调试证书并配置推送证书文件:apns_development.cer和描述文件
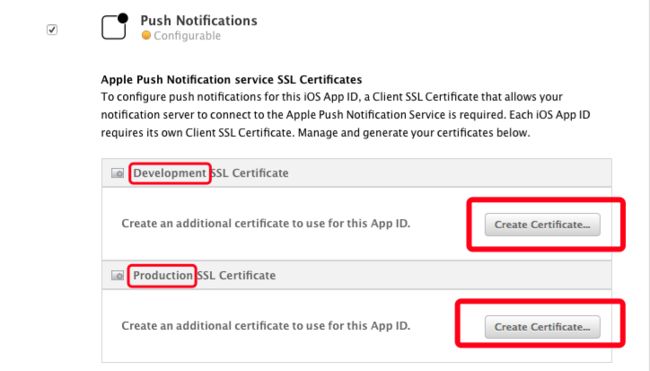
- 首先创建真机证书、AppIDs(要选择Push Notifications), AppIDs创建完后可以看到状态是Configurable,是黄色的圆点,此时还不能使用推送通知,还要继续配置一下,选择Edit–>Push Notifications—> Create Certificate(创建推送通知证书),当证书创建完成后,可以看到AppID中的状态就变成了绿色的圆点(可用状态)


- 首先创建真机证书、AppIDs(要选择Push Notifications), AppIDs创建完后可以看到状态是Configurable,是黄色的圆点,此时还不能使用推送通知,还要继续配置一下,选择Edit–>Push Notifications—> Create Certificate(创建推送通知证书),当证书创建完成后,可以看到AppID中的状态就变成了绿色的圆点(可用状态)
- 请求苹果服务器获取deviceToken
- 发送deviceToken给App的服务器
- 监听用户点击远程推送通知的行为
当配置App IDs时需要选择Push Notifications,然后Edit,Create Certificate(创建证书),然后闯将证书选择Apple Push Notification servide SSL(Sandbox)
获取deviceToken:
- (BOOL)application:(UIApplication *)application didFinishLaunchingWithOptions:(NSDictionary *)launchOptions {
    NSDictionary *dictionary = [launchOptions objectForKey:UIApplicationLaunchOptionsRemoteNotificationKey];

    // 程序完全退出,点击通知[launchOptions objectForKey:UIApplicationLaunchOptionsRemoteNotificationKey]有值,
    UITextView *textView = [[UITextView alloc] initWithFrame:CGRectMake(0, 0, 300, 300)];
    textView.text = dictionary.description;
    [self.window.rootViewController.view addSubview:textView];
    if (dictionary != nil) {
        // 处理程序完全退出时,点击推送通知
    }


    if ([[[UIDevice currentDevice] systemVersion] floatValue] > 8.0) {
        UIUserNotificationType types = UIUserNotificationTypeBadge | UIUserNotificationTypeAlert | UIUserNotificationTypeSound;
        UIUserNotificationSettings *settings = [UIUserNotificationSettings settingsForTypes:types categories:nil];
        [[UIApplication sharedApplication] registerUserNotificationSettings:settings];

        [[UIApplication sharedApplication] registerForRemoteNotifications];
    } else {
        UIRemoteNotificationType types = UIRemoteNotificationTypeBadge | UIRemoteNotificationTypeAlert | UIRemoteNotificationTypeSound;
        [[UIApplication sharedApplication] registerForRemoteNotificationTypes:types];
    }


    return YES;
}

- (void)application:(UIApplication *)application didRegisterForRemoteNotificationsWithDeviceToken:(nonnull NSData *)deviceToken {
    // <37d1dd32 c19a22a0 066cf575 013f968b a89f80b8 2780dd06 be8af24c 521d0c4d>
    NSLog(@"deviceToken: %@", deviceToken);
}

// 我使用的iOS10.0.3,锁屏和从后台进入前台会调用该方法,在前台调用下面那个方法,程序完全退出时这两个方法都不调用,可以通过判断launchOptions 中的键是否有值来判断,这里使用的是iOS10.0.3,好像不同系统这几种状态调用那个方法不一样???
- (void)application:(UIApplication *)application didReceiveRemoteNotification:(nonnull NSDictionary *)userInfo {
    NSLog(@"从后台进入前台、锁屏界面 这两种情况会调用该方法");
}

// 前台
// 该方法需要设置Background Modes --> Remote Notifications
- (void)application:(UIApplication *)application didReceiveRemoteNotification:(nonnull NSDictionary *)userInfo fetchCompletionHandler:(nonnull void (^)(UIBackgroundFetchResult))completionHandler {

    NSLog(@"didReceiveRemoteNotification");
    [_window.rootViewController.view addSubview:[[UISwitch alloc] init]];
    completionHandler(UIBackgroundFetchResultNewData);
}

@end
第三方PushMeBaby: 用于模拟自己的APP服务器,服务器发送格式:
{
“apns”: {
“alert”: “This is some fancy message.”,
“badge”: 1,
“content-available”: “xxx” // 可选,不是必须的
}
}


上面那个代理方法都是用户点击通知以后才会调用,如果想一收到消息(用户还没点击通知)就会调用该方法,需要有3个条件
1. 设置Background Modes –> Remote Notifications
2. 在代理方法中调用代码块 completionHandler(UIBackgroundFetchResultNewData);
3. App服务器发送数据时要增加一个”content-available”字段,值随意写
满足以上三个条件,当接收到通知时立即会调用代理方法
极光推送JPush
上面测试是使用第三放PushMeBaby来模拟自己App对应的服务器,PushMeBaby用于将消息发送给苹果哦服务器,实际开发中可定不能使用这种方式,要么自己搭建自己的推送服务器和苹果服务器进行交换,要么使用其他第三方平台服务,第三方实现的更加方便、更加完善
远程推送:是指服务器向客户端发送消息。
即时通讯:是用户向用户发送消息。
集成步骤
http://docs.jiguang.cn/jpush/client/iOS/ios_sdk/
https://community.jiguang.cn/t/jpush-ios-sdk/4247