JavaWeb传输文件流到Django
实现内容:
1、使用Springboot搭建JavaWeb项目,上传文件(图片)到后台,后台进行转码(Base64)
2、通过HTTPURLConnection向PythonWeb(Django)发送POST请求,文件放入输出流中
3、Django获得请求将流转成图片文件保存在本地,并返回一个结果给Java端
Java代码:https://github.com/Damionew/djangojava.git
Django代码:https://github.com/Damionew/djangodemo.git
JavaWeb
一:前台部分:
jQuery半透明注册表单 - 站长素材
人脸注册
二:后台部分
import java.io.BufferedReader;
import java.io.IOException;
import java.io.InputStream;
import java.io.InputStreamReader;
import java.io.OutputStream;
import java.io.OutputStreamWriter;
import java.net.HttpURLConnection;
import java.net.URL;
import java.net.URLConnection;
import org.springframework.stereotype.Controller;
import org.springframework.ui.Model;
import org.springframework.web.bind.annotation.RequestMapping;
import org.springframework.web.bind.annotation.RequestMethod;
import org.springframework.web.bind.annotation.RequestParam;
import org.springframework.web.bind.annotation.ResponseBody;
import org.springframework.web.multipart.MultipartFile;
import com.alibaba.fastjson.JSONObject;

import sun.misc.BASE64Encoder;

/**
 * 百度AI人脸识别
 *
 * @author yinyunqi
 *
 */
@Controller
public class FaceController {

	/**
	 * 跳转到页面
	 * @param model
	 * @return
	 */
	@RequestMapping("/faceReg")
	public String faceRegIndex(Model model) {
		return "faceReg";
	}

	/**
	 * 接收文件并处理
	 * @param file
	 * @return 返回处理后的结果
	 * @throws Exception
	 */
	@ResponseBody
	@RequestMapping(value = "/face/reg/file", headers = "content-type=multipart/*", method = RequestMethod.POST)
	public String FaceRegFile(@RequestParam("file") MultipartFile file) throws Exception{
		// 转二进制
		byte[] bytes = null;
		try {
			bytes = file.getBytes();
		} catch (IOException e) {
			e.printStackTrace();
		}
		// 转码
		@SuppressWarnings("restriction")
		// 注意导入import sun.misc.BASE64Encoder;
		String sendStr = new BASE64Encoder().encode(bytes);
		// Django接口地址
		String url = "http://localhost:8000/index/";
		URL u = new URL(url);
		// 打开URL连接
		URLConnection rulConnection = u.openConnection();
		HttpURLConnection httpURLConnection = (HttpURLConnection) rulConnection;
		// 设置URL参数。注:HttpURLConnection默认setDoOutput=false,关闭向请求中写数据
		httpURLConnection.setDoOutput(true);
        httpURLConnection.setRequestMethod("POST");
        httpURLConnection.setRequestProperty("Content-Type", "application/x-www-form-urlencoded");
        // 输出流
        OutputStream outputStream = null;
        OutputStreamWriter outputStreamWriter = null;
        // 输入流
        InputStream inputStream = null;
        InputStreamReader inputStreamReader = null;
        BufferedReader reader = null;
        StringBuffer resultBuffer = new StringBuffer();
        String tempLine = null;

        try {
            outputStream = httpURLConnection.getOutputStream();
            outputStreamWriter = new OutputStreamWriter(outputStream);
            // 向请求中写数据
            outputStreamWriter.write(sendStr.toString());
            outputStreamWriter.flush();
            // 连接返回值大于300为请求失败
            // 注意如果返回结果是403,需要到Django项目中将settings下MIDDLEWARE中csrf注释掉
            if (httpURLConnection.getResponseCode() >= 300) {
                throw new Exception("HTTP Request is not success, Response code is " + httpURLConnection.getResponseCode());
            }
         //  接收响应流
         inputStream = httpURLConnection.getInputStream();
         inputStreamReader = new InputStreamReader(inputStream);
         // 读取流
         reader = new BufferedReader(inputStreamReader);
         while ((tempLine = reader.readLine()) != null) {
        	 // 将每行读取到的数据添加到StringBuffer中
             resultBuffer.append(tempLine);
         }
         System.out.println(resultBuffer.toString());
         // 将结果返回给前台
         JSONObject object = new JSONObject();
         object.put("result", resultBuffer.toString());
         return object.toJSONString();
        } finally {
            // 关关关关
            if (outputStreamWriter != null) {
                outputStreamWriter.close();
            }

            if (outputStream != null) {
                outputStream.close();
            }

            if (reader != null) {
                reader.close();
            }

            if (inputStreamReader != null) {
                inputStreamReader.close();
            }
            if (inputStream != null) {
                inputStream.close();
            }
        }
	}
}
Django(接口部分),按请求处理的顺序-。-,
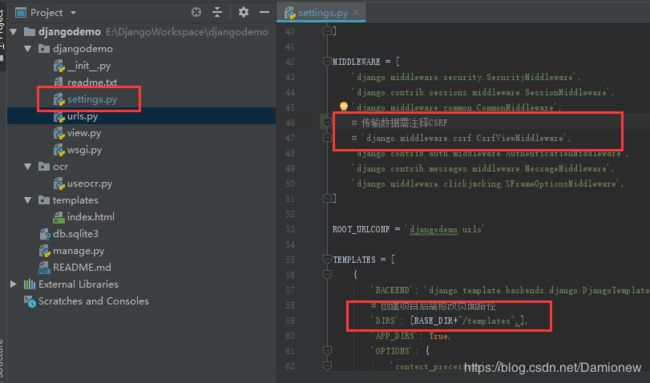
一:Django项目配置:settings中
1、传输数据时需要将MIDDLEWARE内的 Csrf 注释掉
2、有页面文件需要将TEMPLATES内的DIRS修改一下,到指定文件夹,比如到templates文件夹下:[BASE_DIR+"/templates",]
二:urls.py文件中需要添加一个url来处理请求
"""
绑定URL与视图函数
"""
from django.conf.urls import url
from djangodemo.view import index


urlpatterns = [
    # url(正则表达式,调用的方法)
    url(r'^index/', index)
]
三:views.py视图方法
"""
视图对象
"""
from django.http import HttpResponse
import base64
import datetime
import ocr.useocr as aa
def hello(request):
    # 相当于Spring中RequestMapping、ResponseBody返回json字符串
    return HttpResponse("Hello world ! ")

def index(request):
    # 相当于Spring中RequestMapping返回页面
    # return render(request, 'index.html')
    # print(request.body)
    # 请求中获取到的流为Base64编码
    imgBase64 = request.body
    # 解码
    img = base64.b64decode(imgBase64)
    # 根据当前时分秒对文件命令(懒)
    filename = datetime.datetime.now().strftime('%H%M%S')+'.jpg';
    # 打开一个文件对象
    file = open(filename,'wb')
    # 写入文件
    file.write(img)
    file.close()
    # 这里调用了Google的图片识别pytesseract
    result = str(aa.ocrtest(filename))
    print(result)
    # 识别结果返回给请求
    return HttpResponse('图片识别结果:'+result)
四:pytesseract进行图片识别
from PIL import Image
import pytesseract

def ocrtest(filename):
    im = Image.open(filename)  # 用pil打开这个图片
    im = im.convert('L')
    text = pytesseract.image_to_string(im,"chi_sim")
    return text
尝试了一下,如果pytesseract识别不准确,是因为直接调用了pytesseract.image_to_string方法,
如果先将图片进行PIL处理,再调用,识别效果会提高很多,
另外如果对他二值化(只留黑白色),对分辨率的图片可能效果很差
另外在安装的时候需要注意,如果报以下错误
pytesseract.pytesseract.TesseractNotFoundError: C:\Program Files (x86)\Tesseract-OCR esseract.exe is not installed or it's not in your path
请到python目录下比如:
E:\Python\Python37\Lib\site-packages\pytesseract\pytesseract.py
将tesseract_cmd修改为pytesseract安装目录
tesseract_cmd = 'C:/Program Files (x86)/Tesseract-OCR/tesseract.exe'
注意:斜杠的方向!!!!!
效果:
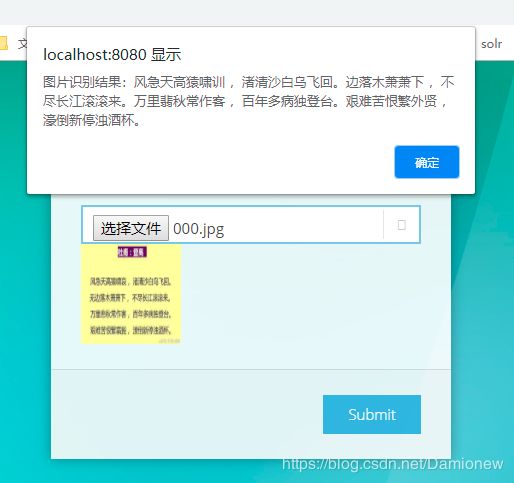
图片使用杜甫的《登高》,
另外pom.xml文件:
	4.0.0

		org.springframework.boot
		spring-boot-starter-parent
		2.1.1.RELEASE


	com.django
	djangojava
	0.0.1-SNAPSHOT
	djangojava
	Demo project for Spring Boot


		1.8


			org.springframework.boot
			spring-boot-starter


			org.springframework.boot
			spring-boot-starter-web


			org.springframework.boot
			spring-boot-devtools
			provided
			true


			com.alibaba
			fastjson
			1.2.47


			org.springframework.boot
			spring-boot-starter-thymeleaf


			org.springframework.boot
			spring-boot-starter-tomcat
			provided


				org.springframework.boot
				spring-boot-maven-plugin