ionic插件基础(五)——自定义插件流程详解
ionic的plugin子命令,只是给JS开发者来add/remove编写好的插件。比如Cordova和ngCordova都提供了大部分的插件供我们使用。如果我们想实现的功能并没有现成的插件使用,这时候就需要我们自定义插件了
自定义插件开发步骤
安装plugman
若我们需要自己编写自己的插件,则可以使用额外的一个叫做plugman的工具, 该工具可直接通过npm来安装。
npm install -g plugman使用plugman的好处就是会自动帮我们生成一套代码框架,而不需要我们再自己一个个建立文件
生成插件框架
安装成功后,就可以使用plugman命令来自动生成插件代码框架,避免手工建立和输入代码文件的工作:
plugman create --name <pluginName> --plugin_id <pluginID> --plugin_version 0.0.1- pluginName: 插件名称(在当前文件夹下生成项目目录)
- pluginID:插件的唯一标识生成插件的唯一标识
这里我们使用该语句生成一个插件框架:
plugman create --name MyPlugin --plugin_id com.test.helloworld --plugin_version 0.0.1之后就可以发现在目录下生成了MyPlugin文件夹。
生成插件的这个语句并不需要在我们ionic项目目录下使用,随便一个目录下生成即可,到时候我们ionic项目需要使用该插件时再使用命令安装我们生成的这个插件就行了
此时我们的插件目录如下:
此时的plugin.xml文件内容如下:(后面再解释这些文件)
<plugin id="com.test.helloworld" version="0.0.1" xmlns="http://apache.org/cordova/ns/plugins/1.0" xmlns:android="http://schemas.android.com/apk/res/android">
    <name>MyPluginname>
    <js-module name="MyPlugin" src="www/MyPlugin.js">
        <clobbers target="cordova.plugins.MyPlugin" />
    js-module>
plugin>
添加平台支持
进入插件目录,运行相应的平台支持命令,就可以支持我们需要的平台,命令如下:
plugman platform add --platform_name android (Andriod)
plugman platform add --platform_name ios    (iOS)
这里我们给我们之前生成的插件添加Android平台的支持:
cd MyPlugin
plugman platform add --platform_name android
这时我们就已经添加了对Android平台的支持。
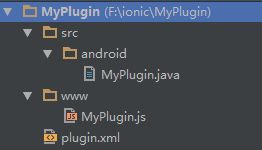
我们看下此时目录结构如下:
可以发现当我们添加了平台支持后,/src目录下就多了相应平台的文件夹。
现在我们先分析下各个文件的内容:
plugin.xml
通知CLI哪个平台应该从什么地方Copy哪些文件到什么地方,以及CLI在生成config.xml时应该根据平台加入什么样的特殊设置。
当执行ionic plugin add命令时会解析该文件。
<plugin id="com.test.helloworld" version="0.0.1"
        xmlns="http://apache.org/cordova/ns/plugins/1.0"
        xmlns:android="http://schemas.android.com/apk/res/android">
    <name>MyPluginname>
    <js-module name="MyPlugin" src="www/MyPlugin.js">
        <clobbers target="cordova.plugins.MyPlugin" />
    js-module>


    <platform name="android">
        <config-file parent="/*" target="res/xml/config.xml">
            <feature name="MyPlugin">
                <param name="android-package" value="com.test.helloworld.MyPlugin" />
            feature>
        config-file>
        <config-file parent="/*" target="AndroidManifest.xml">

        config-file>
        <source-file src="src/android/MyPlugin.java" target-dir="src/com/test/helloworld/MyPlugin" />
    platform>
plugin>- id: 插件的标识,即发布安装到plugin 的 ID
- name:插件的名称
- js-module:对应我们的 javascript 文件,src 属性指向 www/MyPlugin.js
- platform:支持的平台,这里仅仅用到了 android
其中:
<platform name="android">
        <config-file parent="/*" target="res/xml/config.xml">
            <feature name="MyPlugin">
                <param name="android-package" value="com.test.helloworld.MyPlugin" />
            feature>
        config-file>
        <config-file parent="/*" target="AndroidManifest.xml">

        config-file>
        <source-file src="src/android/MyPlugin.java" target-dir="src/com/test/helloworld/MyPlugin" />

    platform>
这里是插件的配置信息,最后会添加到 res/xml/config.xml 文件中,并且将我们的 src/android/MyPlugin.java,复制到 android 的 package 包(src/com/test/helloworld/MyPlugin)中。
MyPlugin.js
var exec = require('cordova/exec');

exports.coolMethod = function(arg0, success, error) {
    exec(success, error, "MyPlugin", "coolMethod", [arg0]);
};
exec(success, error, “MyPlugin”, “coolMethod”, [arg0])这个语句的语法如下:
cordova.exec(function(winParam) {},
             function(error) {},
             "service",
             "action",
["firstArgument", "secondArgument", 42, false]);function(winParam){}:成功的回调函数。如果你的exec成功的执行,这个success函数就会随着你传过去的参数一起执行。function(error) {}:失败的回调。如果操作没有成功的完成执行,这个函数会与一个可选的error参数一起执行。service:与原生端的类名保持一致,上面我们原生端的类时MyPlugin.java,所以这里是“MyPlugin”。action:对应原生类的方法的入参。[/* arguments */]:一组传到原生环境的参数。
MyPlugin.java
package com.test.helloworld;

import org.apache.cordova.CordovaPlugin;
import org.apache.cordova.CallbackContext;

import org.json.JSONArray;
import org.json.JSONException;
import org.json.JSONObject;

/**
 * This class echoes a string called from JavaScript.
 */
public class MyPlugin extends CordovaPlugin { //必须继承CordovaPlugin

    @Override
    public boolean execute(String action, JSONArray args, CallbackContext callbackContext) throws JSONException {
        if (action.equals("coolMethod")) {
            String message = args.getString(0);
            this.coolMethod(message, callbackContext);
            return true;
        }
        return false;
    }

    private void coolMethod(String message, CallbackContext callbackContext) {
        if (message != null && message.length() > 0) {
            callbackContext.success(message);//成功的回调函数
        } else {
            callbackContext.error("Expected one non-empty string argument.");//失败的回调函数
        }
    }
}
其中
public boolean execute(String action, JSONArray args, CallbackContext callbackContext) throws JSONException {}action对应我们exec传过来的actionargs对应我们传过来的那个参数数组callbackContext:对应我们传过来的回调函数
这里是不是想起了之前介绍插件原理时的一张图:
安装插件
当我们编写好自己的插件代码之后就可以在项目中安装我们的插件了。这时我们的插件就跟其他编写好的插件差不多了。
上面自动生成的插件并没有什么实际用处,后面会举一个稍微有点实际意义的例子,这里我们先把自定义插件的流程走一遍
进入我们想要装插件的项目的根目录,运行以下命令:
ionic plugin add 你插件的存储路径运行完成后,我们的插件就装到我们的项目中了。
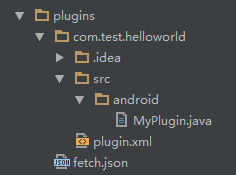
这里是我的操作截图:
我们的plugins/目录下存在了我们自定义的插件:
在ionic项目中调用你的插件
在需要调用Android接口的地方加上JS代码,就跟之前介绍的插件使用方法类似,具体的在后面的例子中说明。
编译运行你的项目
ionic build android
ionic run android
到这里我们自定义插件的使用编写流程就已经走了一遍了。下一篇文章我们结合具体的例子来加深理解。
本文参考了:
- http://www.ioniconline.com/plugin-dev-android/
- http://www.ionic.ren/2015/11/26/ionic%E5%AE%9E%E7%94%A8%E5%8A%9F%E8%83%BD%E4%B8%89-%E7%BC%96%E5%86%99cordova%E6%8F%92%E4%BB%B6plugin/
- http://cordova.apache.org/docs/en/latest/guide/hybrid/plugins/index.html


