Ansible之Playbook使用
一、Playbook是什么
playbook-剧本(也称编排) 介绍
playbooks是 一个不同于使用Ansible命令行执行方式的模式,其功能更强大灵活。简单来说,playbook是一个非常简单的配置管理和多主机部署系统,不同于任何已经存在的模式,可作为一个适合部署复杂应用程序的基础。Playbook可以定制配置,可以按照指定的操作步骤有序执行,支持同步和异步方式。我们完成一个任务,例如安装部署一个httpd服务,我们需要多个模块(一个模块也可以称之为task)提供功能来完成。而playbook就是组织多个task的容器,他的实质就是一个文件,有着特定的组织格式,它采用的语法格式是YAML(Yet Another Markup Language)。YAML语法能够简单的表示散列表,字典等数据结构。具体请参考YAML详细语法。
YAML基本语法
列表:每一个列表成员前面都要有一个短横线和一个空格。
fruits:
- Apple
- Orange
- Strawberry
- Mango或者:
fruits: ['Apple', 'Orange', 'Strawberry', 'Mango']
字典:每一个成员由键值对组成,注意冒号后面要有空格。
martin:
name: Martin D'vloper
job: Developer
skill: Elite
或者
martin: {name: Martin D'vloper, job: Developer, skill: Elite}
列表和字典可以混合使用
- martin:
name: Martin D'vloper
job: Developer
skills:
- python
- perl
- pascal
- tabitha:
name: Tabitha Bitumen
job: Developer
skills:
- lisp
- fortran
- erlang
二、playbook基础组件
- hosts:运行执行任务(task)的目标主机
- remote_user:在远程主机上执行任务的用户
- tasks:任务,由模板定义的操作列表
- handlers:任务,与tasks不同的是只有在接受到通知(notify)时才会被触发
- templates:模板,使用模板语言的文本文件,使用jinja2语法。
- variables:变量,变量替换{{ variable_name }}
- roles:角色
hosts:用于指定要执行指定任务的主机,须事先定义在主机清单中。
示例:
- hosts: websrvs
remote_user:执行身份
(1)可用于hosts和task中。
(2)通过指定其通过sudo的方式在远程主机上执行任务,其可用于play全局或某任务。
(3)可以在sudo时使用sudo_user指定sudo时切换的用户
示例:
- hosts: websrvs
remote_user: root
tasks:
- name: test connection
ping:
remote_user: fz.hou
sudo: yes #默认sudo为root
sudo_user:fl #sudo为fl
task:任务列表
格式:
(1) action: module arguments
(2) module: arguments 建议使用
注意:shell和command模块后面跟命令,而非key=value
示例:
tasks:
- name: disable selinux
command: /sbin/setenforce 0
notify与handlers:
某任务的状态在运行后为changed时,可通过“notify”通知给相应的handlers,继而执行handlers之后的命令。
tags:标签
任务可以通过”tags“打标签,而后可在ansible-playbook命令上使用-t指定进行调用
注意:如果多个任务标签相同,标签被调用时,任务都会被执行。
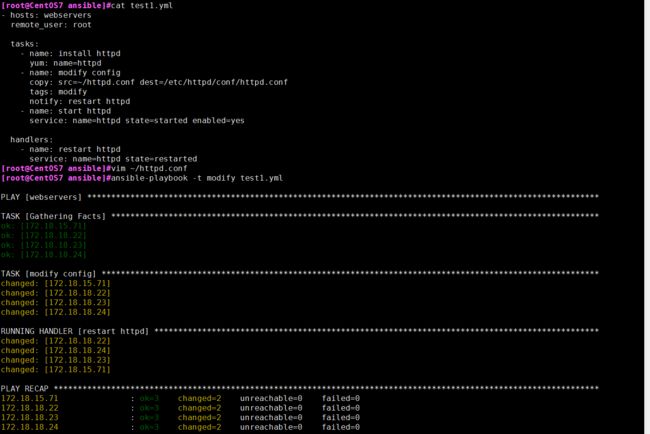
示例:安装httpd,修改httpd配置文件,并重启服务。
- hosts: webservers
remote_user: root
tasks:
- name: install httpd
yum: name=httpd
- name: modify config
copy: src=~/httpd.conf dest=/etc/httpd/conf/httpd.conf
tags: modify
notify: restart httpd
- name: start httpd
service: name=httpd state=started enabled=yes
handlers:
- name: restart httpd
service: name=httpd state=restarted
示例结果:
注意:如果命令或脚本的退出码不为零,可以使用如下方式替代:
tasks:
- name: run this command and ignore the result
shell: /usr/bin/somecommand || /bin/true
或者使用ignore_errors来忽略错误信息:
tasks:
- name: run this command and ignore the result
shell: /usr/bin/somecommand
ignore_errors: True
运行playbook
运行playbook的方式
ansible-playbook
常见选项
–check 只检测可能会发生的改变,但不真正执行操作
–list-hosts 列出运行任务的主机
–limit 主机列表 只针对主机列表中的主机执行
-v 显示过程 -vv -vvv 更详细
playbook变量
变量名:仅能由字母、数字和下划线组成,且只能以字母开头
变量来源:
1、ansible setup facts 远程主机的所有变量都可直接调用
示例:
ansible myhosts -m setup -a 'filter=ansible_nodename'
filter是用来匹配后面的字符串,可以使用正则表达式。
也可以使用grep过滤,-C选项查看上下文三行。
示例结果:

2、在/etc/ansible/hosts中定义
普通变量:主机组中主机单独定义,优先级高于公共变量
公共(组)变量:针对主机组中所有主机定义统一变量
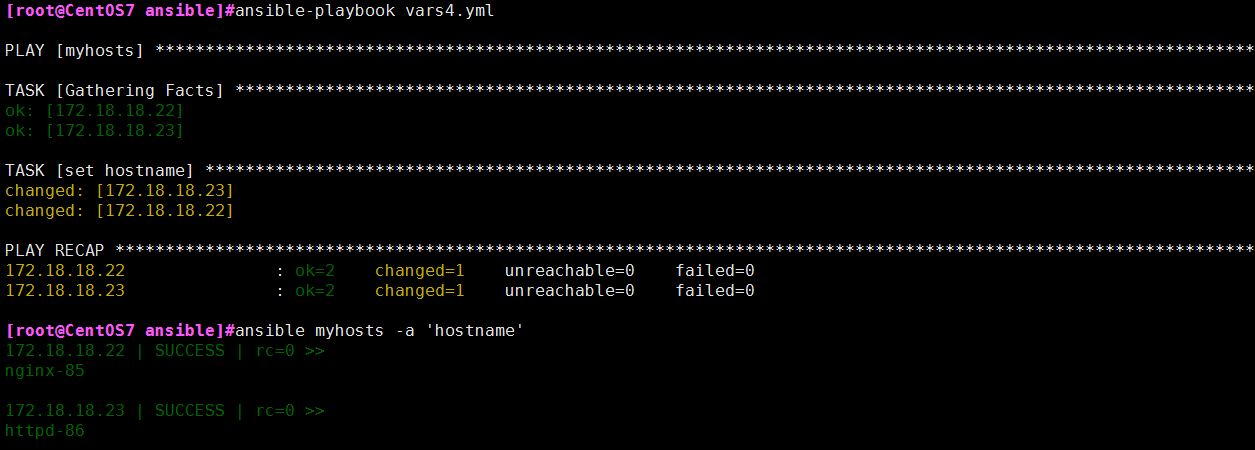
普通变量示例:在/etc/ansible/hosts文件中定义
[myhosts]
172.18.18.22 http_port=85 hname=nginx
172.18.18.23 http_port=86 hname=httpd
编写playbook:
cat /root/ansible/vars4.yml
---
- hosts: myhosts
remote_user: root
tasks:
- name: set hostname
hostname: name={{ hname }}-{{ http_port }}
示例结果:
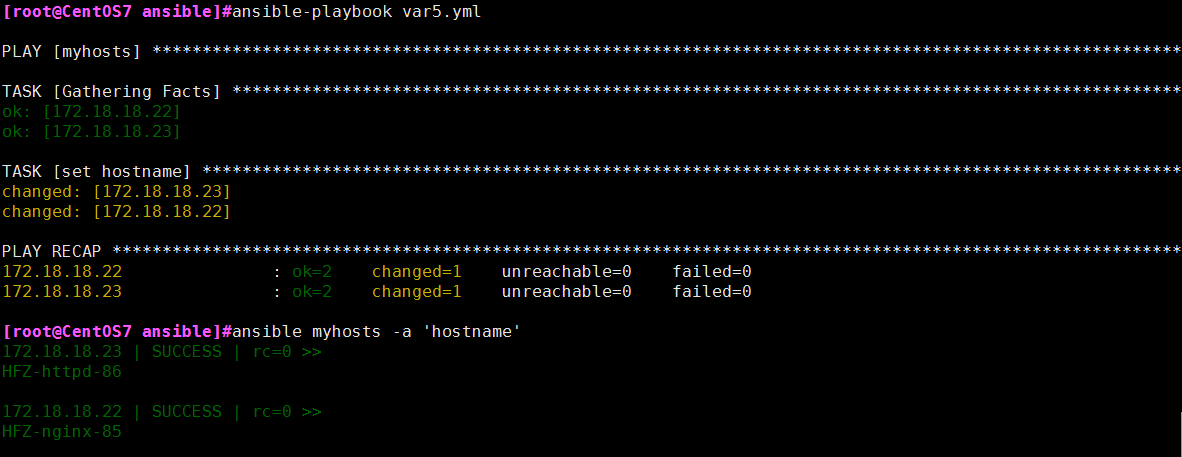
公共(组)变量示例:在/etc/ansible/hosts文件中定义
[myhosts:vars]
myh=HFZ
编写playbook:
cat /root/ansible/vars5.yml
---
- hosts: myhosts
remote_user: root
tasks:
- name: set hostname
hostname: name={{ myh }}-{{ hname }}-{{ http_port }}
示例结果:
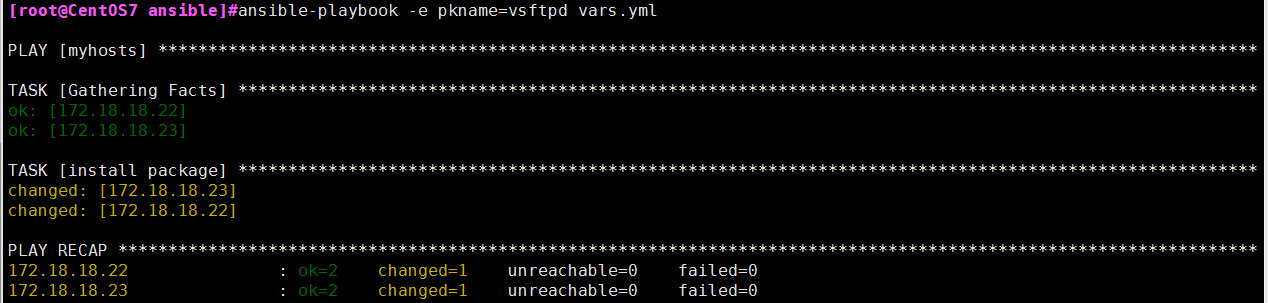
3、通过命令行指定变量,优先级最高
ansible-playbook –e varname=value
示例:
cat /root/ansible/vars.yml
---
- hosts: myhosts
remote_user: root
tasks:
- name: install package
yum: name={{ pkname }}
示例结果:
4、在playbook中定义
示例:
cat cat vars2.yml
---
- hosts: myhosts
remote_user: root
vars:
- username: user1
- groupname: group1
tasks:
- name: create group
group: name={{ groupname }} state=present
- name: create user
user: name={{ username }} group{{ groupname }} home=/home/{{ username }}dir
示例结果:

5、可以在文件中定义变量,并在playbook中调用文件。
示例:在vars.yml文件中定义变量
hi: hello
wd: world
编写playbook:
- hosts: myhosts
remote_user: root
vars_files:
- vars.yml
tasks:
- name: create file
file: name=/root/{{ hi }}-{{ wd }}.log state=touch
示例结果:

6、在role中定义
playbook中的templates模板
templates特点:
基于Jinja2语言的文本文件,嵌套有脚本。
templates功能:
根据模块文件动态生成对应的配置文件
templates格式:
templates文件必须存放于templates目录下,且命名为 .j2 结尾。
yaml/yml 文件需和templates目录平级,目录结构如下:
./
├── temnginx.yml
└── templates
└── nginx.conf.j2
Jinja2语言:
使用字面量:
字符串:使用单引号或双引号
数字:整数,浮点数
列表:[item1, item2, ...]
元组:(item1, item2, ...)
字典:{key1:value1, key2:value2, ...}
布尔型:true/false
算术运算:+, -, *, /, //, %, **
比较操作:==, !=, >, >=, <, <=
逻辑运算:and, or, not
流表达式:for、if、when
示例:在centos6与centos7主机上安装httpd服务,并修改相应配置文件。
1、创建文件夹
mkdir ~/ansible/templats -pv
2、拷贝centos6与centos7主机上的httpd配置文件到主机。并修改文件名
ansible myhosts -m fetch -a 'src=/etc/httpd/conf/httpd.conf dest=~/ansible/'
3、复制文件到templats文件夹下并修改文件名,修改文件内容
mv ~/ansible/172.18.18.22/httpd.conf ~/ansible/templats/httpd-7.conf.j2
mv ~/ansible/172.18.18.22/httpd.conf ~/ansible/templats/httpd-6.conf.j2
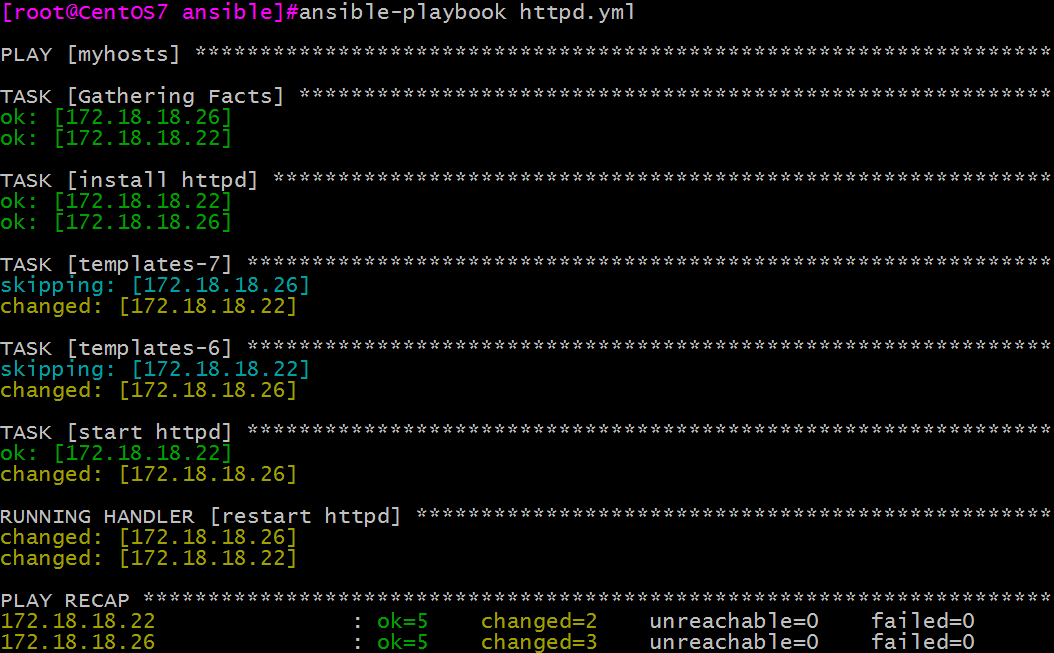
4、编写playbook,注意httpd.yml与templats文件夹同级
cat httpd.yml
- hosts: myhosts
remote_user: root
tasks:
- name: install httpd
yum: name=httpd
- name: templates-7
template: src=httpd-7.conf.j2 dest=/etc/httpd/conf/httpd.conf
when: ansible_distribution_major_version == "7"
notify: restart httpd
tags: conf
- name: templates-6
template: src=httpd-6.conf.j2 dest=/etc/httpd/conf/httpd.conf
when: ansible_distribution_major_version == "6"
notify: restart httpd
tags: conf
- name: start httpd
service: name=httpd state=started
handlers:
- name: restart httpd
service: name=httpd state=restarted
示例演示:
条件判断
多条件判断
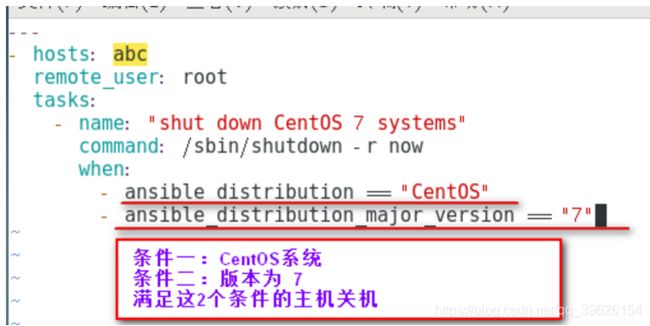
组条件判断

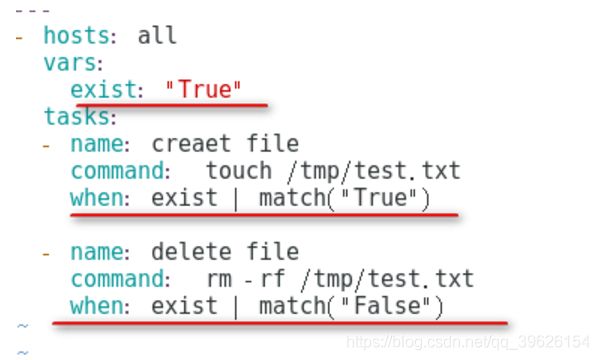
自定义条件判断
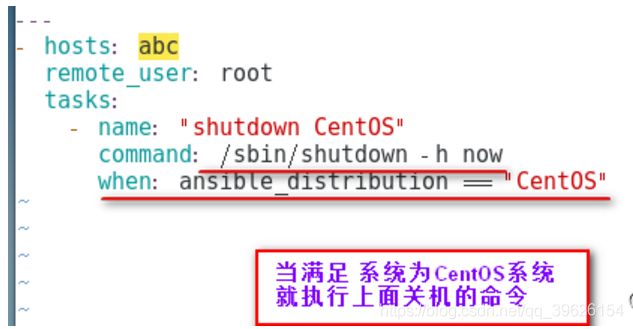
- when的值是一个条件表达式,如果条件判断成立,这个task就执行,如果判断不成立,则task不执行
- 如果需要根据变量、facts(setup)或此前任务的执行结果来作为某task执行与否的前提时要用到条件测试,在Playbook中条件测试使用when子句。
- 在task后添加when子句即可使用条件测试:when子句支持jinjia2表达式或语法,例如:
playbook迭代
迭代:当有需要重复性执行的任务时,可以使用迭代机制
对迭代项的引用,固定变量名为”item”
要在task中使用with_items给定要迭代的元素列表
列表格式:
字符串
字典
示例:创建固定组,并把新建用户加入到固定组中。
cat items.yml:
- hosts: myhosts
remote_user: root
tasks:
- name: create groups
group: name={{item}}
with_items:
- itemgroup1
- itemgroup2
- itemgroup3
- name: create users
user: name={{item.username}} group={{item.groupname}}
with_items:
- {username: 'testuser1',groupname: 'itemgroup1'}
- {username: 'testuser2',groupname: 'itemgroup2'}
- {username: 'testuser3',groupname: 'itemgroup3'}
示例结果:

playbook中template for if
示例:利用for-if和templates编写playbook
cat for-if.yml
- hosts: myhosts
remote_user: root
vars:
hosts:
- {listen_port: 8080,web: nginx1,name: web1.fz.com}
- {listen_port: 8081,web: nginx2,name: web2.fz.com}
- {listen_port: 8082,web: nginx3}
tasks:
- name: for-if
template: src=for-if.j2 dest=/root/for-if
cat templates/for-if.j2
{% for host in hosts %}
server{
listen: {{host.listen_port}};
{%if host.name is defined%}
name: {{host.name}};
{%endif%}
web: {{host.web}};
}
{%endfor%}
示例结果:

playbook加密
- ansible-vault:管理加密解密yml文件
- ansible-vault encrypt hello.yml 加密
- ansible-vault decrypt hello.yml 解密
- ansible-vault view hello.yml 查看
- ansible-vault edit hello.yml 编辑加密文件
- ansible-vault rekey hello.yml 修改口令
- ansible-vault create new.yml 创建新文件
整理自 houfazhu -> http://www.houfazhu.com/ansible%E5%B7%A5%E5%85%B7%E4%B9%8Bplaybook/
http://blog.51cto.com/13630803/2154192