Saltstack搭建http,nginx,haproxy服务
搭建httpd
(1)
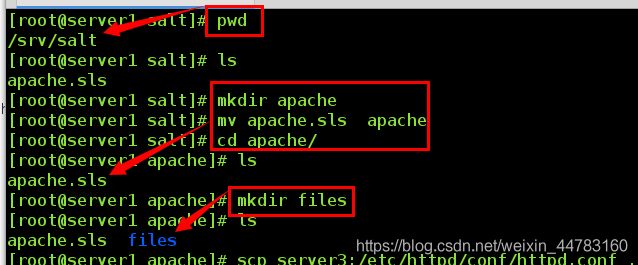
pwd
mkdir apache
mv apache.sls apache
cd apache/
mkdir files
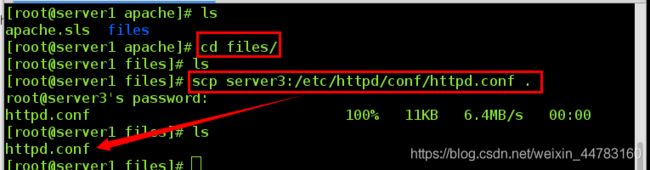
cd files/
scp server3:/etc/httpd/conf/httpd.conf . --> ls
pwd
/srv/salt/apache
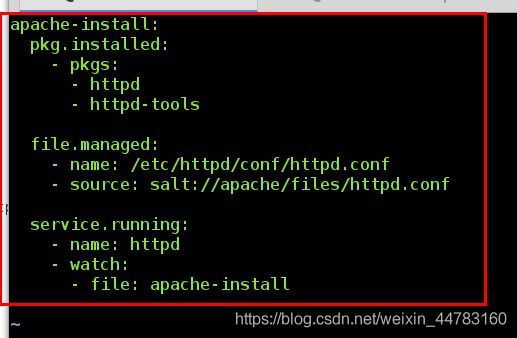
(2)vim apache.sls
apache-install:
pkg.installed: ##安装httpd
- pkgs:
- httpd
- httpd-tools
file.managed: ##拷贝文件到server3
- name: /etc/httpd/conf/httpd.conf ##目的路径
- source: salt://apache/files/httpd.conf ##源文件
service.running: ##启动服务
- name: httpd ##服务名httpd
- watch: ##监控第一行apache-install下的file模块内容
- file: apache-install
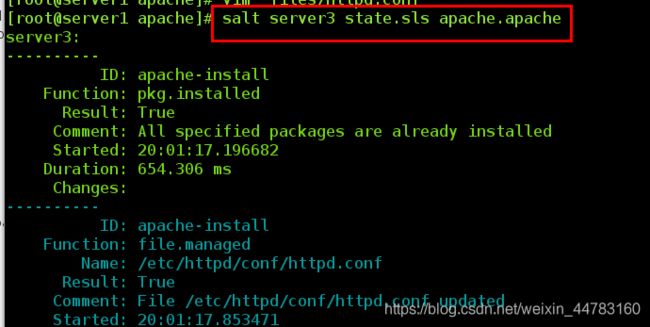
salt server3 state.sls apache.apache (apache.apache=apache/apache.yml)

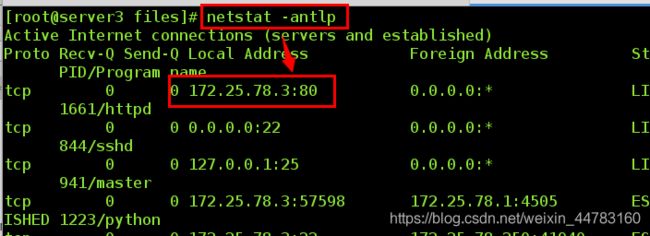
server3: 查看80端口
netstat -antlp
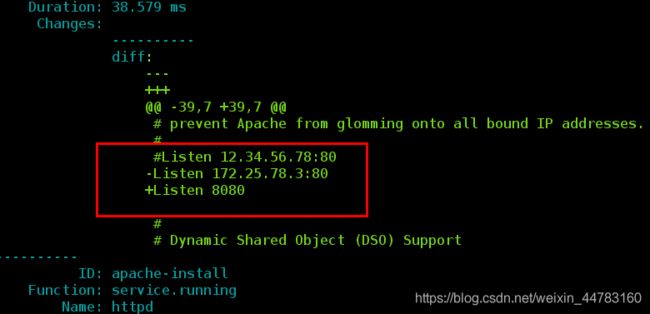
(3)更改端口
server1: 修改监控端口为8080
vim files/httpd.conf
42 Listen 8080
salt server3 state.sls apache.apache
##可以看到,将原来的删除,添加了新的
-Listen 172.25.78.3:80
+Listen 8080
server3查看8080端口
netstat -antlp


搭建nginx
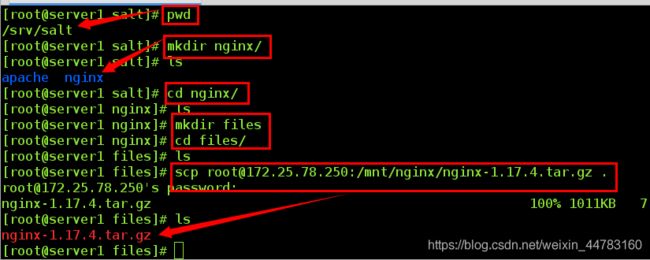
(1)创建目录,获取nginx包
[root@server1 salt]# pwd
/srv/salt
[root@server1 salt]# mkdir nginx/ ##创建nginx服务部署目录
[root@server1 salt]# cd nginx/
[root@server1 nginx]# ls
[root@server1 nginx]# mkdir files
[root@server1 nginx]# cd files/
[root@server1 files]# scp [email protected]:/mnt/nginx/nginx-1.17.4.tar.gz .
[root@server1 files]# ls
nginx-1.17.4.tar.gz

[root@server1 nginx]# pwd
/srv/salt/nginx
(2)拷贝nginx包
vim install.sls
nginx-install:
file.managed:
- name: /mnt/nginx-1.17.4.tar.gz
- source: salt://nginx/files/nginx-1.17.4.tar.gz
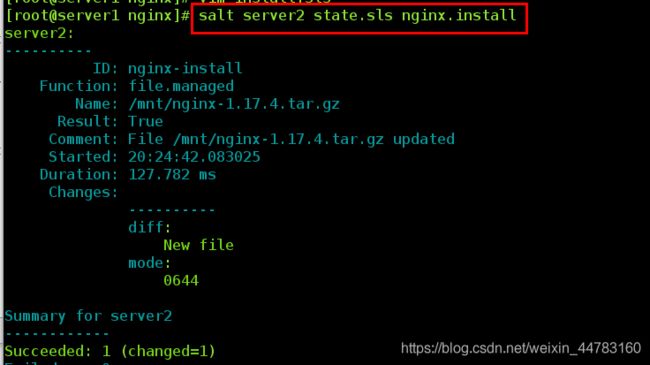
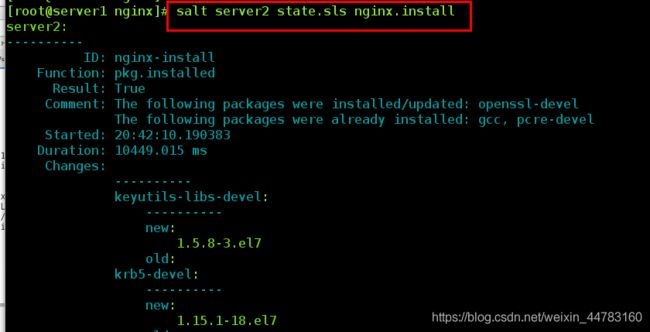
salt server2 state.sls nginx.install

(3)关闭debug,可以先在server2试一试
测试:server2
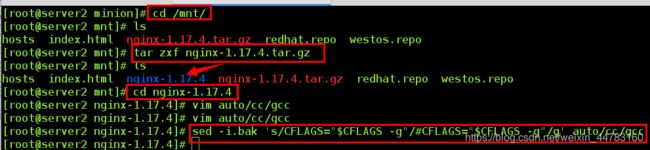
cd /mnt
tar zxf nginx-1.17.4.tar.gz
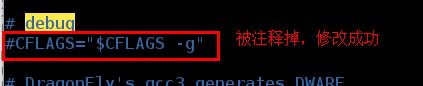
cd nginx-1.17.4sed -i.bak 's/CFLAGS="$CFLAGS -g"/#CFLAGS="$CFLAGS -g"/g' auto/cc/gcc
vim auto/cc/gcc ##查看是否成功关闭debug
成功以后再将解压后的包删除rm -fr nginx-1.17.4

server1:
pwd:
/srv/salt/nginx
vim install.sls
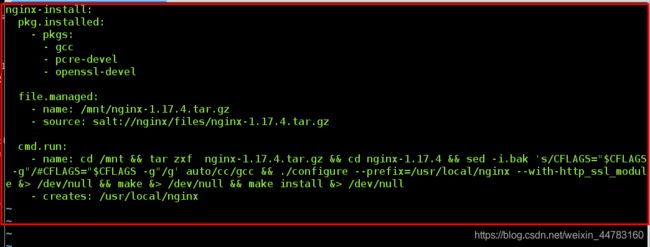
nginx-install:
pkg.installed: ##安装nginx编译所需要的包
- pkgs:
- gcc
- pcre-devel
- openssl-devel
file.managed: ##拷贝文件
- name: /mnt/nginx-1.17.4.tar.gz
- source: salt://nginx/files/nginx-1.17.4.tar.gz
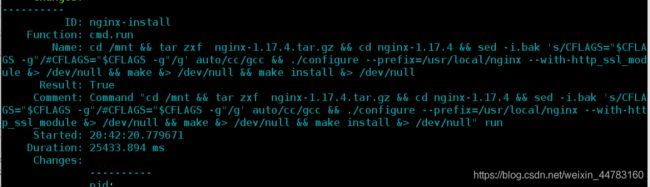
cmd.run: ##源码编译
- name: cd /mnt && tar zxf nginx-1.17.4.tar.gz && cd nginx-1.17.4 && sed -i.bak 's/CFLAGS="$CFLAGS -g"/#CFLAGS="$CFLAGS -g"/g' auto/cc/gcc && ./configure --prefix=/usr/local/nginx --with-http_ssl_module &> /dev/null && make &> /dev/null && make install &> /dev/null
- creates: /usr/local/nginx ##表示当系统已经有了nginx文件不进行重复编译安装
##- creates:判断语句,没有这个语句的话,每次都会执行上面的步骤
salt server2 state.sls nginx.install
(4)编写启动命令文件
重新编写脚本保证一个脚本内容不要繁多不然不好管理
vim nginx/files/nginx.service

[Unit]
Description=The NGINX HTTP and reverse proxy server
After=syslog.target network.target remote-fs.target nss-lookup.target  ##网络组件

[Service]
Type=forking
PIDFile=/usr/local/nginx/logs/nginx.pid
ExecStartPre=/usr/local/nginx/sbin/nginx -t
ExecStart=/usr/local/nginx/sbin/nginx
ExecReload=/usr/local/nginx/sbin/nginx -s reload
ExecStop=/bin/kill -s QUIT $MAINPID
PrivateTmp=true

[Install]
WantedBy=multi-user.target

[root@server1 files]# pwd
/srv/salt/nginx/files
[root@server1 files]# ls
nginx-1.17.4.tar.gz  nginx.conf
[root@server1 files]# vim nginx.conf
worker_processes  auto;

(5)启动nginx
pwd
/srv/salt/nginx

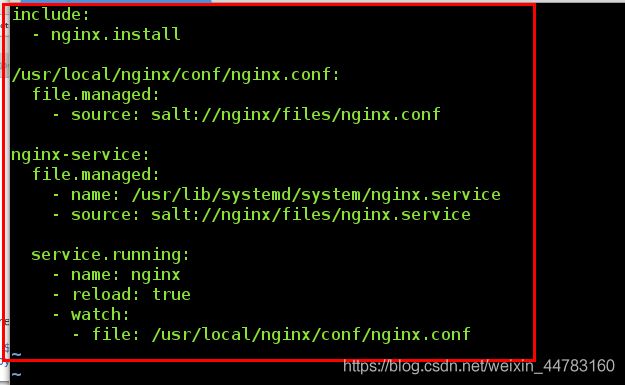
vim  service.sls
include:   ##调用install.sls文件
  - nginx.install

/usr/local/nginx/conf/nginx.conf:
  file.managed:
    - source: salt://nginx/files/nginx.conf

nginx-service:
  file.managed:   ##拷贝启动命令文件
    - name: /usr/lib/systemd/system/nginx.service
    - source: salt://nginx/files/nginx.service

  service.running:   ##启动nginx服务
    - name: nginx
    - reload: true
    - watch:
      - file: /usr/local/nginx/conf/nginx.conf

salt server2 state.sls nginx.service
pwd
ls

server2查看:
ps ax | grep nginx
systemctl  status nginx


servre1:
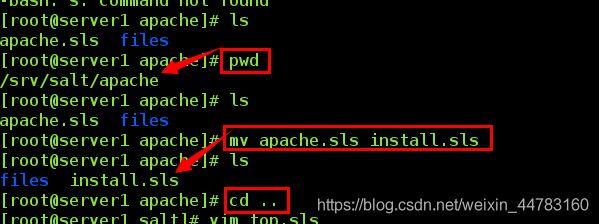
[root@server1 apache]# pwd
/srv/salt/apache
[root@server1 apache]# ls
apache.sls  files
[root@server1 apache]# mv apache.sls install.sls
[root@server1 apache]# ls
files  install.sls
[root@server1 apache]# cd ..
vim top.sls
base:
  'server2':
    - nginx.service

  'server3':
    - apache.install
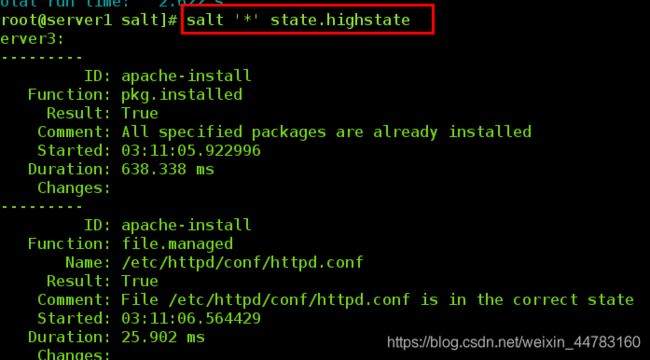
同时推多个节点:salt ‘*’ state.highstate ##高级状态
state.highstate:全局的所有的环境的所有的状态生效
state.sls 用来指定特定sls进行处理
server2: 关闭nginx
systemctl stop nginx
在server1重新推,server2会重新开启nginx
server1:salt ‘*’ state.highstate
server2:systemctl status nginx


haproxy负载均衡
(1)搭建server4环境
在server1将yum文件scp给server4
server1:
cd /etc/yum.repos.d/scp salt.repo [email protected]:/etc/yum.repos.d/
server4:
server4:
cd /etc/yum.repos.d/ --> ls
yum clean all
yum repolist

获取4.0包
scp -r  [email protected]:/mnt/zabbix/4.0 . cd 4.0/ --> ls
(2)安装salt-minion
yum install salt-minion -y
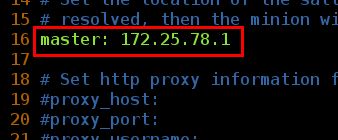
vim /etc/salt/minion
16 master: 172.25.78.1
systemctl start salt-minion


(3)server1进行授权:
salt-key -A
salt-key -L

srever1:编写文件
[root@server1 salt]# pwd
/srv/salt
[root@server1 salt]# mkdir haproxy
[root@server1 salt]# cd haproxy/
[root@server1 haproxy]# ls
[root@server1 haproxy]# mkdir files

server1编写文件,给server4安装 haproxy
cd /srv/salt/haproxy
vim haproxy.slshaproxy-install: pkg.installed: - name: haproxy
ls
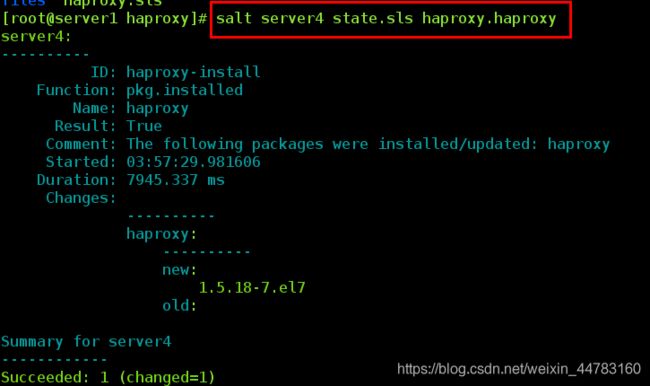
salt server4 state.sls haproxy.haproxy
##安装成功后server4会生成配置文件/etc/haproxy/haproxy.cfg
将文件拷贝到本地
cd /srv/salt/haproxy/files
scp server4:/etc/haproxy/haproxy.cfg .


vim haproxy.cfg
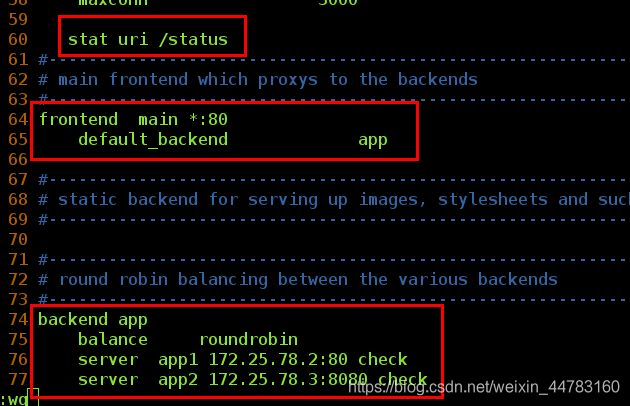
60 stat uri /status
64 frontend main *:80
65 default_backend app
74 backend app
75 balance roundrobin
76 server app1 172.25.78.2:80 check
77 server app2 172.25.78.3:8080 check
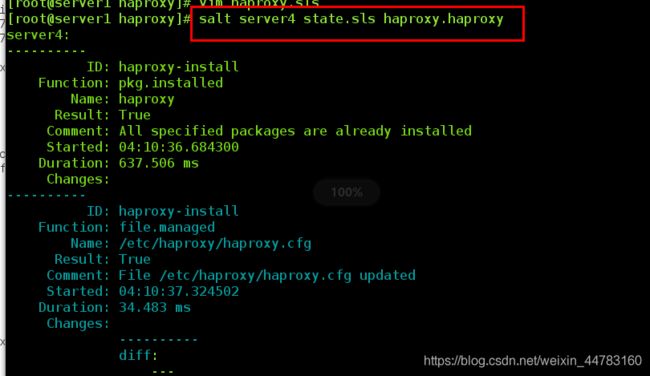
vim /srv/salt/haproxy/haproxy.sls
haproxy-install:
  pkg.installed:
   - name: haproxy
file.managed:
- name: /etc/haproxy/haproxy.cfg
- source: salt://haproxy/files/haproxy.cfg
service.running:
- name: haproxy
- reload: true
- watch:
- file: haproxy-install
salt server4 state.sls haproxy.haproxy


未完。。。。。。。。
host:’%'允许所有用户进行远程连接
name:是yum文件的中括号[]
description:是yum文件中的name
reload:以什么方法进行触发