Python学习10-18.1-18.14用GUI自动化控制键盘和鼠标
Python学习10-18.1-18.14用GUI自动化控制键盘和鼠标
- 18.1 安装pyautogui模块
- 18.2 走对路
- 18.3 控制鼠标移动
-
- 18.3.1 移动鼠标
- 18.3.2 获取鼠标位置
- 18.4 现在鼠标在哪里
- 18.5 控制鼠标交互
- 18.5.2 拖动鼠标
- 18.6 处理屏幕
-
- 18.6.1 获取屏幕快照
- 18.6.2 分析屏幕快照
- 18.7 扩展mouseNow程序
- 18.8 图像识别
- 18.9 控制键盘
-
- 18.9.1 通过键盘发送一个字符串
- 18.9.2 键名
- 18.9.3 按下和释放键盘
- 18.9.4 热键组合
- 18.11 自动填表程序
- 内容来源
本文为学习python编程时所记录的笔记,仅供学习交流使用。
18.1 安装pyautogui模块
图形用户界面自动化 GUI自动化
C:\Users\VECTOR>cd C:\Users\VECTOR\AppData\Local\Programs\Python\Python37
C:\Users\VECTOR\AppData\Local\Programs\Python\Python37>cd Scripts
C:\Users\VECTOR\AppData\Local\Programs\Python\Python37\Scripts>pip install pyautogui
18.2 走对路
通过注销关闭所有程序、暂停和自动防故障装置 pyautogui.PAUSE=1.5
将鼠标移到屏幕左上角将导致pyautogui.FailSafeException异常
18.3 控制鼠标移动
>>> import pyautogui
>>> pyautogui.size()
Size(width=1920, height=1080)
>>> width,height=pyautogui.size()
18.3.1 移动鼠标
>>> for i in range(10):
	pyautogui.moveTo(100,100,duration=0.25)
	pyautogui.moveTo(200,100,duration=0.25)
	pyautogui.moveTo(200,200,duration=0.25)
	pyautogui.moveTo(100,200,duration=0.25)
相对于当前位置移动
>>> for i in range(10):
	pyautogui.moveRel(100,0,duration=0.25)
	pyautogui.moveRel(0,100,duration=0.25)
	pyautogui.moveRel(-100,0,duration=0.25)
	pyautogui.moveRel(0,-100,duration=0.25)
18.3.2 获取鼠标位置
>>> pyautogui.position()
Point(x=1095, y=742)
>>> pyautogui.position()
Point(x=1095, y=742)
>>> pyautogui.position()
Point(x=1287, y=505)
18.4 现在鼠标在哪里
#! python3
# mouseNow.py-Displays the mouse cursor's current position
import pyautogui
print('Press Ctrl+C to quit')
#TODO:Get and print the mouse coordinates.
try:
    while True:
        #todo:get and print the mouse coordinates.
        x,y=pyautogui.position()
        positionStr='X: '+str(x).rjust(4)+' Y: '+str(y).rjust(4)

except KeyboardInterrupt:
    print('\nDone.')
print(positionStr,end='')
print('\b'*len(positionStr),end='',flush=True)
18.5 控制鼠标交互
18.5.2 拖动鼠标
import pyautogui,time
time.sleep(5)
pyautogui.click() #click to put drawing program in focus
distance=200
while distance>0:
    pyautogui.dragRel(distance,0,duration=0.2)#move right
    distance=distance-5
    pyautogui.dragRel(0,distance,duration=0.2)#move down
    pyautogui.dragRel(-distance,0,duration=0.2)#move left
    distance=distance-5
    pyautogui.dragRel(0,-distance,duration=0.2)#move up
18.6 处理屏幕
18.6.1 获取屏幕快照
>>> import pyautogui
>>> im=pyautogui.screenshot()
>>> im.getpixel(0,0)
Traceback (most recent call last):
File "" , line 1, in <module>
im.getpixel(0,0)
TypeError: getpixel() takes 2 positional arguments but 3 were given
>>> im.getpixel((0,0))
(255, 255, 255)
>>> im.getpixel((50,200))
(255, 255, 255)
18.6.2 分析屏幕快照
>>> import pyautogui
>>> im=pyautogui.screenshot()
>>> im.getpixel((50,200))
(255, 255, 255)
>>> pyautogui.pixelMatchesColor(50,200,(255,255,255))
True
>>> pyautogui.pixelMatchesColor(50,200,(255,255,0))
False
18.7 扩展mouseNow程序
#! python3
# mouseNow.py-Displays the mouse cursor's current position
import pyautogui
print('Press Ctrl+C to quit')
#TODO:Get and print the mouse coordinates.
try:
    while True:
        #todo:get and print the mouse coordinates.
        x,y=pyautogui.position()
        positionStr='X: '+str(x).rjust(4)+' Y: '+str(y).rjust(4)
        pixelColor=pyautogui.screenshot().getpixel((x,y))
        positionStr+=' RGB:('+str(pixelColor[0]).rjust(3)
        positionStr+=','+str(pixelColor[1]).rjust(3)
        positionStr+=','+str(pixelColor[2]).rjust(3)+')'
        print(positionStr, end='')

except KeyboardInterrupt:
    print('\nDone.')
print(positionStr,end='')
print('\b'*len(positionStr),end='',flush=True)
18.8 图像识别
>>> import pyautogui
>>> pyautogui.locateOnScreen('submit.png')
Box(left=382, top=105, width=347, height=140)
>>> pyautogui.locateOnScreen('submit1.png')
Box(left=1189, top=499, width=67, height=44)
>>> pyautogui.center((382,105,347,140))
Point(x=555, y=175)
>>> pyautogui.click(555,175)
18.9 控制键盘
18.9.1 通过键盘发送一个字符串
>>> pyautogui.click(100,100);pyautogui.typewrite('Hello world!')
>>> pyautogui.click(100,100);pyautogui.typewrite('Hello world!',0.25)
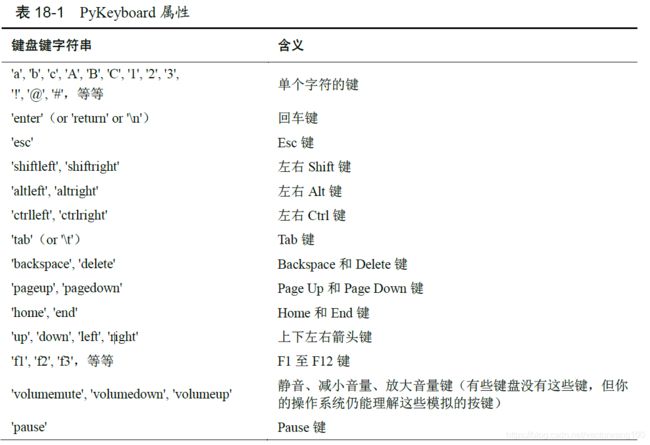
18.9.2 键名
>>> pyautogui.KEYBOARD_KEYS
['\t', '\n', '\r', ' ', '!', '"', '#', '$', '%', '&', "'", '(', ')', '*', '+', ',', '-', '.', '/', '0', '1', '2', '3', '4', '5', '6', '7', '8', '9', ':', ';', '<', '=', '>', '?', '@', '[', '\\', ']', '^', '_', '`', 'a', 'b', 'c', 'd', 'e', 'f', 'g', 'h', 'i', 'j', 'k', 'l', 'm', 'n', 'o', 'p', 'q', 'r', 's', 't', 'u', 'v', 'w', 'x', 'y', 'z', '{', '|', '}', '~', 'accept', 'add', 'alt', 'altleft', 'altright', 'apps', 'backspace', 'browserback', 'browserfavorites', 'browserforward', 'browserhome', 'browserrefresh', 'browsersearch', 'browserstop', 'capslock', 'clear', 'convert', 'ctrl', 'ctrlleft', 'ctrlright', 'decimal', 'del', 'delete', 'divide', 'down', 'end', 'enter', 'esc', 'escape', 'execute', 'f1', 'f10', 'f11', 'f12', 'f13', 'f14', 'f15', 'f16', 'f17', 'f18', 'f19', 'f2', 'f20', 'f21', 'f22', 'f23', 'f24', 'f3', 'f4', 'f5', 'f6', 'f7', 'f8', 'f9', 'final', 'fn', 'hanguel', 'hangul', 'hanja', 'help', 'home', 'insert', 'junja', 'kana', 'kanji', 'launchapp1', 'launchapp2', 'launchmail', 'launchmediaselect', 'left', 'modechange', 'multiply', 'nexttrack', 'nonconvert', 'num0', 'num1', 'num2', 'num3', 'num4', 'num5', 'num6', 'num7', 'num8', 'num9', 'numlock', 'pagedown', 'pageup', 'pause', 'pgdn', 'pgup', 'playpause', 'prevtrack', 'print', 'printscreen', 'prntscrn', 'prtsc', 'prtscr', 'return', 'right', 'scrolllock', 'select', 'separator', 'shift', 'shiftleft', 'shiftright', 'sleep', 'space', 'stop', 'subtract', 'tab', 'up', 'volumedown', 'volumemute', 'volumeup', 'win', 'winleft', 'winright', 'yen', 'command', 'option', 'optionleft', 'optionright']
18.9.3 按下和释放键盘
>>> import pyautogui
>>> pyautogui.keyDown('shift');pyautogui.press('4');pyautogui.keyUp('shift')
$
18.9.4 热键组合
>>> import pyautogui,time
>>> def commentAfterDelay():
	pyautogui.click(100,100)
	pyautogui.typewrite('In IDLE,Alt+3 comments out a line.')
	time.sleep(2)
	pyautogui.hotkey('alt','3')


>>> commentAfterDelay()
18.11 自动填表程序
#! python3
#formFiller.py Automatically fills in the form.

import pyautogui, time
#set these to the correct coordinates for your computer

nameField=(750,380)
submitButton=(949,963)
submitButtonColor=(72,111,202)
submitAnotherLink=()

formData=[{
     'name':'Alice','fear':'eavesdroppers','source':'wand','robocop':1,'comments':'Tell Bob I said hi.'},]
pyautogui.PAUSE=0.5

for person in formData:
    #Give the user a chance to kill the script.
    print('>>>5 SECOND PAUSE TO LET USER PRESS CRTL-C<<<')
    time.sleep(5)

    #wait until the form page has loaded
    #while not pyautogui.pixelMatchesColor(submitButton[0],submitButton[1],submitButton[2]):
    time.sleep(0.5)
    print('Entering %s info...'%(person['name']))
    pyautogui.click(nameField[0],nameField[1])

        #Fill out the Name fields.
    pyautogui.typewrite(person['name']+'\t')

        #Fill out the greatest fears field
    pyautogui.typewrite(person['fear']+'\t')
        #Fill out the souce of wizard power fiels.
    if person['source']=='wand':
        pyautogui.typewrite(['down','\t'])
    elif person['source']=='amulet':
        pyautogui.typewrite(['down','down','\t'])
    #todo
    #Fill out the Robocop field
    if person['robocop']==1:
        pyautogui.typewrite(['enter','\t','\t','\t','\t','\t'])
    pyautogui.typewrite(person['comments']+'\t')
内容来源
[1] [美]斯维加特(Al Sweigart).Python编程快速上手——让繁琐工作自动化[M]. 王海鹏译.北京:人民邮电出版社,2016.7.p351-374


