微服务Swoole(1)- 初识swoole,安装swoole
现在微服务Saas比较热门。那么微服务必然会选择Swoole。小编从零开始研究Swoole。
安装swoole
以mac操作系统为例,如果你是mac新手。
环境要求:php版本大于7.0
swoole  php -v
PHP 7.1.19 (cli) (built: Jun 25 2018 10:42:21) ( NTS )
Copyright (c) 1997-2018 The PHP Group
Zend Engine v3.1.0, Copyright (c) 1998-2018 Zend Technologies
    with Zend OPcache v7.1.19, Copyright (c) 1999-2018, by Zend Technologies
使用pecl安装swoole,安装过程中,会提示你是否需要安装某些扩展,可自主选择yes或no,如果是选择安装redis扩展,本机需要安装redis环境
pecl install swoole
选择redis扩展需要先安装相应的库
brew install redis
brew install hiredis
ide自动提示
默认情况下,phpstorm并不会自动提示swoole扩展包的相关函数,需要借助 swoole-ide-helper 实现自动提示
安装方法:
在项目的根目录执行:
composer require --dev "eaglewu/swoole-ide-helper:dev-master"
对于compoesr不熟悉的同学,自己可以从网上找点资料看下、
接下来使用swoole搭建tcp,udp, http, websocket 服务,体验swoole的基本使用
tcp 服务
新建server.php
on('connect', function ($serv, $fd) {
    echo "Client: Connect.\n";
});

// 监听数据接收事件
$serv->on('receive', function ($serv, $fd, $from_id, $data) {
    $serv->send($fd, "Server: " . $data);
});

// 监听连接关闭事件
$serv->on('close', function ($serv, $fd) {
    echo "Client: Close.\n";
});

// 启动服务器
$serv->start();
服务端启动:swoft
☁  server [master] ⚡ php server.php
[2018-04-26 09:08:59 @96245.0]  TRACE   Create swoole_server host=127.0.0.01, port=9501, mode=3, type=1
telnet 测试连接
☁  ~  telnet 127.0.0.1 9501
Trying 127.0.0.1...
Connected to localhost.
Escape character is '^]'.
hello
Server: hello
退出telnet的方式:ctrl+], 然后再按 ctrl+d
udp 服务
新建udp_server.php
on('Packet', function ($serv, $data, $clientInfo) {
    $serv->sendto($clientInfo['address'], $clientInfo['port'], 'Server ' . $data);
    var_dump($clientInfo);
});

// 启动服务器
$serv->start();
☁  server [master] ⚡ php udp_server.php
[2018-04-26 09:18:10 @97828.0]  TRACE   Create swoole_server host=127.0.0.1, port=9502, mode=3, type=2

☁  ~  netcat -u 127.0.0.1 9502
hello
Server hello
http 服务
on('request', function ($request, $response) {
$response->header("Content-Type", "text/html; charset=utf-8");
$time = date('Y-m-d H:i:s', time());
$response->end("{$time}--这是swoole提供的http服务,修改代码后要重启服务才能生效
");
});
$http->start();
☁  http  php http_server.php
[2018-07-27 09:25:05 @53999.0]  TRACE   Create swoole_server host=0.0.0.0, port=9502, mode=3, type=1
浏览器访问:http://127.0.0.1:9502/

swoole-http
websocket 服务
ws 服务端
新建server.php文件
ws = new swoole_websocket_server(self::HOST, self::PORT);
        $this->ws->set(
            [
                'worker_num' => 2,
            ]
        );

        $this->ws->on('open', [$this, 'onOpen']);
        $this->ws->on('message', [$this, 'onMessage']);
        $this->ws->on('close', [$this, 'onClose']);

        $this->ws->start();
    }


    /**
     * 监听连接事件
     * @param $ws
     * @param $request
     */
    public function onOpen($ws, $request)
    {
        echo "建立连接,客户端id:{$request->fd}\n";
    }


    /**
     * 监听消息事件
     * @param $ws
     * @param $frame
     */
    public function onMessage($ws, $frame)
    {
        echo "客户端发送的数据: {$frame->data}\n";
        $pushData = date("Y-m-d H:i:s");
        $ws->push($frame->fd, "服务端推送的数据: {$pushData}");
    }

    /**
     * 监听关闭事件
     * @param $ws
     * @param $fd
     */
    public function onClose($ws, $fd)
    {
        echo "客户端:{$fd} 关闭了连接\n";
    }
}

$ws = new Ws();
ws 客户端
新建client.html
websocket client
swoole-websocket测试
结果显示
开启ws服务:
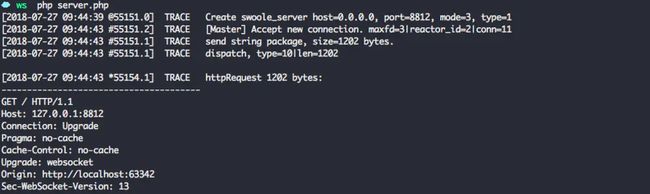
ws server
浏览器打开ws_client.html文件:
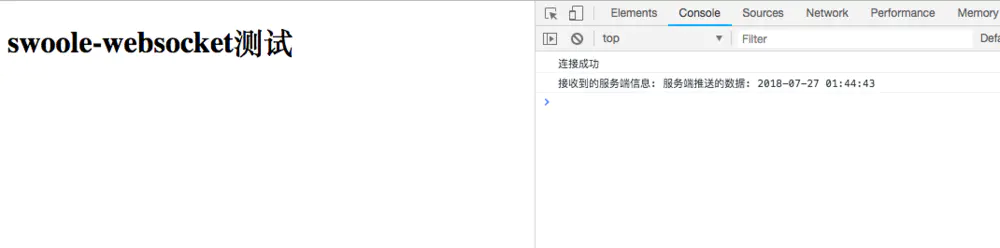
ws client
如果觉得本文对你有所帮助,请给个赞,