linux命令行安装weblogic12c
linux命令行安装weblogic12c
- 1.安装准备
- 2.安装jdk
- 1.进入下载的jdk的文件夹,解压jdk
- 2.配置环境变量
- 3.使修改生效
- 4.验证配置是否生效
- 3.安装weblogic
- 1.新建组与用户
- 2.创建准备文件
- 3.设置文件读写权限
- 4.修改随机数
- 5.登录新建的用户weblogic,开始安装
- 4.创建域
- 1.登录root,创建准备
- 2.开始创建
- 3.配置域
- 4.启动weblogic
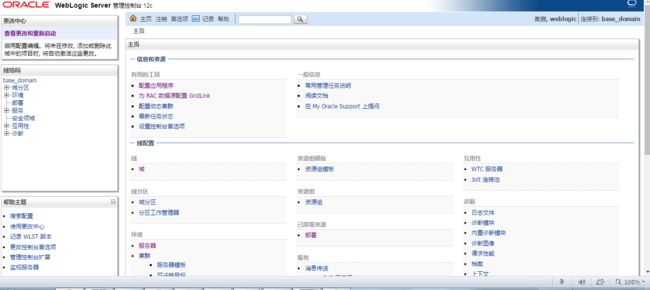
- 5.登录控制台
- 5.部署项目
- 6.文件路径
1.安装准备
准备jdk安装包,weblogic安装包。
这里用的是jdk1.8和weblogic12,
jdk-8u191-linux-x64.tar.gz,fmw_12.2.1.3.0_wls.jar
网上有很多下载途径,或者用这里分享的文件
链接:https://pan.baidu.com/s/1Gf30WGlnhdJCKu-wYHss-w 密码:xhv9
下载完成后传入linux,这里是通过 FlashFXP
jdk放入了 /usr/local/ 文件夹。weblogic移动到**/wls**文件夹下
2.安装jdk
这里是通过 SecureCRT 登录Linux服务器主机,用命令行安装jdk和weblogic。
1.进入下载的jdk的文件夹,解压jdk
[root@iZ88w5 ~]# cd /usr/local/
[root@iZ88w5 local]# tar -xzf jdk-8u191-linux-x64.tar.gz
2.配置环境变量
[root@iZ88w5 local]# vim /etc/profile
修改profile,在文件末尾加上
JAVA_HOME=/usr/local/jdk1.8.0_191
CLASSPATH=$JAVA_HOME/lib/
PATH=$PATH:$JAVA_HOME/bin
export PATH JAVA_HOME CLASSPATH
3.使修改生效
[root@iZ88w5 local]# source /etc/profile
4.验证配置是否生效
[root@iZ88w5 local]# java -version
出现以下信息为安装成功
java version "1.8.0_191"
Java(TM) SE Runtime Environment (build 1.8.0_191-b12)
Java HotSpot(TM) 64-Bit Server VM (build 25.191-b12, mixed mode)
3.安装weblogic
用命令行安装不能用root用户,所以新建组与用户
1.新建组与用户
[root@iZ88w5 local]# cd ..
[root@iZ88w5 usr]# cd ..
[root@iZ88w5 /]# groupadd weblogic
[root@iZ88w5 /]# useradd -g weblogic -m -d  /home/weblogic weblogic
[root@iZ88w5 /]# passwd weblogic
Changing password for user weblogic.
New password:
Retype new password:
passwd: all authentication tokens updated successfully.
2.创建准备文件
用FlashFXP在根目录下新建文件夹 /wls,
在此文件夹下传入wls.rsp内容如下:
[ENGINE]
#DO NOT CHANGE THIS.
Response File Version=1.0.0.0.0
[GENERIC]
#The oracle home location. This can be an existing Oracle Home or a new Oracle Home
ORACLE_HOME=/wls/weblogic12/bea
#Set this variable value to the Installation Type selected. e.g. WebLogic Server, Coherence, Complete with Examples.
INSTALL_TYPE=WebLogic Server
#Provide the My Oracle Support Username. If you wish to ignore Oracle Configuration Manager configuration provide empty string for user name.
MYORACLESUPPORT_USERNAME=
#Provide the My Oracle Support Password
MYORACLESUPPORT_PASSWORD=
#Set this to true if you wish to decline the security updates. Setting this to true and providing empty string for My Oracle Support username will ignore the Oracle Configuration Manager configuration
DECLINE_SECURITY_UPDATES=true
#Set this to true if My Oracle Support Password is specified
SECURITY_UPDATES_VIA_MYORACLESUPPORT=false
#Provide the Proxy Host
PROXY_HOST=
#Provide the Proxy Port
PROXY_PORT=
#Provide the Proxy Username
PROXY_USER=
#Provide the Proxy Password
PROXY_PWD=
#Type String (URL format) Indicates the OCM Repeater URL which should be of the format [scheme[Http/Https]]://[repeater host]:[repeater port]
COLLECTOR_SUPPORTHUB_URL=
ORACLE_HOME=/wls/weblogic12/bea,此处可修改为自己定义的文件夹
传入oraInst.loc内容如下:
inventory_loc=/oracle/oraInventory
inst_group=wls
3.设置文件读写权限
[root@iZ88w5 /]# cd wls
[root@iZ88w5 wls]# chmod 777 weblogic12/
[root@iZ88w5 wls]# chmod 777 wls.rsp
[root@iZ88w5 wls]# chmod 777 oraInst.loc
[root@iZ88w5 wls]# chmod 777 fmw_12.2.1.3.0_wls.jar
4.修改随机数
tomcat和weblogic等容器在linux下启动时可能会有 明明启动成功,但访问不了的情况,这有一部分情况是由于 jdk 随机数生成有问题导致的。(不修改可能安装weblogic以及建域时会一直卡在某个步骤,要等很久,建议修改)
解决办法:
vim $JAVA_HOME/jre/lib/security/java.security
修改第117行,改为:
securerandom.source=file:/dev/./urandom
5.登录新建的用户weblogic,开始安装
[root@iZ88w5 wls]# su - weblogic
[weblogic@iZ88w5 ~]$ cd /wls
[weblogic@iZ88w5 wls]$ java -jar fmw_12.2.1.3.0_wls.jar  -silent  -responseFile  /wls/wls.rsp  -invPtrLoc /wls/oraInst.loc
出现最后completed successfully,为成功安装
Launcher log file is /tmp/OraInstall2019-01-16_04-12-49PM/launcher2019-01-16_04-12-49PM.log.
Extracting the installer . . . . . . . . . . . . . . . . . . . . . Done
Checking if CPU speed is above 300 MHz.   Actual 2593.992 MHz    Passed
Checking swap space: must be greater than 512 MB.   Actual 7999 MB    Passed
Checking if this platform requires a 64-bit JVM.   Actual 64    Passed (64-bit not required)
Checking temp space: must be greater than 300 MB.   Actual 22193 MB    Passed
Preparing to launch the Oracle Universal Installer from /tmp/OraInstall2019-01-16_04-12-49PM
Log: /tmp/OraInstall2019-01-16_04-12-49PM/install2019-01-16_04-12-49PM.log
Copyright (c) 1996, 2017, Oracle and/or its affiliates. All rights reserved.
Reading response file..
Skipping Software Updates
Starting check : CertifiedVersions
Expected result: One of oracle-6, oracle-7, redhat-7, redhat-6, SuSE-11, SuSE-12
Actual Result: redhat-7.0.1406
Check complete. The overall result of this check is: Passed
CertifiedVersions Check: Success.


Starting check : CheckJDKVersion
Expected result: 1.8.0_131
Actual Result: 1.8.0_191
Check complete. The overall result of this check is: Passed
CheckJDKVersion Check: Success.


Validations are enabled for this session.
Verifying data
Copying Files
Percent Complete : 10
Percent Complete : 20
Percent Complete : 30
Percent Complete : 40
Percent Complete : 50
Percent Complete : 60
Percent Complete : 70
Percent Complete : 80
Percent Complete : 90
Percent Complete : 100

The installation of Oracle Fusion Middleware 12c WebLogic Server and Coherence 12.2.1.3.0 completed successfully.
Logs successfully copied to /wls/weblogic12/oraInventory/logs.
如果Checking 中间出现未通过情况,如交换空间不够等,可网上查解决方法
4.创建域
1.登录root,创建准备
[weblogic@iZ88w5 wls]$ su - root
Password:
[root@iZ88w5 ~]# cd /
[root@iZ88w5 /]# export MW_HOME="/wls/weblogic12/bea"
[root@iZ88w5 /]# export WL_HOME="/wls/weblogic12/bea/oracle_common"
[root@iZ88w5 /]# cd /wls/weblogic12/bea/wlserver/common/bin/
2.开始创建
[root@iZ88w5 bin]# ./wlst.sh
这里会等一段时间,直到出现 wls:/offline>
WARNING: This is a deprecated script. Please invoke the wlst.sh script under oracle_common/common/bin.

Initializing WebLogic Scripting Tool (WLST) ...

Jython scans all the jar files it can find at first startup. Depending on the system, this process may take a few minutes to complete, and WLST may not return a prompt right away.

Welcome to WebLogic Server Administration Scripting Shell

Type help() for help on available commands

wls:/offline>
3.配置域
wls:/offline>后的内容为配置内容。第一行readTemplate后会需要等一段时间。
配置的各个属性可以修改
‘ListenPort’, 7001//端口号
cmo.setPassword(‘weblogic123’)//控制台密码
base_domain//文件夹名称
wls:/offline> readTemplate('/wls/weblogic12/bea/wlserver/common/templates/wls/wls.jar')
WARNING: The readTemplate is deprecated. Use selectTemplate followed by loadTemplates in place of readTemplate.
wls:/offline/base_domain>cd('Servers/AdminServer')
wls:/offline/base_domain/Server/AdminServer>set('ListenAddress','')
wls:/offline/base_domain/Server/AdminServer>set('ListenPort', 7001)
wls:/offline/base_domain/Server/AdminServer>cd('../..')
wls:/offline/base_domain>cd('Security/base_domain/User/weblogic')
wls:/offline/base_domain/Security/base_domain/User/weblogic>cmo.setPassword('weblogic123')
wls:/offline/base_domain/Security/base_domain/User/weblogic>setOption('OverwriteDomain', 'true')
wls:/offline/base_domain/Security/base_domain/User/weblogic>writeDomain('/wls/weblogic12/bea/user_projects/domains/base_domain')
wls:/offline/base_domain/Security/base_domain/User/weblogic>closeTemplate()
wls:/offline>exit()


Exiting WebLogic Scripting Tool.

[root@iZ88w5 bin]#
4.启动weblogic
进入base_domain文件夹,用nohup 后台运行
[root@iZ88w5 bin]# cd /wls/weblogic12/bea/user_projects/domains/base_domain/
[root@iZ88w5 base_domain]# nohup ./startWebLogic.sh &
[1] 15356
[root@iZ88w5 base_domain]# nohup: ignoring input and appending output to 鈥榥ohup.out鈥?

[root@iZ88w5 base_domain]#
此时,base_domain文件夹下,会生成nohup.out文件,此为日志文件
5.登录控制台
登录http://xx.xx.xx.xx:7001/console/
用户名为weblogic,密码为weblogic123(或自己设置的值,不要太简单,一定要记住,最好英文加数字,否则可能会创建失败)。
启动后大概需要等1到2分钟。如果2分钟后仍然进不了控制台,可以查看日志,是否有报错。

5.部署项目
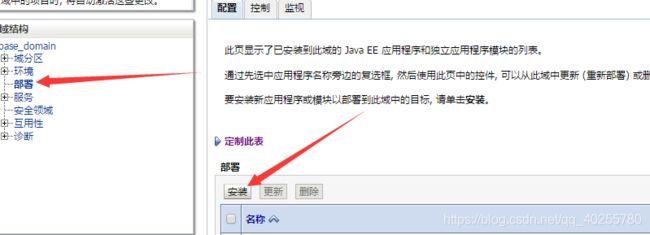
部署一般用以下两种方式:
1.打包成war
2.直接找到项目下的webapp文件夹,
上传linux后,在控制台部署

一直下一步,部署好了,项目为正常,就可以访问了。

6.文件路径
|–/
··|-- usr
····|-- local
······|–jdk-8u191-linux-x64.tar.gz
······|–jdk1.8.0_191
··|-- wls
····|-- wls.rsp
····|-- oraInst.loc
····|-- fmw_12.2.1.3.0_wls.jar
····|-- weblogic12
······|–bea
········|–oracle_common
········|–user_projects
··········|–domains
············|–base_domain